
PLEASE READ THE COMPLETE INSTRUCTIONS BEFORE YOU START.
One of the best features of Windows (XP Professional, Vista and Windows 7, 8, 10) is the Remote Desktop Connection feature. This feature allows you to connect to another computer as if you are using that computer. Some examples would be:
- allowing access to your home/small business computer when you are away
- gaining information on one computer that is not on the system you are using
- providing project team members access to your system(s) without revealing the network to their private system so that viruses and so forth cannot be introduced.
In some cases you may have more than one computer or server or even virtual machines that you want to access remotely.
(Now, we assume you have Remote Desktop turned on and allowed for the machines you wish to modify. That procedure is not covered here, but you can find instructions here.)
Let’s talk about how you can accomplish this. At a high level there are four things that need to be done:
- Make sure each PC/VM you want to make accessible has a fixed and unique local IP address in your LAN. This means you have to configure the IP address manually so it will work in the LAN network but never have the IP change due to a power cycle of your DHCP server (usually your Router).
- Make sure you have each computer that you want to support remote desktop access listening on a unique port number. This is needed because there is a default port number all systems listen for remote desktop connections on: TCP Port 3389. Therefore, if you want to connect to more than one system on the LAN remotely, each system needs to be on a different Port. For example, let’s assume we have 3 PCs we want to set up for remote desktop connection. We will assign Port 3390 on PC 1, Port 3391 on PC 2, and Port 3392 on Port 3. Don’t worry, these ports are available and will not conflict with any other applications. You can verify this here.
- Allow the Windows Firewall to use the port configured (other than Port 3389) for Remote Desktop Connections.
- Configure your Router to forward packets received on the Public IP:Port to the Private IP:Port for each system.
OK time to detail these four steps.
Step 1: Fix the IP addresses of the PC’s/VM’s you want to make accessible.
You can skip to Step 2 if you already have statically configured your PC’s/VM’s.
Begin by discovering the Current dynamic IP Address on your PC’s/VM’s.
- Click on Start, Run
- Type CMD and press Enter
- At the blinking cursor, type “ipconfig /all” and press Enter (note the space between “ipconfig” and the /)
- Find the section for the Connected Ethernet Adapter and note the following information:
- IP Address
- Subnet Mask
- Default Gateway
- DNS Servers
- Type “exit” and press Enter to close the window
Now, let’s assign a static IP. We suggest using the same IP it was dynamically assigned, which you discovered above. Alternatively, you may wish to use a completely different IP address.
- Click on Start, Control Panel
- In Classic View: Open Network Connections; In Category View: Select Network and Internet Connections, then click on Network Connections
- Right-click on your active LAN or Internet connection
- Click on Properties
- In the General tab, highlight Internet Protocol (TCP/IP) and click Properties
- Under the General tab, click Use the following IP Address and enter the information you wrote down in the previous section for this computer including:
- IP address
- Subnet mask
- Default gateway
- Click the option for Use the following DNS server addresses and enter the DNS servers your router is using
- Click OK and then click OK again to leave the Network Settings section
- Restart your computer
- Follow the procedure above to check your current IP address and verify it’s the same as before. If you selected a different IP, then it should be changed.
- Finally, test the connection and make sure you can still access the Internet. If you can, you are ready to proceed.
Step 2: Configuring the Computers on the LAN to listen to different Remote Desktop Port numbers
- Click on Start, Run
- Type REGEDIT and press Enter
- Click on the plus signs (+) next to the following sections in the Registry Editor in the order shown:
- HKEY_LOCAL_MACHINE
- System
- CurrentControlSet
- Control
- TerminalServer
- WinStations
- Click on the RDP-TCP folder to open it.
- In the right-hand column find the item called PortNumber and double click it. You should get a pop-up.
- In the pop-up, choose the Decimal option under Base and type the new port number (replacing the default 3389) using a port number such as 3390. Remember, this will be different for each PC.
- Click OK
- Close the Registry Editor
You will need to repeat this procedure on each computer you wish to access remotely using a different port number in each PC. The changes will not take effect until the PC or VM is restarted. Before you restart, perform the next step.
Step 3: Changing the Firewall to Allow AccessStep 3: Changing the Firewall to Allow Access
Now that each computer is assigned a unique port to use for Remote Desktop, you’ll have to tell the firewall running on each computer to allow that port through. Follow these steps to change the Windows Firewall to allow access.
- In the Control Panel, click on the option for Security Center
- Verify Windows Firewall is turned on and, click on Windows Firewall under the heading “Manage Security Settings For” (usually near the bottom of the screen)
- Click on the Exceptions tab
- Click on the Add Port button
- In the Name field, type “Remote Desktop 2”
- In the Port field, type the port you assigned to the computer in the previous section: 3390, or 3391, etc.
- Choose TCP as the protocol and Click OK
- Verify that there is a checkmark for the option “Remote Desktop 2”
- Click OK
Again, the changes will not take effect until a restart. Restart the machine.
Time for the last step.
Step 4: Configuring your Router to Port Forward the Remote Desktop Ports to the Appropriate PC’s/VM’s
Now this may be different on your router type or brand, but it should be simple to adapt the procedure below to your Router.
- Log into your router (usually requires you to http://192.168.0.1 or http://192.168.1.1)
- Navigate to the”Applications and Gaming” configuration screen. Should look something like this:
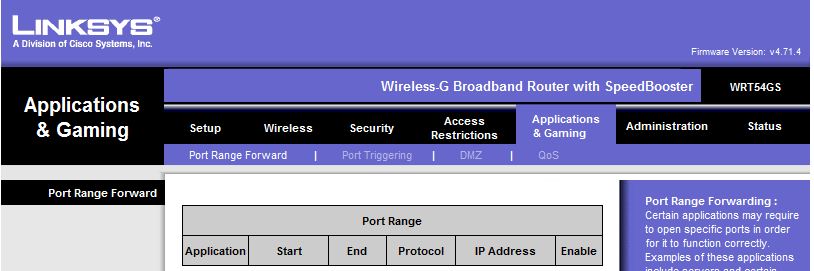
- Under each of the headings, you will enter one entry for each PC as follows:
- Application – just use the name of the PC
- Start – use the port number you configured (i.e. 3390)
- End – same number (i.e. 3390)
- Protocol – Select “both”
- IP Address – this is the local LAN IP address of the system using that Port that you fixed (i.e. 192.168.1.200)
- Select the Enable
- Repeat this process for each computer you configured.
- Save the Settings.
Also, it’s best if your internet connection to your LAN is assigned a static IP by your ISP. If you don’t have a static IP, you will find it harder to connect because your IP will change each time your router is rebooted. To discover your current LAN IP, go to the website WhatIsMyIP.com and it will show you your current IP.
As an alternative, you can sign up for a free Dynamic DNS account to track your IP and have the ability to access your network. You can sign up for DynDNS by visiting their site at http://www.dyndns.com or http://www.tzo.net
Verification: Now you can test the remote desktop connections from another location.
- On your laptop or another computer not connected to your LAN, open the Remote Desktop Connection software under Accessories and Communications
- On the Remote Desktop screen, type the IP of the network you want to connect to followed by a colon and the port number you wish to connect to. For example: 15.10.10.10:3390 or www.yourdyndns.tzo.net:3390
- Finally, click connect and see if you can reach your computer. If the connection is successful, you will be presented with the login screen for your computer. Type your username and password, then click OK to access your computer.
- Test this connection for each computer you wish to connect to behind your local area network.
We have successfully tested this process ourselves, but let us know if you come across anything we are missing.
I hope you find this article and its content helpful.
Comments are welcomed below from registered users. You can also leave comments at our Discord server.
If you would like to see more content and articles like this, please support us by clicking the patron link where you will receive free bonus access to courses and more, or simply buying us a cup of coffee!