

In this article we will discuss using 6to4 Tunneling in your Windows machine. In order to do this, we will use a very popular “Tunnel Broker” Service provided by Hurricane Electric.
6to4 tunnels are a way to create a tunnel between two IPv6 end points (your computer and a web server) across the IPv4 network (your home or business and the Internet). By deault, Windows 7 has a “Protocl 41” 6in4 tunnel interface available!
The first step in this process just takes a couple of minutes to set up an account at Hurricane Electric. Go to http://tunnelbroker.net and sign up for an account. You will be emailed your account credentials – this part has been known to take some time.
While we are waiting, lets examine the Windows configuration. Since most of the steps require us to use the CMD Prompts in Administrator mode, begin by creating a shortcut to the CMD window on your desktop (right click on the desktop, select “New”, select “Shortcut”, enter “cmd” in the dialogue), then right click on that shortcut, select “Run as Administrator”.
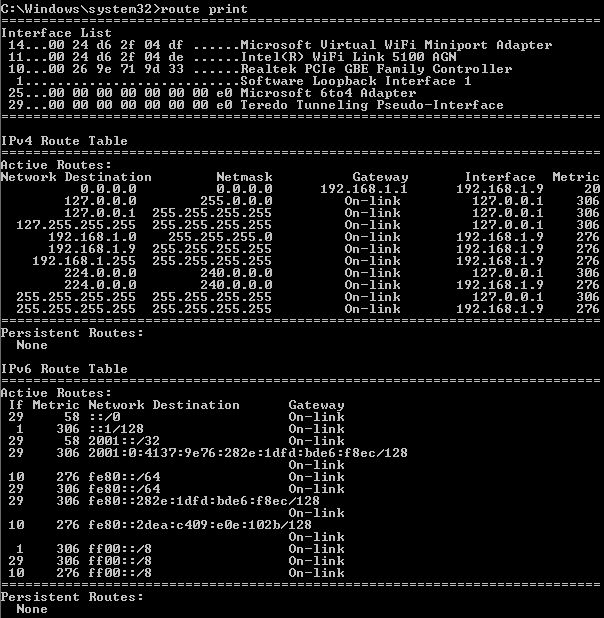
- Enter “route print” at the command line. It may scroll off the screen, but look for the “Microsoft 6to4 Adapter” at the top part of the output. You can see below that mine was #25.
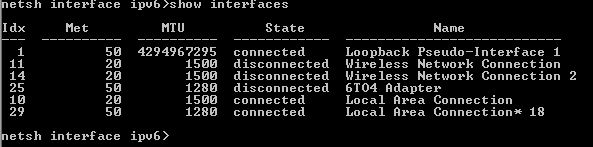
- Now, let’s check the status of your 6to4 Tunnel. This is done using the “netsh” command (you can read more about netsh here). At the command line, enter “netsh”.

- You will be at the netsh prompt as shown. Now enter “interface ipv6”. Note the prompt changes.

- Now, lets display your ipv6 information. At this new prompt enter “show interfaces”. Your output may differ, but you should see a couple of interesting things. Note your matching interface number for the 6to4 Adapter (mine was 25), note the smaller minimum IPv6 MTU of 1280. Also note the IPv6 loopback interface has a default MTU of 4 gigabytes!
Everything is good to go.
By now, you should have received an email from Hurrican Electric. Get your credentials from that email, and log in at the site.
Once logged in, look for the link that says “Create a Regular Tunnel”. The next screen will advise the IPv4 address that you are communicating with. Input that number into the IPv4 Endpoint (Your side) box.
The Hurricane Electric system is going to ping the IPv4 address you enter. Make sure the router you will be using allows itself to be pinged from either “the Internet”, or at the least from HE’s server, currently 66.220.2.74.
You should get a positive response from Hurricane Electric, and your tunnel should be ready.
Hurricane Electric provides the next commands for you to enter on their web page. Go to the “Main Page” under the Account Menu at Hurricane Electric:
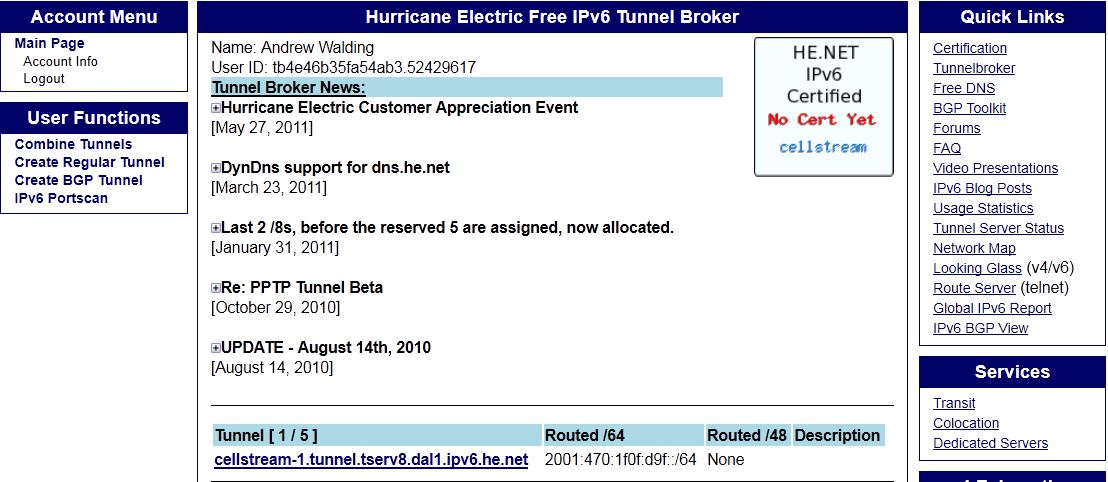
Look at the bottom, your tunnel should be shown. Click on the tunnel link. You should now be shown the Tunnel Details.
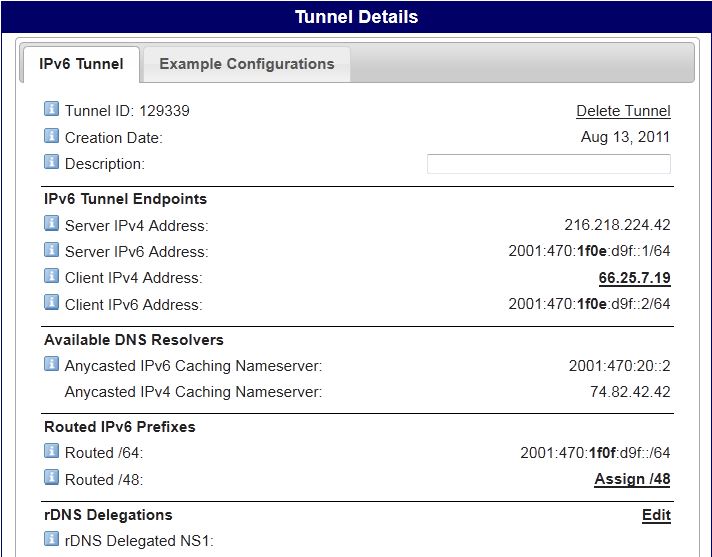
Now we want to click on the “Example Configurations” Tab. Select your OS, and the system will show you the command line configurations to set up the Tunnel. I copy and pasted these to my notepad.
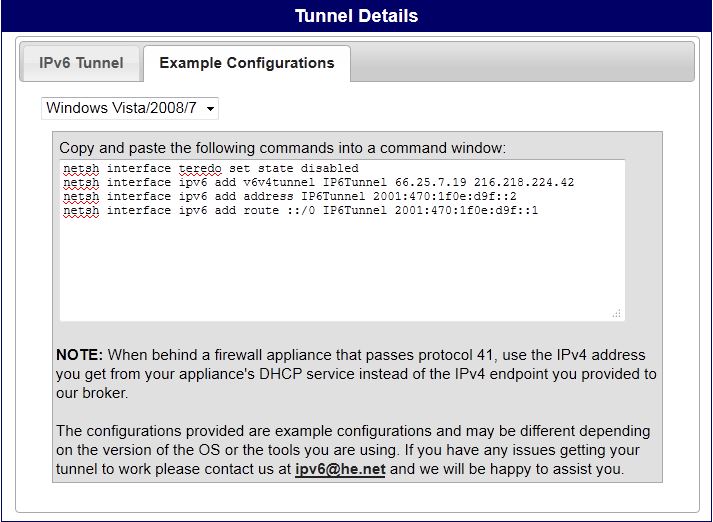
Now, if you are behind a NAT, you must edit the 2nd line of the commands and replace the public IP with your Private IP. Above, I edited 66.25.7.19 to 192.168.1.9. Note: the first command disables a Teredo Interface in case you have it. If you do not, simply ignore this statement.
Now, since our command line interface is already at the “netsh interface ipv6” prompt, simply remove those words from the begining of each command in your note pad. You should have something like this with the highlighted address being your private IP:
add v6v4tunnel IP6Tunnel 192.168.1.9 216.218.224.42
add address IP6Tunnel 2001:470:1f0e:d9f::2
add route ::/0 IP6Tunnel 2001:470:1f0e:d9f::1
Now add these commands to the command line. You should get “Ok” as responses.
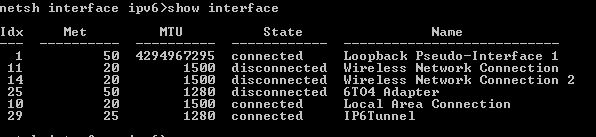
Great! Let’s see if the Tunnel is up.
Type “show interface” and your tunnel should show “connected”:
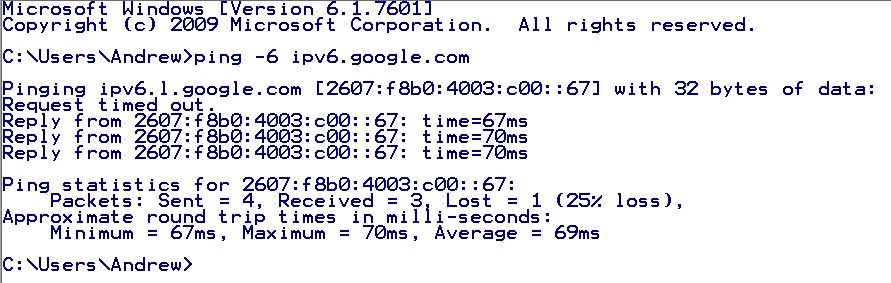
The only way to test this is to now attempt to contact an IPv6 server. First open a second CMD window (does not have to be Run as Administrator). Try “ping -6 ipv6.google.com”. Two things will happen:
-
- 1st the ipv6.google.com will be resolved by the AAAA IPv6 DNS. You will see the IPv6 address.
- 2nd you should get valid responses from the IPv6 site.
Congratulations! You have successfully built and used an 6to4 Tunnel!
Removing Routes or Interfaces
To remove this static route, from the netsh interface ipv6 prompt, enter “delete route ::/0 IP6Tunnel”. You will get an “Ok” response. If you try your ping again, it will not work. The tunnel is still there. To delete the interface enter “delete interface IP6Tunnel” and you are back to where you started.
Also, if you have been playing a little too much and want to reset the ntesh configurations to default, simply type “netsh interface ipv6 reset”, and then reboot.
Check out these additional IPv6 Resources: |
| Our IPv6 overview course at Udemy |
| Our IPv6 Custom Profiles for Wireshark |
| Our IPv6 classes at the Online School |
Comments are welcomed below from registered users. You can also leave comments at our Discord server.
If you would like to see more content and articles like this, please support us by clicking the patron link where you will receive free bonus access to courses and more, or simply buying us a cup of coffee!