
In this article we will discuss setting up and ISATAP (Intra-Site Automatic Tunnel Addressing Protocol) Tunneling in your Windows 7 machine. In order to do this, we will use an ISATAP Server at Sanjiang University in China.
- Let’s examine the Windows configuration. Since most of the steps require us to use the CMD Prompts in Administrator mode, begin by creating a shortcut to the CMD window on your desktop (right click on the desktop, select “New”, select “Shortcut”, enter “cmd” in the dialogue), then right click on that shortcut, and select “Run as Administrator”.
- Enter “route print” at the command line. It may scroll off the screen.
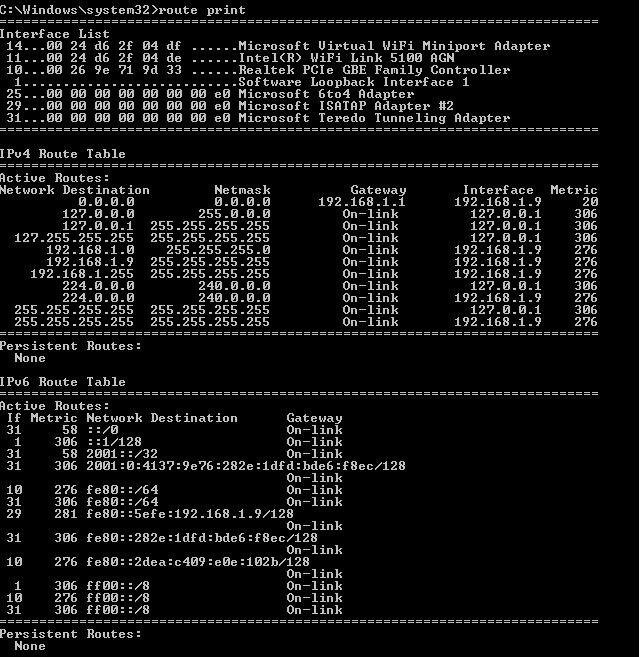
- You should see default ISATAP adapters. Now, let’s create the ISATAP Tunnel. This is done using the “netsh” command (you can read more about netsh here). At the command line, enter “netsh”.

- You will be at the netsh prompt as shown. Now enter “interface ipv6”. Note the prompt changes.

- Now enter “isatap”

- From this isatap prompt, enter “set router isatap.sju.edu.cn enable”. The response is “Ok.”

- Now open a second command line window and enter “ping -6 ntp.buptnet.edu.cn”
- You should get two things: first, an accurate IPv6 address (this indicates you are communicating on IPv6 to the DNSv6), and second, ping responses. Depending on where you are in the world, the response time may be bad causing timeouts.
Everything is good to go. Your ISATAP Tunnel is running.
To remove the ISATAP config, go back to the CMD window that has the netsh prompt and enter “set router isatap.sju.edu.cn disable”.
Also, if you have been playing a little too much and want to reset the ntesh configurations to default, simply type “netsh interface ipv6 reset”, and then reboot.
Check out these additional IPv6 Resources: |
| Our IPv6 overview course at Udemy |
| Our IPv6 Custom Profiles for Wireshark |
| Our IPv6 classes at the Online School |
Comments are welcomed below from registered users. You can also leave comments at our Discord server.
If you would like to see more content and articles like this, please support us by clicking the patron link where you will receive free bonus access to courses and more, or simply buying us a cup of coffee!