

Check out these additional IPv6 Resources: |
| Our IPv6 overview course at Udemy |
| Our IPv6 Custom Profiles for Wireshark |
| Our IPv6 classes at the Online School |
A major change in the behavior of IP networks between IPv4 and IPv6 is that in IPv6 networks, all hosts are required to support something called Path MTU (PMTU) discovery. I have listened to a lot of people talk about this over the years, and for those of us who have been working with IPv6 for a long time, many felt the requirement was long overdue. The result of the requirement is simple, reduced, if not eliminated, need for fragmentation in the IP network. More specifically, this means routers along a packet’s path will not need to fragment packets.
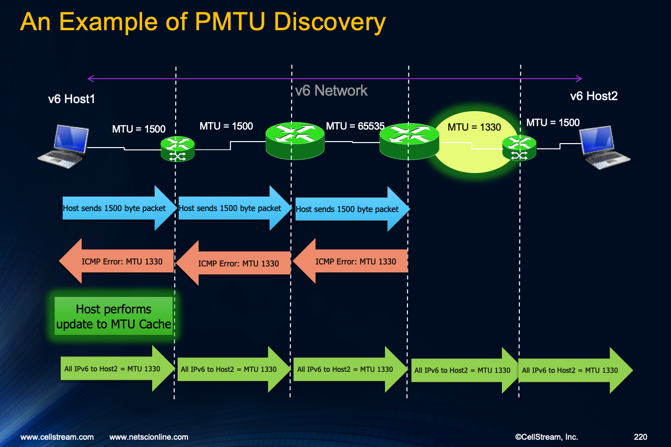
If you examine the illustration to the right, we see a path from Host1 to Host2, where all the links except one have an MTU of 1500 bytes or more. The one link has an MTU of 1330 bytes.
In an IP network that does not support PMTU discovery, the second to last router will perform fragmentation of any packets greater than 1330 bytes. Those packets must travel all the way to Host2 and Host2 will reassemble/de-ragment the packets as needed.
In a network that supports PMTU, Host1 sends its first packet assuming the MTU of it’s local connection (standard Ethernet would be 1500 bytes). The router that would previously fragment, send an ICMP error message to Host1 and advises what the MTU should be. Host1 updates its PMTU cache for that specific destination, and then sends any further packets to Host2 with the MTU of 1330. This cache will keep the information for some number of minutes, and then forget the entry.
So you can’t block ICMP.
In IPv4 networks, the ICMP Type 3, Code 4 error occurred, but hosts did not have to listen to it, or do anything about it. In some cases ICMP error like this were blocked.
RFC 1191 says “The basic idea is that a source host initially assumes that the PMTU of a path is the (known) MTU of its first hop, and sends all datagrams on that path with the DF [don’t fragment] bit set. If any of the datagrams are too large to be forwarded without fragmentation by some router along the path, that router will discard them and return ICMP Destination Unreachable messages with a code meaning “fragmentation needed and DF set” [7]. Upon receipt of such a message (henceforth called a “Datagram Too Big” message), the source host reduces its assumed PMTU for the path.” The RFC goes on to suggest this should be kept for 10 minutes.
RFC 1981 provides details of how PMTU works with IPv6. Otherwise, most of the document is the same as RFC 1191.
Seems simple enough. It begs several questions.
But how do we see this? The answer is, it is all done auto-magically by your protocol stack/operating system. There are no errors reported.
Can we examine anything regarding PMTU? The answer is absolutely, yes. In Windows, the command for IPv4 is:
netsh interface ipv4 show destinationcache address
I have put some sample outputs below.
The command for IPv6 is:
netsh interface ipv6 show destinationcache address
To look at a specific address, just specify the address:
netsh interface ipv4 show destinationcache address={some IP address}
Here are the IPv4 and IPv6 response examples for Windows:
| IPv4 | IPv6 |
| C:\Users\amwal>netsh interface ipv4 show destinationcache
Interface 15: Wi-Fi
PMTU Destination Address Next Hop Address Interface 1: Loopback Pseudo-Interface 1
PMTU Destination Address Next Hop Address Interface 10: VMware Network Adapter VMnet0
PMTU Destination Address Next Hop Address Interface 5: VirtualBox Host-Only Network
PMTU Destination Address Next Hop Address Interface 23: Ethernet 4
PMTU Destination Address Next Hop Address Interface 15: Wi-Fi
PMTU Destination Address Next Hop Address Interface 10: VMware Network Adapter VMnet0
PMTU Destination Address Next Hop Address Interface 15: Wi-Fi
PMTU Destination Address Next Hop Address | C:\Users\amwal>netsh interface ipv6 show destinationcache
Interface 15: Wi-Fi
PMTU Destination Address Next Hop Address Interface 1: Loopback Pseudo-Interface 1
PMTU Destination Address Next Hop Address Interface 10: VMware Network Adapter VMnet0
PMTU Destination Address Next Hop Address Interface 5: VirtualBox Host-Only Network
PMTU Destination Address Next Hop Address Interface 23: Ethernet 4
PMTU Destination Address Next Hop Address |
We can see that all the PMTU settings are actually the same as mu Link Local MTU. For me this is a good sign. However, if I were experiencing slow response from a particular web site, I would definitely want to check out the PMTU to see if I was having to send small packets.
In Linux (Debian) you can use this command:
ip route get {some IP address}
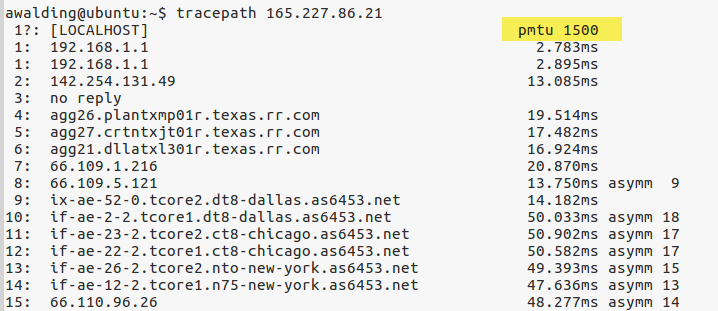
You can also use the ‘tracepath’ command as the PMTU will be displayed:
tracepath -n {some IP address}
Here is an example:
RFC 4821 allows for the host to do two additonal things:
- Use regular PMTU discovery, however if no acknowledgments are received and no ICMP messages are received, start to “probe”
- Ignore regular PMTU discovery, and always probe
What does “probe” mean? Probing is when the host sends a packet with the min MTU configured, and then attempts to increase that size. If acknowledgements are received on the larger size, then try increase it once again.
Option 1 will wait for a timeout so on broken PMTU discovery paths it starts a slowly. It will however use regular PMTU discovery whenever it can so it’s a lot more efficient.
Option 2 simple probes all the time. It starts faster on smaller MTU paths, but the server is also sending smaller packets to ALL paths in the beginning, so this is not as efficient.
Probing is something you can turn on in Linux. To see whether it is turned on, use the following command:
sysctl net.ipv4.tcp_mtu_probing
or you can more generally use:
sysclt net | grep "prob"
Example output:

My system is set to ‘0’.
You can change this by using:
sudo sysctl -w net.ipv4.tcp_mtu_probing=1
You can then explorte what happens in Wireshark.
My understanding from reading the Ubuntu docs on this is that whatever you have set for the IPv4 probing, the IPv6 stack mimicks the setting.
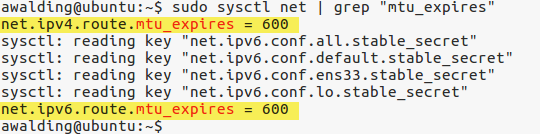
Another thing you may be interested in is the amout of time the MTU setting is kept in the cache. You can look at this in Debian Linux with:
sudo sysctl net | grep "mtu_expires"
You will see 600 seconds – which translates to 10 minutes:
If you would like to help support the continued development of independent networking, broadband, Wi-Fi, VoIP, and packet analysis content, please consider joining our Patreon community where you will gain access to exclusive technical resources, downloadable labs and PCAPs, bonus course content, troubleshooting guides, and additional member-only material. Comments and technical discussion are always welcomed at our Patreon community or on our Discord server. You can also support our work by simply buying us a coffee — every contribution helps us continue creating practical, real-world network science education for professionals and enthusiasts alike.