

Yesterday I wanted to mess around with IPv6 Temporary addresses on my computer. Let me start with an overview of IPv6 Temporary addresses.
IPv6 Temporary Addresses are a feature designed to enhance privacy for devices using the IPv6 protocol. In the IPv6 addressing scheme, devices typically have both a permanent (static) address and one or more temporary addresses.
The primary motivation for temporary addresses is to reduce the potential for tracking and profiling of devices based on their IPv6 addresses. IPv6 Temporary Addresses are commonly used for outbound connections, such as when a device initiates communication with a remote server.
Here’s how they work:
Every IPv6-enabled device is assigned a stable or permanent address. This address is typically derived from the device’s MAC (Media Access Control) address or assigned manually, and it remains relatively constant over time.
Temporary Address:
In addition to the stable address, devices can generate temporary addresses for outgoing connections. These addresses are often based on the device’s stable address but include additional randomness. This randomization helps enhance privacy by making it more difficult for observers to track a device over time based on its IPv6 address.
Privacy Extensions:
Privacy extensions are commonly used to implement temporary addresses. The most common method is called “Privacy Extensions for Stateless Address Autoconfiguration in IPv6,” defined in RFC 4941. This RFC suggests a method for generating temporary addresses that change periodically, making it more challenging for third parties to track devices.
Address Lifetimes:
Temporary addresses are assigned a limited lifetime. They expire after a certain period, and the device generates a new temporary address. This process helps mitigate the risk of long-term tracking.
IPv6 Temporary Addresses are particularly relevant for mobile devices that frequently connect to different networks. By regularly changing temporary addresses, devices can reduce the likelihood of being tracked based on their IPv6 addresses. However, it’s worth noting that not all devices or network configurations use IPv6 Temporary Addresses, and their adoption depends on various factors, including operating system settings and network configurations.
To view your IPv6 addresses in Windows, open up a Command Line or Powershell, and enter:
ipconfig
You should get something like the following, although your output will depend on what interfaces exist on your system as well as whether you actually have Global Unicast IPv6 addressing in play (meaning your service/company supports IPv6):
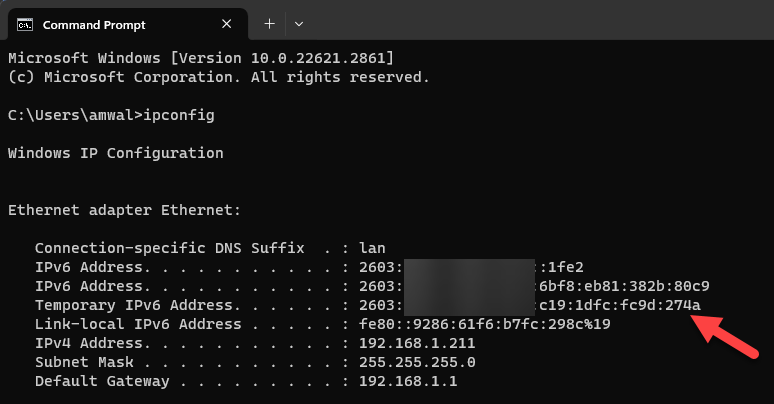
I have trimmed the screenshot to just show the interface I am using – my Ethernet interface, and I have blurred a portion of my prefix. For some readers, you will be looking at your Wi-Fi interface, perhaps. The point is that we see three IPv6 addresses in my example that begin with a “2”. These are my Global Unicast Addresses. If you do not have any IPv6 addresses that begin with a “2” then it is not likely that you have an IPv6 service.
OK – back to temporary addresses – so we see in my case I have a temporary address, some of you may have multiple. Some of you may not have any.
Having Temporary addresses is highly recommended and should be on by default. You can check this by issuing the following command:
netsh interface ipv6 show privacy
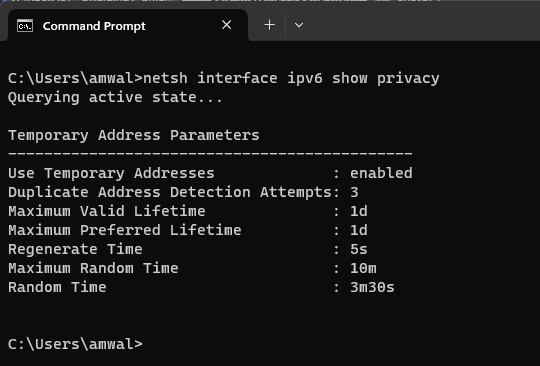
We see that on my system IPv6 Temporary addresses are enabled, that the IPv6 Duplicate Address Detection process will use 3 retries, then we see two IPv6 address lifetimes – both set to one day, a 5 second regenerate time and a maximum random timer of 10 minutes with the random time being 3 minutes and 30 seconds.
So what if I wanted to modify any of these? You can see what is changeable by issuing the following command:
netsh interface ipv6 set privacy ?
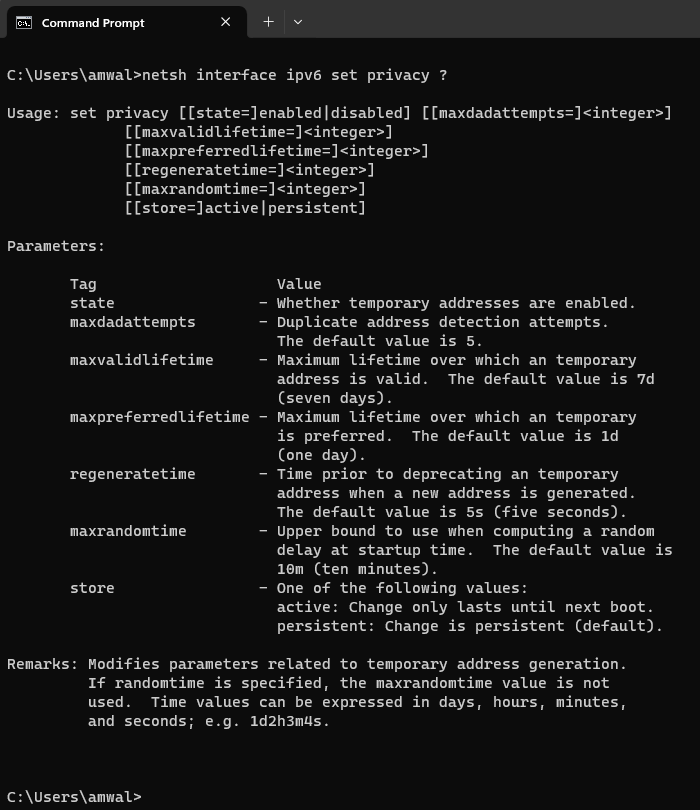
Nice!
If you try to make any changes in your normal command prompt, you will get the following error:

Close this command line, and open up a new one, this time running as administrator. You will need administrative privileges to do the remainder of steps on your Windows machine. Now, I do not recommend you do disable IPv6 Temporary addresses, but to Enable/Disable Temporary Addresses:
netsh interface ipv6 set privacy state=disable
netsh interface ipv6 set privacy state=enable
On your system you valid and preferred lifetimes are likely set to 7 days. This means the Temporary address is changed every 7 days. On my system it is set to 1 day. To change the Valid and Preferred timers to 1 day:
netsh interface ipv6 set privacy maxvalidlifetime=1d
netsh interface ipv6 set privacy maxpreferredlifetime=1d
When you make these changes, they will not take effect without either rebooting your system, or resetting your interface. I prefer the resetting of the interface. When you reset the interface, the result will be the generation of new IPv6 temporary addresses. This can be done with the following commands:
netsh interface set interface name="interfacename" admin=disabled
netsh interface set interface name="interfacename" admin=enabled
We saw above from my ‘ipconfig’ command that the interface name was “Ethernet”. Keep in mind that doing this will drop any network sessions that may be in progress. Therefore the commands I would actually enter are:
netsh interface set interface name=Ethernet admin=disabled
netsh interface set interface name=Ethernet admin=enabled
I hope you found this article informative.
If you would like to help support the continued development of independent networking, broadband, Wi-Fi, VoIP, and packet analysis content, please consider joining our Patreon community where you will gain access to exclusive technical resources, downloadable labs and PCAPs, bonus course content, troubleshooting guides, and additional member-only material. Comments and technical discussion are always welcomed at our Patreon community or on our Discord server. You can also support our work by simply buying us a coffee — every contribution helps us continue creating practical, real-world network science education for professionals and enthusiasts alike.