

An essential function when administering a Linux system is viewing, configuring and managing users and groups. I cover adding users in this article: https://www.cellstream.com/2022/04/06/using-the-useradd-command-to-create-user-accounts-in-linux/
That said, viewing users is done using a few simple commands.
How To View Users on a Linux System
Every user on a Linux system, whether created as an account for a real human being or associated with a particular service or system function, is stored in a file called “/etc/passwd”.
The “/etc/passwd” file contains information about the users on the system and each line describes a distinct user. Lets view this file with the following command:
less /etc/passwd
You should get an output that looks like this (your system will be different):
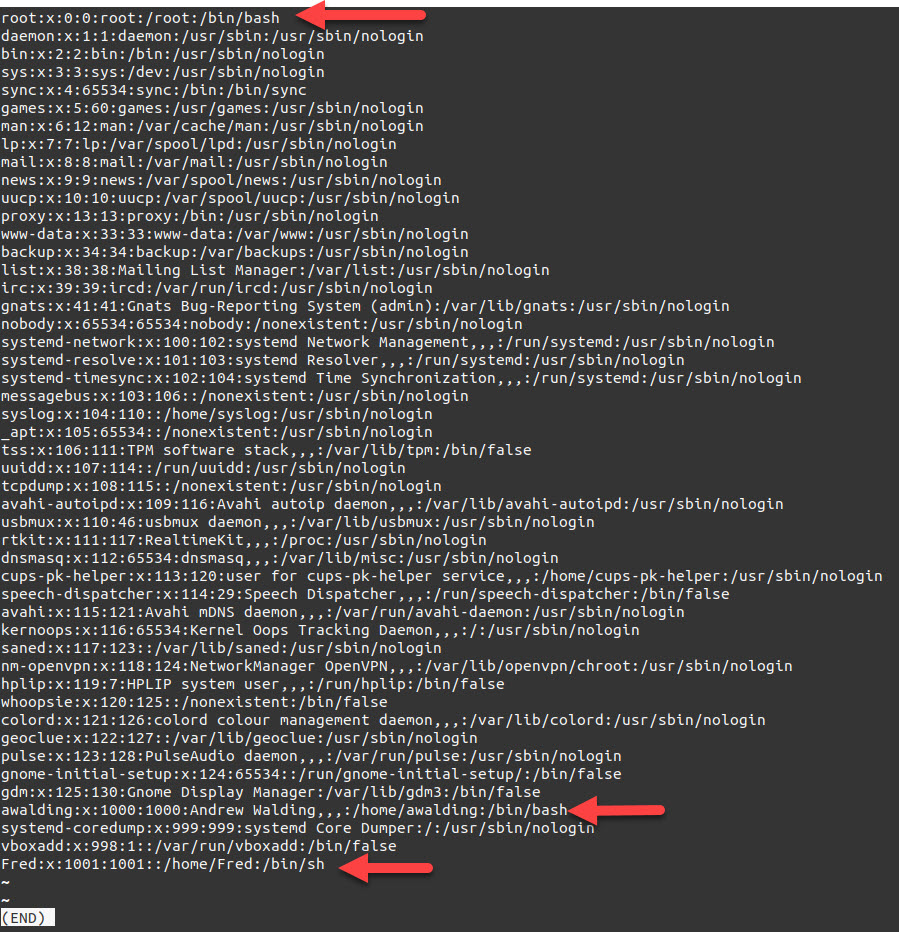
I have indicated the human/system users with arrows. The other users are processes. Some of these other users might be created for use by daemons and background services.
Each line is an independent user name, and then the rest is broken up into fields. These fields are delimited by the colon (:) character. Let’s take a look at a single line to see what information it contains:
root:x:0:0:root:/root:/bin/bash
The fields of information are separated by a colon (:) character. There are seven fields on each line in a typical Linux “/etc/passwd” file:
- root: This is the sccount username.
- x: Placeholder for password information. The password is obtained from the “/etc/shadow” file.
- 0: User ID. Each user has a unique ID that identifies them on the system. The root user is always referenced by user ID 0.
- 0: Group ID. Each group has a unique group ID. Each user has a “primary” group that is used as the group by default. Again, the root group’s ID is always 0.
- root: Comment field. This field can be used to describe the user or user’s function. This can be anything from contact information for the user, to descriptions of the service the account was made for.
- /root: Home directory. For regular users, this would usually be “/home/<span class=”highlight”>username</span>”. For root, this is “/root”.
- /bin/bash: User shell. This field contains the shell that will be spawned or the command that will be run when the user logs in.
If the only field that we are really interested in at the moment is the first one, we can get this list without wading through the entire “/etc/passwd” by typing:
cut -d : -f 1 /etc/passwd
How To Find Which Users Are Logged In
Many times, it will be more useful to find out which users are active on your system. The “w” command is a simple way to list all of the currently logged in users, their log in time, and what the command they are currently using:

The first line contains system uptime information. The following lines describe who is logged in – in my example I am the only user on the system.
An simpler alternative that provides similar information is the “who” command:

How To View Available Groups on a Linux System
The corresponding file for discovering system groups is “/etc/group”. You can fiew the entire file by typing the following command:
less /etc/group
Your output will look different, but you should get something like this:
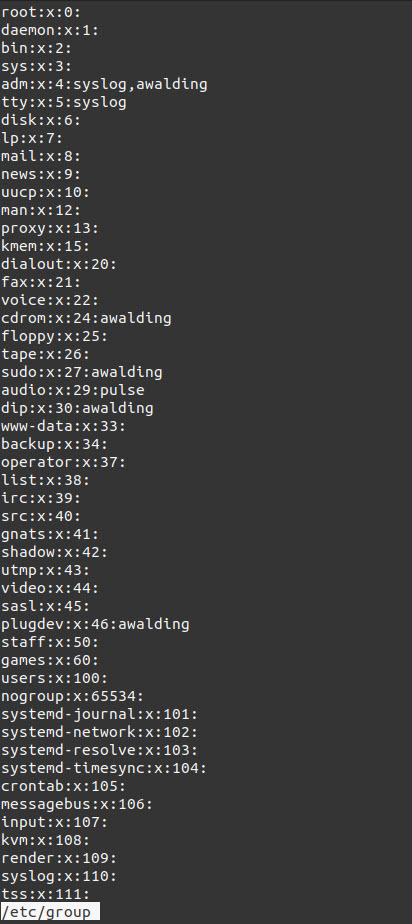
The output will be a list of each group on the system, one per line. You can see that many of the group names mirror the users we discovered on our system. This is part of a configuration scheme called ” user private groups”, or UPG. User private groups create a private group for each user and set that group as the primary group. The umask is then changed from 022 to 002. This allows for more flexibility in shared directories by setting a flag called setgid, which gives files inside the directory the same group owner as the directory itself. While this configuration is useful, it is outside of the scope of this article.
As before, you can pare down the information from the “/etc/group” file by using the cut command:
cut -d : -f 1 /etc/group
Summing Up
Hopefully I have done some justice to the Linux useradd command. Let us all know other options you use and why you use them in the comments below. The same instructions apply for any Linux distribution, including Ubuntu, CentOS, RHEL, Debian, Fedora, and Arch Linux.
I hope you find this article and its content helpful. Comments are welcomed below. If you would like to see more articles like this, please support us by clicking the patron link where you will receive free bonus access to courses and more, or simply buying us a cup of coffee!, and all comments are welcome!