
Like most operating systems, Linux can have multiple user accounts. The system administrator or root account, or users with sudo privileges are responsible for managing these users, as well as managing those accounts. Linux is a multi-user system, which means that more than one person can interact with the same system at the same time. I have a separate article on viewing users and groups on a Linux system here: https://www.cellstream.com/2022/04/06/viewing-users-system-users-on-linux/
Depending on what software you have installed, there can be a number of users on your system, or just a few. To display the users on your system, use the following command:
cut -d : -f 1 /etc/passwd
This command concatenates the /etc/passwd file to cleanly display a list of users.
OK – in this article we will focus on the useradd command. Let us know in the comments how you use the useradd command.
To learn about this command let’s start where I always like to start and that is the help screen:
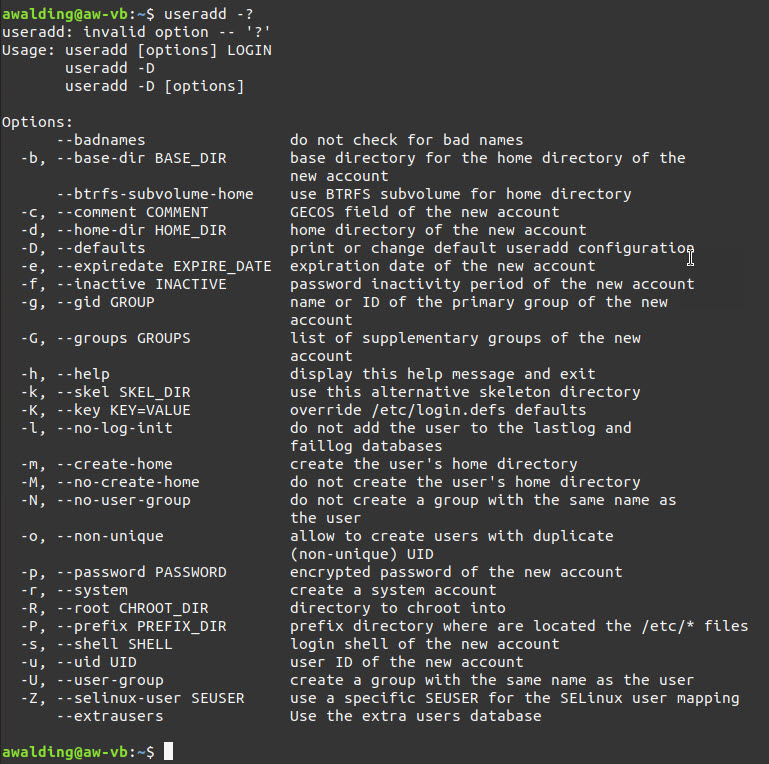
We see that the general syntax for the useradd command is as follows:
useradd [OPTIONS] {username}
The useradd command creates a new user account according to the options specified on the command line and the default values set in the /etc/default/useradd file. Please be aware that the variables defined in this file differ from distribution to distribution, which causes the useradd command to produce different results on different systems.
Furthermore, the useradd command also reads the content of the /etc/login.defs file. This file contains configuration for the shadow password suite such as password expiration policy, ranges of user IDs used when creating system and regular users, and more.
Let’s Create an Account
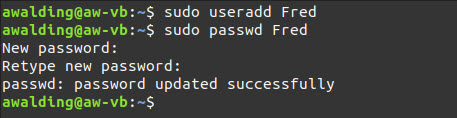
To create a new user account, assuming you are a sudo user, or you can be logged in as root, enter the useradd command followed by the name of the user. For example to create a new user named “Fred” you would run:
sudo useradd Fred
When executed without any options, useradd creates a new user account using the default settings specified in the /etc/default/useradd file.
The command adds an entry to the /etc/passwd, /etc/shadow, /etc/group and /etc/gshadow files. You can verify the user was added, as in my case, user Fred will be at the bottom of the output from the ‘cut -d : -f 1 /etc/passwd’ discussed earlier.
To actually be able to log in as the newly created user, you need to set the user password. To do that run the passwd command followed by the username (again we are root, you would need sudo in front of the command if not):
passwd {username}
You will be prompted to enter and confirm the password. Make sure you use a strong password.
You can verify this user works by logging out and logging back in as the new user you created.

You may notice, however that there is a problem. The new user you created has no home directory!
Adding a New User and Creating Home Directory
Before we go on, let’s remove the previously created user called ‘Fred’. We do this with the userdel command. I have a more extensive article on the userdel command here:
sudo userdel Fred
You can use the previously mentioned cut command to see that Fred is no longer in your system’s list of users.
As you likely noticed, on most Linux distributions, when creating a new user account with useradd, the user’s home directory is not created. To correct this we have to use the -m (–create-home) option to create the user home directory as /home/username:
sudo useradd -m Fred
This command creates the new user’s home directory and copies files from /etc/skel directory to the user’s home directory.
If you list the files in the /home/username directory, you will see the initialization files:
ls -la /home/Fred/
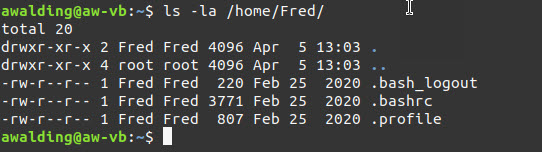
Now, within the home directory, the user can write, edit and delete files and directories.
Creating a User with a Specific Home Directory
As we have seen, by default, useradd creates the user’s home directory in /home. However, if you wanted to create the user’s home directory in some other location, you need to use the d (–home) option. Here is an example showing how to create a new user named username with a home directory of /opt/username:
sudo useradd -m -d /opt/Fred Fred
Creating a User with Specific User ID
In all Linux operating systems, users are identified by unique UID (user identifier) and username. The User identifier (UID) is a unique positive integer assigned by the Linux system to each user. The UID and other access control policies are used to determine the types of actions a user can perform on system resources. By default, when a new user is created, the system assigns the next available UID from the range of user IDs specified in the login.defs file. To see this use the following command:
id -u Fred

We can see in my example that Fred is UID 1001.
If you wanted to assign a specific UID, you must modify the basic useradd command with the -u (–uid) option to create a user with a specific UID. For example to create a new user named username with UID of 1500 you would type:
sudo useradd -u 1500 Fred
To verify this you would simply run the “id -u Fred” command.
You can verify the user’s UID, using the id command:
id -u Fred
Creating a User with a Specific Group ID
Linux groups are organization units that are used to organize and administer user accounts in Linux. The primary purpose of groups is to define a set of privileges such as reading, writing, or executing permission for a given resource that can be shared among the users within the group. When creating a new user, the default behavior of the useradd command is to create a group with the same name as the username, and same GID as UID. To see this GID, use the following command:
id gn Fred
With the useradd command, the -g (–gid) option allows you to create a user with a specific initial login group. You can specify either the group name or the GID number. The group name or GID must already exist. The following example shows how to create a new user named username and set the login group to users type:
sudo useradd -g newusers Fred
The ‘newusers’ above is the group name and ‘Fed” is the username.
Creating a System User
There is no real technical difference between the system and regular (normal) users. Typically system users are created when installing the OS and new packages. Use the -r (–system) option to create a system user account. For example, to create a new system user named username you would run:
sudo useradd -r Fred
A couple of details: System users are created with no expiry date. Their UIDs are chosen from the range of system user IDs specified in the login.defs file, which is different than the range used for normal users.
Creating a User and Assigning the User to Multiple Groups
If I can create a user and make them part of a group, the question that this leads to is can I add the user into multiple groups. The answer is yes. There are two types of groups in Linux operating systems Primary group and Secondary (or supplementary) group. Each user can belong to exactly one primary group and zero or more secondary groups. You to specify a list of supplementary groups which the user will be a member of with the -G (–groups) option.
The following command creates a new user named Fred with primary group newusers and secondary groups engineering and accounting. Keep in mind these groups must exist.
sudo useradd -g newusers -G engineering,accounting Fred
Verification can be accomplished using the ‘id username’ command.
Creating a User and Assigning a Specific Login Shell
When you create a new user, the Linux system sets the login shell to the one specified in the /etc/default/useradd file. In some distributions the default shell is set to /bin/sh while in others it is set to /bin/bash. The -s (–shell) option allows you to specify the new user’s login shell. For example, to create a new user named username with /usr/bin/zsh as a login shell type:
sudo useradd -s /usr/bin/zsh Fred
To verify, check the user entry in the /etc/passwd file to verify the user’s login shell:
grep Fred /etc/passwd
You should get a response like this:
red:x:1001:1001::/home/Fred:/bin/sh
Creating a User with a Customized Comment
Keeping track of users and why you have them is made easier with the ability to comment why you have a user. The -c (–comment) option allows you to add a short description for the new user. Typically the user’s full name or the contact information are added as a comment. The comment field is also known as GECOS. In the example below, I am creating a new user named Fred with the comment “Demonstration Account”:
sudo useradd -c "Demonstration Account" Fred
You can verify this actions by checking the /etc/passwd file:
grep Fred /etc/passwd
And the comment will be seen:
Fred:x:1001:1001:Demonstration Account:/home/Fred:/bin/sh
Creating a User with an Expiry Date
What if you want to limit the amount of time a certain account exists? This is accomplished by controlling the expiry of the account. To define a time at which the new user accounts will expire, use the -e (–expiredate) option. This is useful for creating temporary accounts. The date must be specified using the YYYY-MM-DD format. For example to create a new user account named username with an expiry time set to April 7th, 2022 you would run:
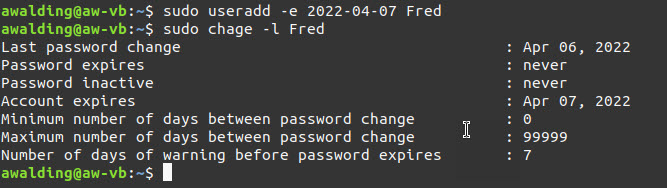
sudo useradd -e 2022-04-07 Fred
Use the chage command to verify the user account expiry date:
sudo chage -l Fred
The output will look something like this:
Modifying the Default useradd Values
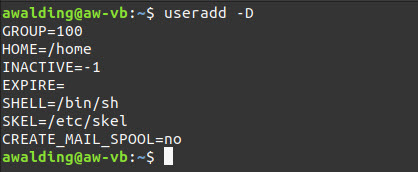
The default useradd options can be viewed and changed using the -D, –defaults option, or by manually editing the values in the /etc/default/useradd file. To view the current default options type:
useradd -D
The output will look similar to this example:
Let’s say you want to change the default login shell from /bin/sh to /bin/bash. To do that, you need sudo privileges, and then you can specify the new shell as shown below:
sudo useradd -D -s /bin/bash
Now you can verify that the default shell value is changed by running the following command:
sudo useradd -D | grep -i shell
The system will respond with:
SHELL=/bin/bash
Summing Up
Hopefully I have done some justice to the Linux useradd command. Let us all know other options you use and why you use them in the comments below. The same instructions apply for any Linux distribution, including Ubuntu, CentOS, RHEL, Debian, Fedora, and Arch Linux. The useradd command is a low-level utility, Debian and Ubuntu users can use the friendlier adduser command instead:

I hope you find this article and its content helpful.
If you would like to help support the continued development of independent networking, broadband, Wi-Fi, VoIP, and packet analysis content, please consider joining our Patreon community where you will gain access to exclusive technical resources, downloadable labs and PCAPs, bonus course content, troubleshooting guides, and additional member-only material. Comments and technical discussion are always welcomed at our Patreon community or on our Discord server. You can also support our work by simply buying us a coffee — every contribution helps us continue creating practical, real-world network science education for professionals and enthusiasts alike.