
In this article, I wanted to provide a guide to using ping – ICMP Echo – to troubleshoot your network. Most people use ping on their platform to test if they can reach a given destination. Just open up a terminal (Linux or MAC OSx) or command line (Windows: Start> Run> cmd) and enter the following command:
ping 1.1.1.1
This is super simple, and great as it verifies that the network and protocol stack (up to Layer 3) in the sender and receiver is working or not. By the way, if you are curious as to what 1.1.1.1 is, you can read more here.
If you want to ensure your own system. up to Layer 3, is operating correctly. you can ping your loopback address:
ping 127.0.0.1
A quick note here: you could say ‘ping localhost’ and that will work as well, except if your system supports IPv6 you will see a resolution of that name ‘localhost’ to the ::1 address which is synonymous with 127.0.0.1 in IPv4. And that, of course, brings up the fact that you could say something like ‘ping www.google.com’ and your system will attempt to resolve the URL and then ping whatever address is provided by the DNS system. I digress. Let’s stick with IPv4 for now, and I will deal with IPv6 later in the article.
Digging a Little Deeper
Let’s look at the Wireshark capture of this simple ping to 1.1.1.1. A quick note here, I am using Wireshark with my ICMPv4 profile. You can grab the latest version of this profile in the repository here: https://www.cellstream.com/resources/wireshark-profiles-repository and keep in mind it may look a little different if I have made improvements to it.
That said, I started Wireshark capturing on my working interface, and then I issued the command (I am using Windows):
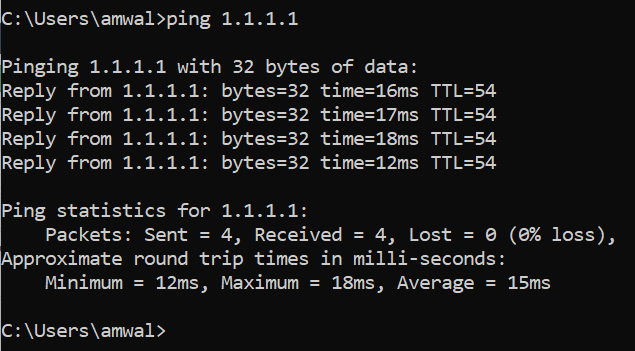
OK there are several important takeaways.
- First, the IP address did not need to be resolved since we typed it in.
- Second, we sent 4 echo requests of 32 bytes of data, and received 4 echo replies
- Third, statistically we had 0% packet loss and an average round trip time of 15 milliseconds.
Now lets look at the Wireshark screen after selecting the Ping> All Echo Requests and Replies display filter button:
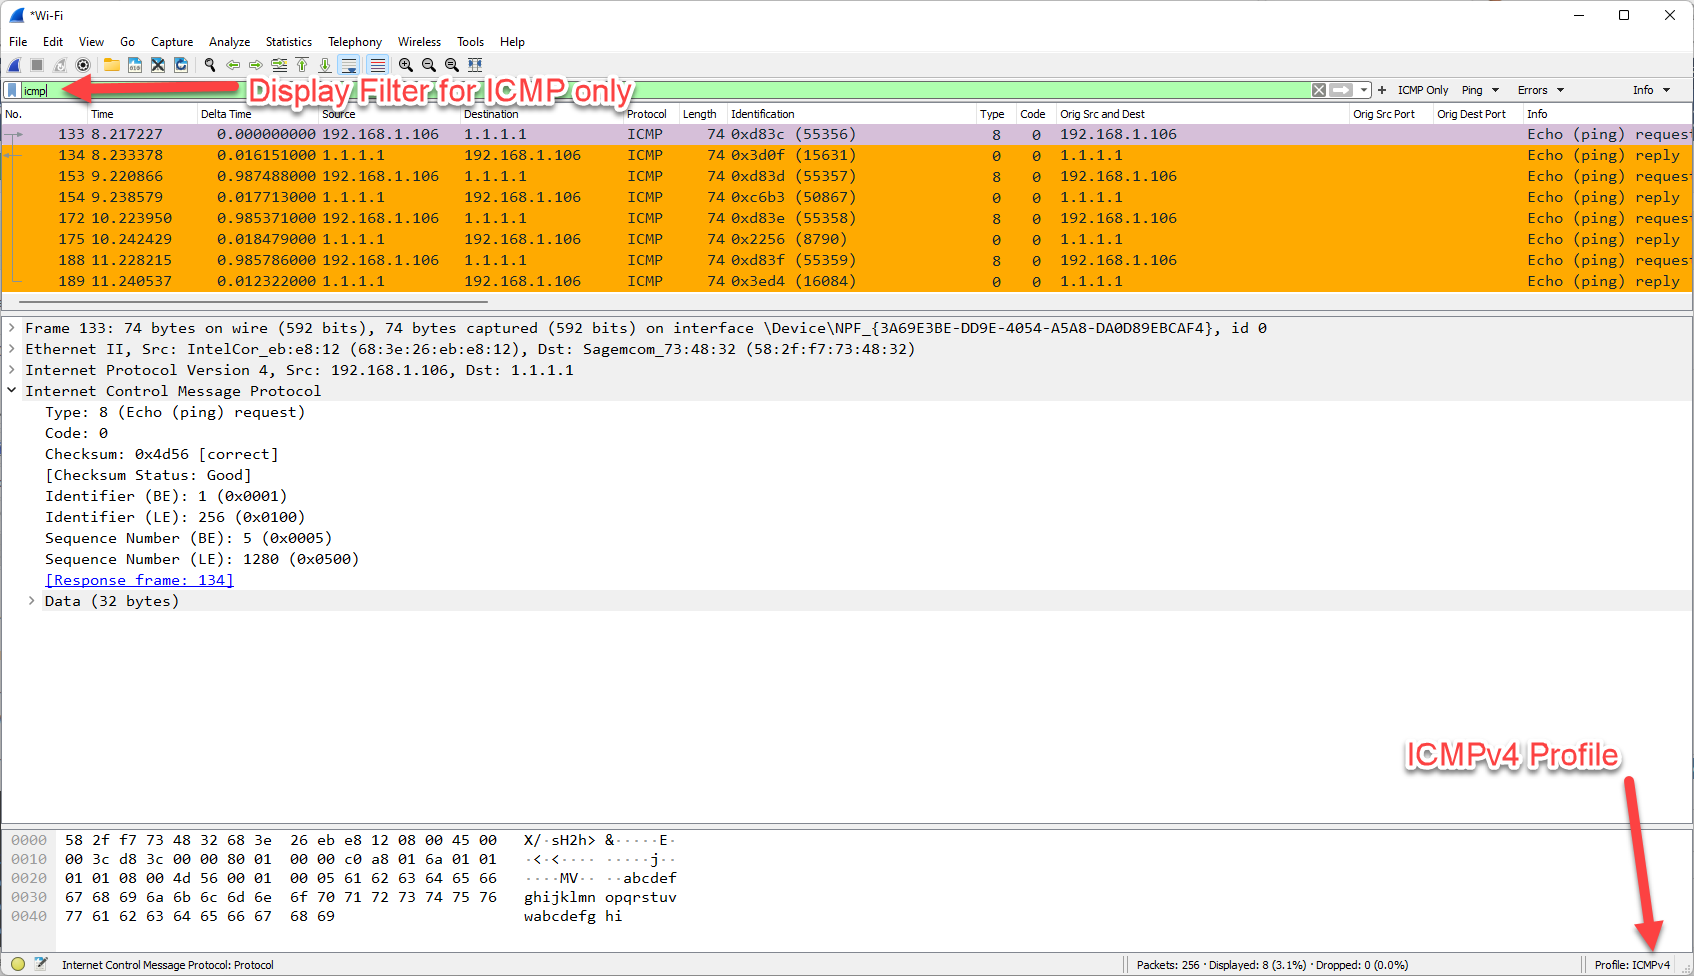
I always love using packet capture to see what is actually going on. So what do we see? We see an Echo Request being sent out from my machine at IPv4 address 192.168.1.106 to 1.1.1.1 at time zero. A reply comes back (IP addresses swapped) about 16 milliseconds later. The next packet is again and Echo Request that is sent 987 milliseconds after the prior reply is received, to which we see a reply 17 milliseconds after that. This pattern repeats plus or minus a couple of milliseconds for the next four packets.
If you look at the IP ID fields, you see they increment perfectly by one for each of the Echo Requests. The Replies do not, however, meaning that the end system we are pinging is busy sending other traffic.
We also note that the total length of these standard pings from the Windows system are 74 bytes/octets in length in order to send the 32 bytes of actual data in the ping request. We further note that the ‘data’ was just the repeated lower case alphabet: “abcdefghijklmnopqrstuvwxyzabcdefghi”
As a basic test of connectivity this is great, but it leaves us wondering:
- Should we use bigger packets?
- What is the largest packet we can send?
- Should we repeat this echo request/reply over a longer number of exchanges?
- Should we test more aggressively, sending more pings over time?
- What if I am on a VPN?
- And finally, how can I leverage ICMP to better troubleshoot my network?
Ping Command Options
To answer those questions, we need to examine if we have any options with the ping command to extend our ability to leverage ping to test/troubleshoot. If options exist, then what are some of the ping command options that we can leverage?
This is where networking gets a little difficult. Unfortunately, there are different help results on different systems (I will just cover 3 here). Further these different systems behave differently when you use the ping command, so let’s look at all three and the results of a simple ping in each:
Windows:
Here is an example of a simple ping in Windows:
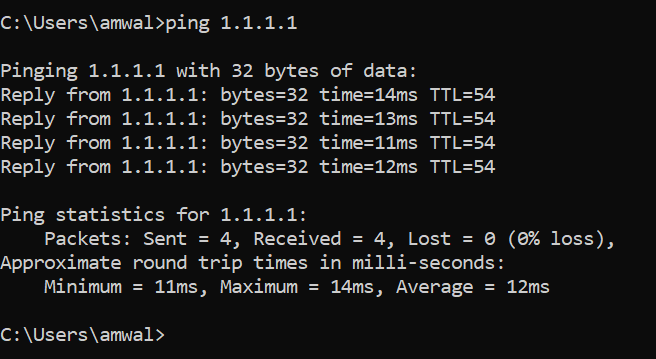
This is the ping default operation in Windows.
Notice Windows sends 4 consecutive pings and then stops. If you receive message for any ping packet that says “request timed out”, this implies that your computer did not receive a reply from the target. If some packets are lost, some of the routing paths between your computer and the target have an issue with the path not being available or the response took too long.
MAC OSx:
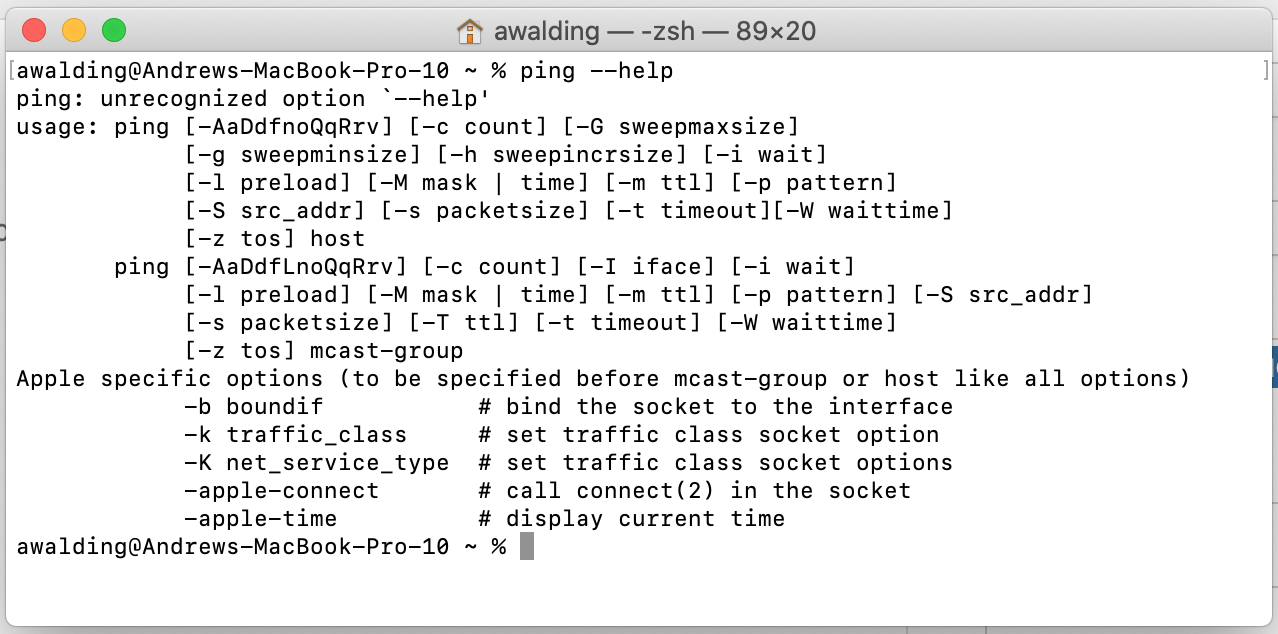
Linux (Debian):

It should be fairly obvious to everyone that there are plusses and minuses to each implementation. One conclusion we can walk away with, and that is the the most options are clearly contained in MAC OS and Linux above, and we are left waiting much more from Windows (are you listening Microsoft?). To get on my peach box for a sentence, this is why I often am heard to say that you are better off learning Linux in the networking space: see my article here and if you work at a service provider here.
Some Great Troubleshooting Ping Commands
Let’s start with just a couple of general things:
In Windows you can use the -t option to continuously ping a target for however long you want and then press Ctrl + Break to pause the process and look at the current statistics, or to stop, press Ctrl + C. This emulates the behavior of MAC OSx and Linux.
Let’s try to answer some of those questions posed earlier.
What I will start with is some alternatives to the super simple plain ping command that can be very helpful when troubleshooting. I will list the use case and the command below.
1. Should we repeat this echo request/reply over a longer number of exchanges?
For troubleshooting, absolutely. Busy systems can handle small amounts of work. So sending a small ping packet over many seconds (which is an eternity in the Internet) may not be stressing or revealing issues. In my mind there are two parts to this: repeating the ping over time – say 100 pings, and then increasing the frequency of the pings. I will deal with the second part in the next use case. Here are some command options for pinging 100 times, as examples:
Windows:
ping 1.1.1.1 -n 100
MAC OSx:
ping 1.1.1.1 -c 100
Linux:
ping 1.1.1.1 -c 100
2. Should we test more aggressively, sending more pings over time?
As stated in #1, the answer should be combined with the number of pings. So let’s leave the count at 100 pings but let’s reduce the time between pings to 250ms – instead of the default 900+ milliseconds. Note that I use .250 below. You could extend the pinging to be longer that the default of approximately 1 second to pinging say every 10 seconds or every minute.
Windows:
No option to do this – which is not good.
MAC OSx:
ping 1.1.1.1 -n 100 -i .250
Linux:
ping 1.1.1.1 -n 100 -i .250
3. How long should we wait for a valid response?
By default, the wait time seems similar to us across systems – it is about 4 seconds (4000 milliseconds). In some cases that may not be long enough. But in most cases, the Internet speed should be much much faster (deliberately much x2). So perhaps we should lessen this. Now we encourage you to find the number that is normal for your network (this is part of baselining your network) by exploring in a downward direction until your command is too demanding. Then remember that border point and perhaps pick something slightly larger than that. Let’s say the border point for your network is 50 milliseconds. Perhaps you would pick 75 in future testing. In the examples below I picked 25 milliseconds.
Windows:
ping 1.1.1.1 -n 100 -w 25
MAC OSx:
ping 1.1.1.1 -n 100 -i .250 -W 25
Linux:
ping 1.1.1.1 -n 100 -i .250 -W 25
*Note: I did get different responses out of different Linux systems to this command. So you may want to play around a little, like changing the order of the command line switches.
4. What about size of the packets?
This is an excellent question. In my opinion, this is also where we are going to get into the some really important troubleshooting issues, particularly regarding MSS (Maximum Segment Size) and MTU (Maximum Transmission Unit size). Let’s once again do a simple ping and capture the packets (I am using Windows – but the result will be similar on all platforms):
ping 1.1.1.1
Now let’s look at the result in Wireshark once again:
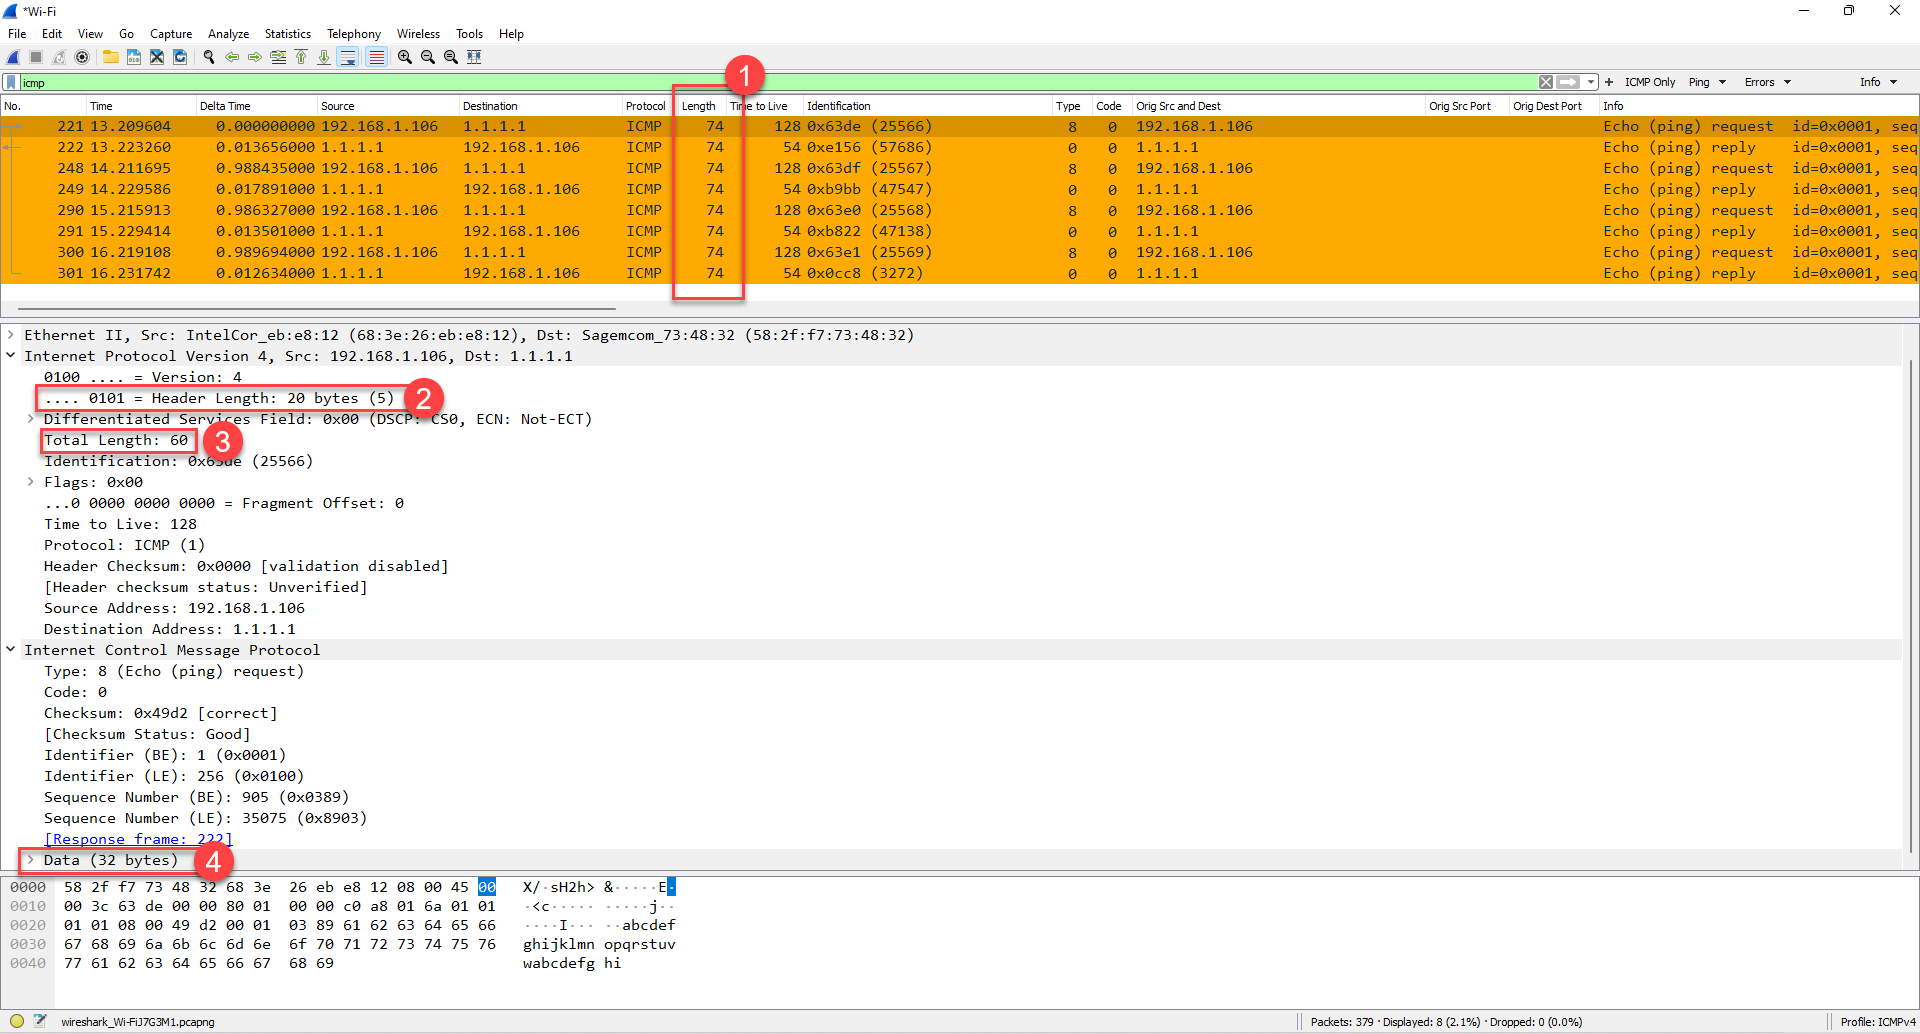
1. We see that the length of each echo request and reply is uniform – a total of 74 bytes/octets.
2. We are in IP – and the header is 20 of those bytes.
3. We see the total length of the IP packet is 60 bytes. So this minus the 20 bytes in #2 equals 40 bytes.
4. We see there are 32 bytes of data in the ICMP request. Thus 40 bytes from the math in #3, minus 32 bytes here means the ICMP header is 8 bytes.
So starting with the 32 bytes of data + 8 bytes of ICMP header + 20 bytes of IP header as we see in #3 is 60 bytes. The difference between the total length of 74 bytes “on the wire” that Wireshark is reporting and the 60 bytes is 14 bytes, which in this case is the size of the reported Ethernet header (6 bytes for Destination MAC + 6 bytes for Source MAC + 2 bytes for the Type/Len field).
However, we know that the MTU of Ethernet and/or Wi-Fi 802.11 is much larger than this. Which in turn means that the TCP MSS is much larger. If we were using standard Ethernet, it’s MTU is usually 1500 bytes. To determine MSS of TCP we must subtract the IP header (which we see is 20 bytes by default for IPv4), and we must subtract the TCP header wich is normally also 20 bytes (with the exception of the SYN and SYN-ACK which can have a bigger header as options are usually included). Therefore 1500-20-20 = 1460 bytes. So a common MSS will be 1460.
Two problems can occur here. First, the two end points may not have the same MSS. Second, the MTU of network interfaces between the end points may not be consistent, and if smaller than that of the end station may cause fragmentation and therefore increase in overhead and processing, or where fragmentation is being avoided, we may have smaller MTU/MSS sizes reducing the throughput.
This is important theory, so thanks for sticking with me.
Back to our question of size of the packets and how can we leverage ping to test this? As we played with timing above, we will also want to play with the size of our ICMP packets by modifying the data size. It is important to point out that ICMP does not get encapsulated into TCP as our capture clearly shows. So we are not testing TCP here. We are testing the MTU capabilities of the network. But you will have to use the match discussed above to come up with at least some expectations.
If we assume an MTU of our local system of 1500 bytes, then to create a full size frame, we use the following math:
1500 – 20 (IP header) – 8 (ICMP header) = 1472
Windows:
ping 1.1.1.1 -l 1472
MAC OSx:
ping 1.1.1.1 -s 1472
Linux:
ping 1.1.1.1 -s 1472
On my systems this all worked. But what if we tried something that is too big? The result will be fragmentation (as shown below):
Here I tried 1500 byte packets (the most common mistake people make):
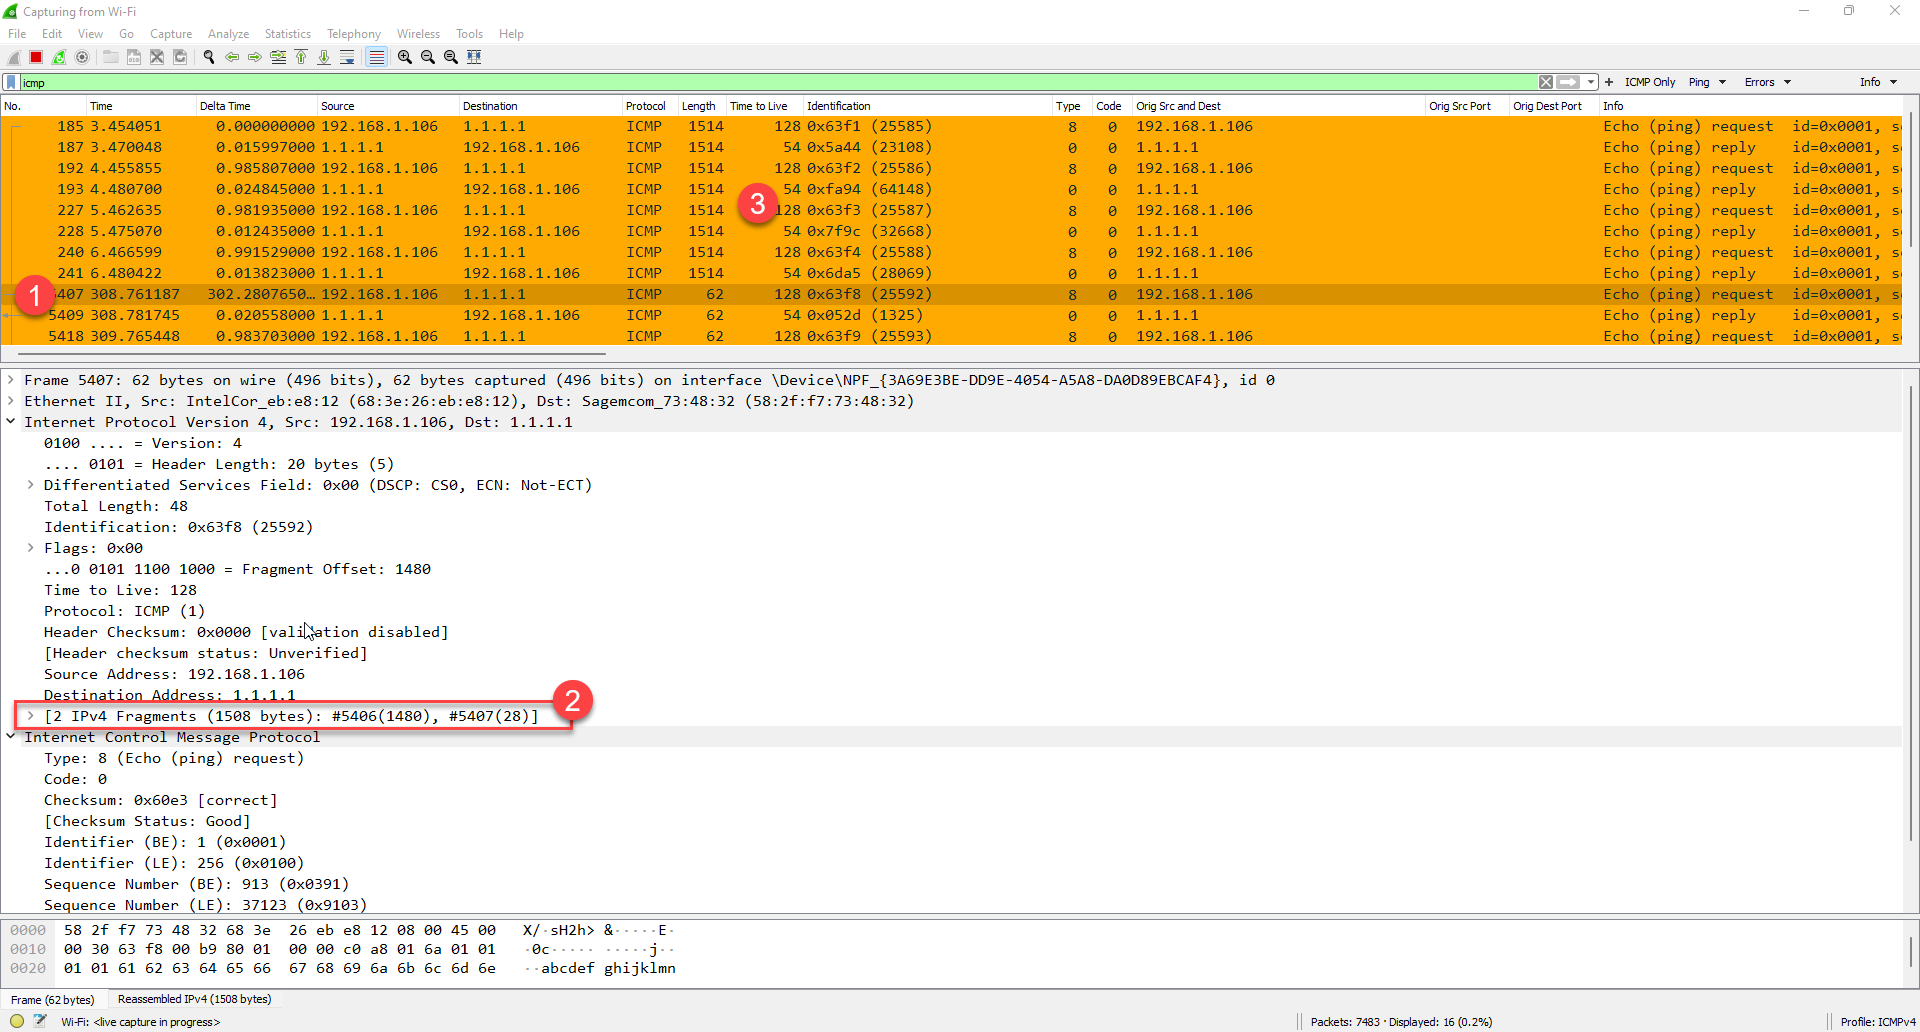
At #1 we see frame 5407 which is expanded in the details pane and we see that Wireshark has detected fragmentation at #2. We also see that when I did the pings with the proper match that they worked at #3.
What is left to do here is to once again baseline a given communications path in the network by testing to see what the MTU size really is, especially for users that are complaining of slow connections. Then do the math to figure out what the MSS size would be. Perhaps in that math we will find smaller packets are causing slower speeds. Here you will have the evidence to show the results of your experimentation.
If you are using a MAC system you can have some more fun with the length testing:
MAC OSx:
The following command will ping continuously with a starting data field size of 1300 bytes, increasing by 32 bytes each ping, until it reaches 1600 bytes.
ping 1.1.1.1 -G 1600 -g 1300 -h 32
Let’s look at the results:
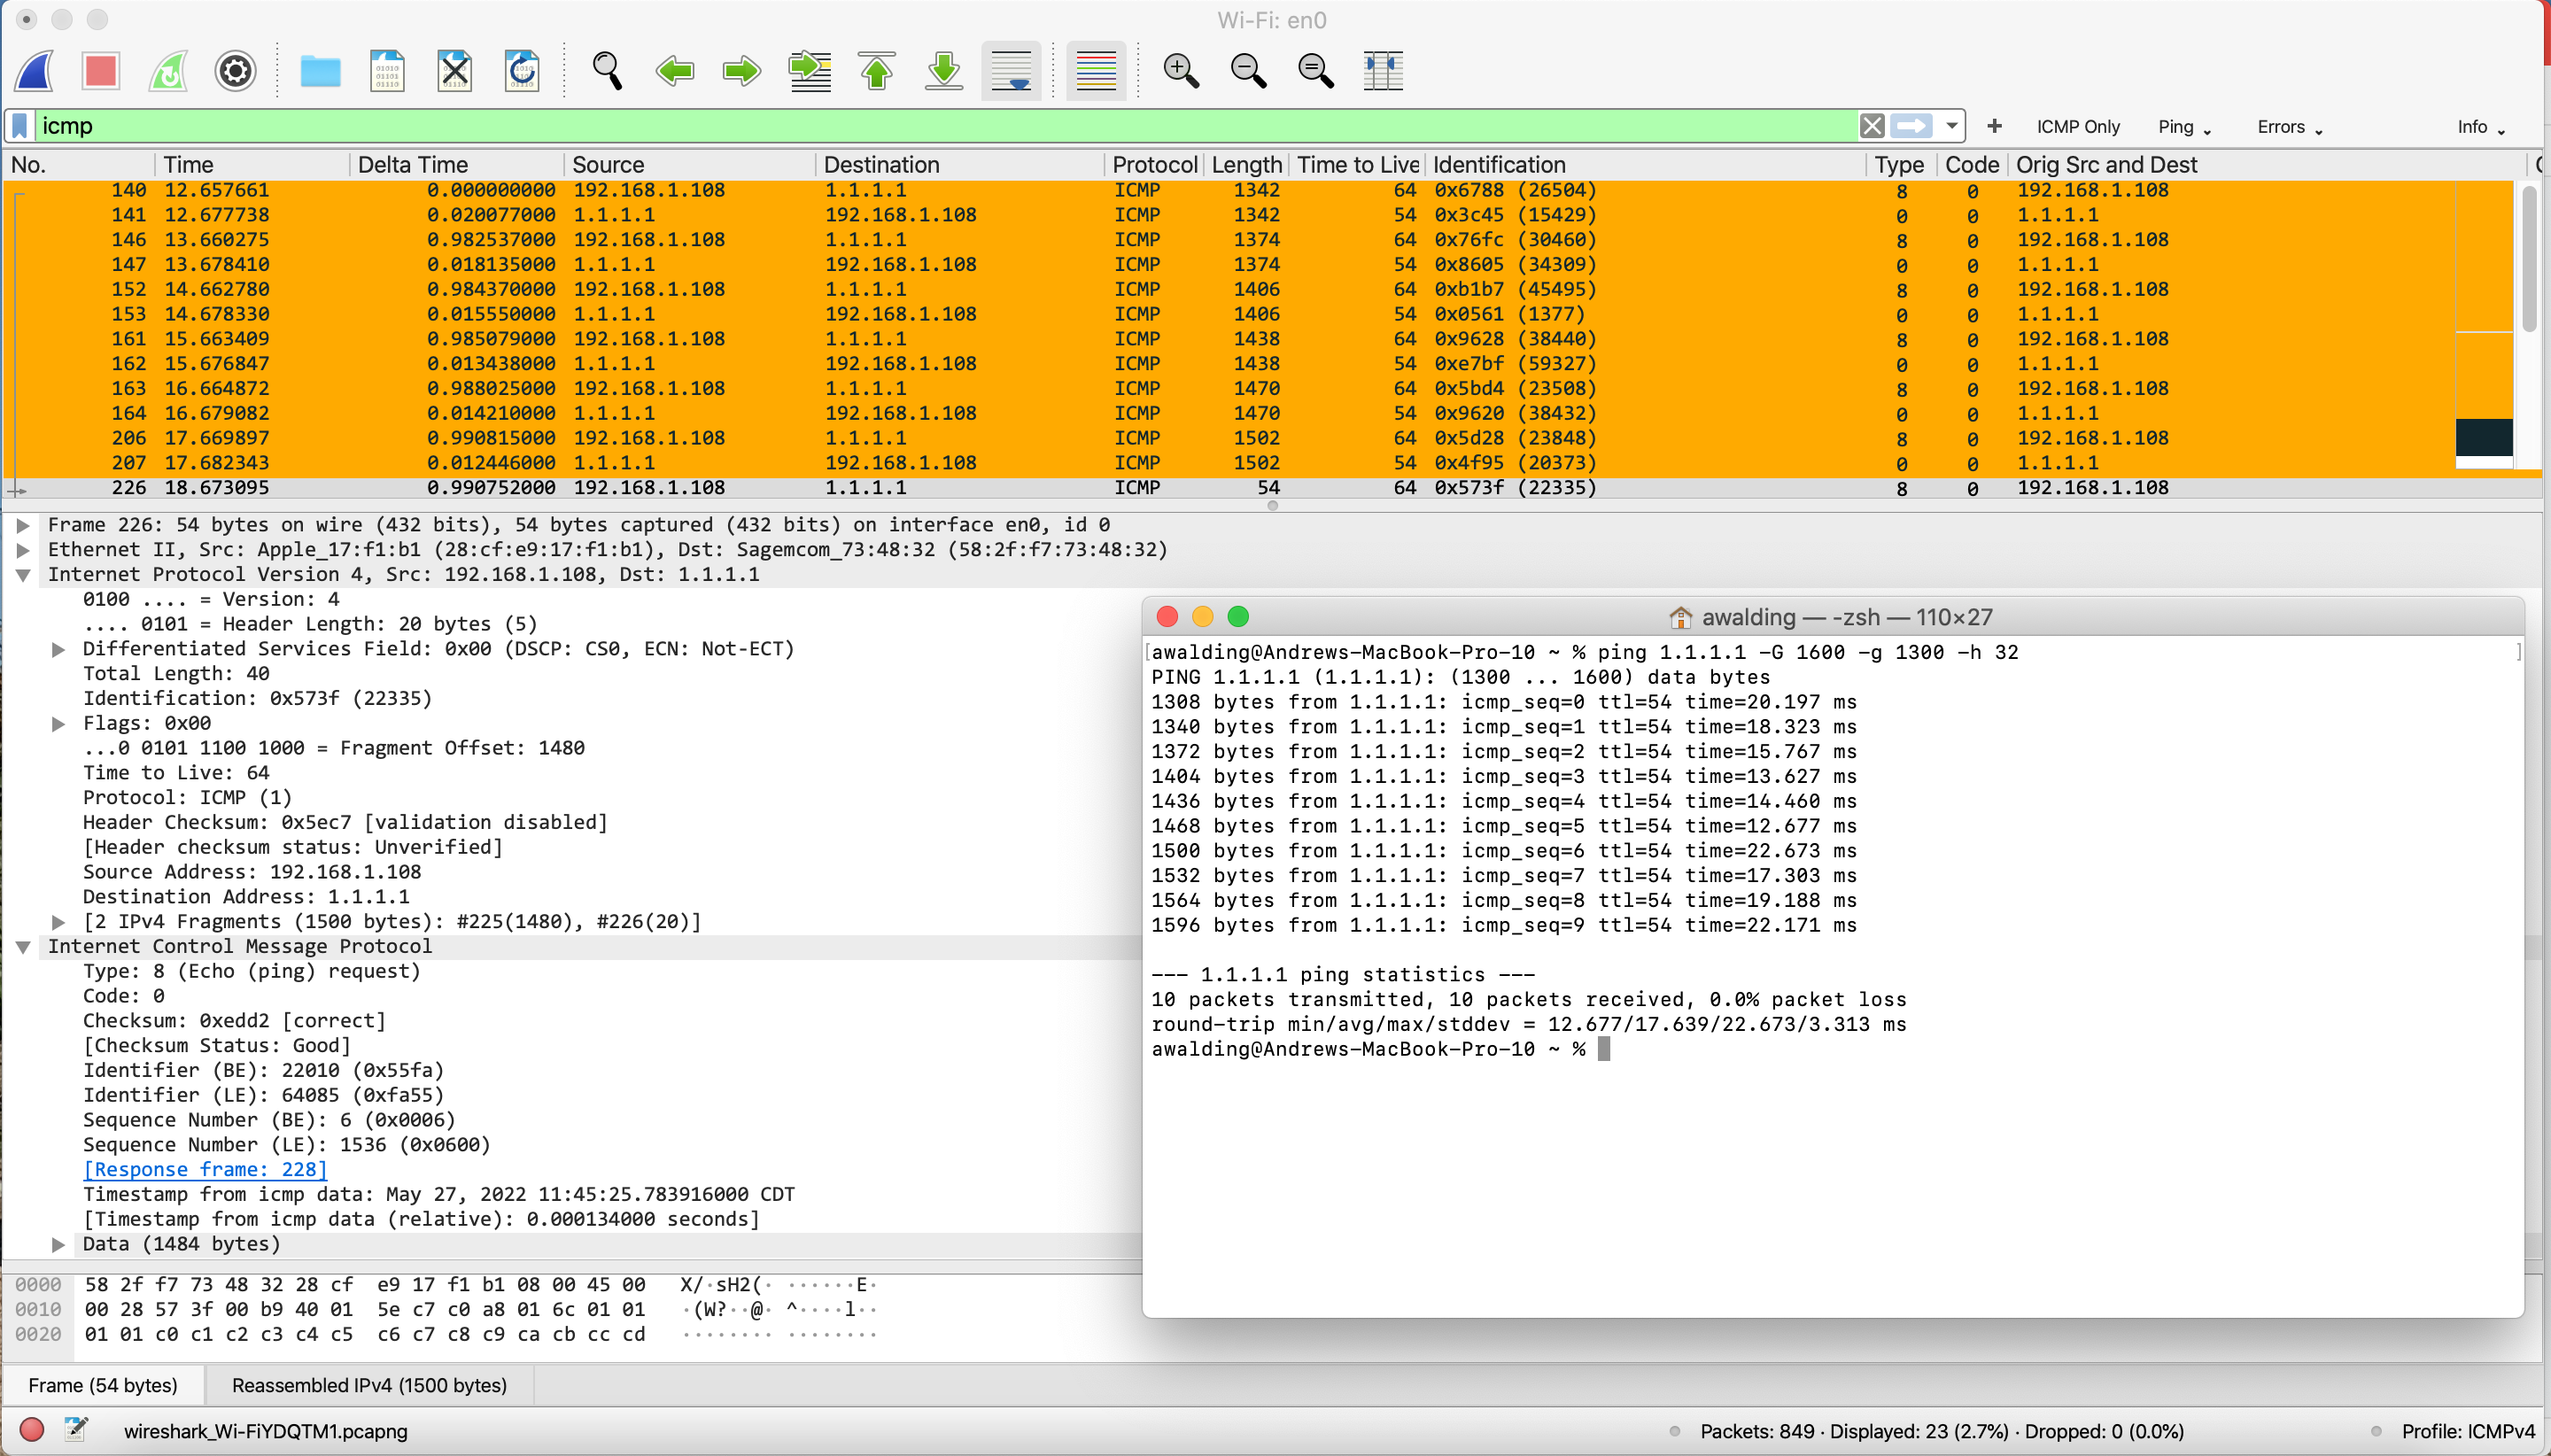
You see that we are getting an increase in size on each ping. Once we got above 1500 bytes we ended up with fragmentation.
6. Some other use cases:
As we saw from the help on the three operating systems, there are additional command options that we will not cover further here. For example all three allow you to modify the TTL setting in the IP header. Remember that TTL is really number of hops. If something is dozens of hops away vs just a few, response and round trip times will be higher and therefore throughput slower. This is a use case you may wish to explore.
Testing the local system can be done with ping 127.0.0.1 – this is often handy to verify the local protocol stack is fully operational.
What About IPv6
Great question. Everything so far has focused on IPv4. But with IPv6 growing daily, we should address this.
Most systems today run dual stack, meaning they are IPv6 and IPv4. If your network and service provider supports IPv6, the computer will use whatever version of IP that the preferred DNS response is:
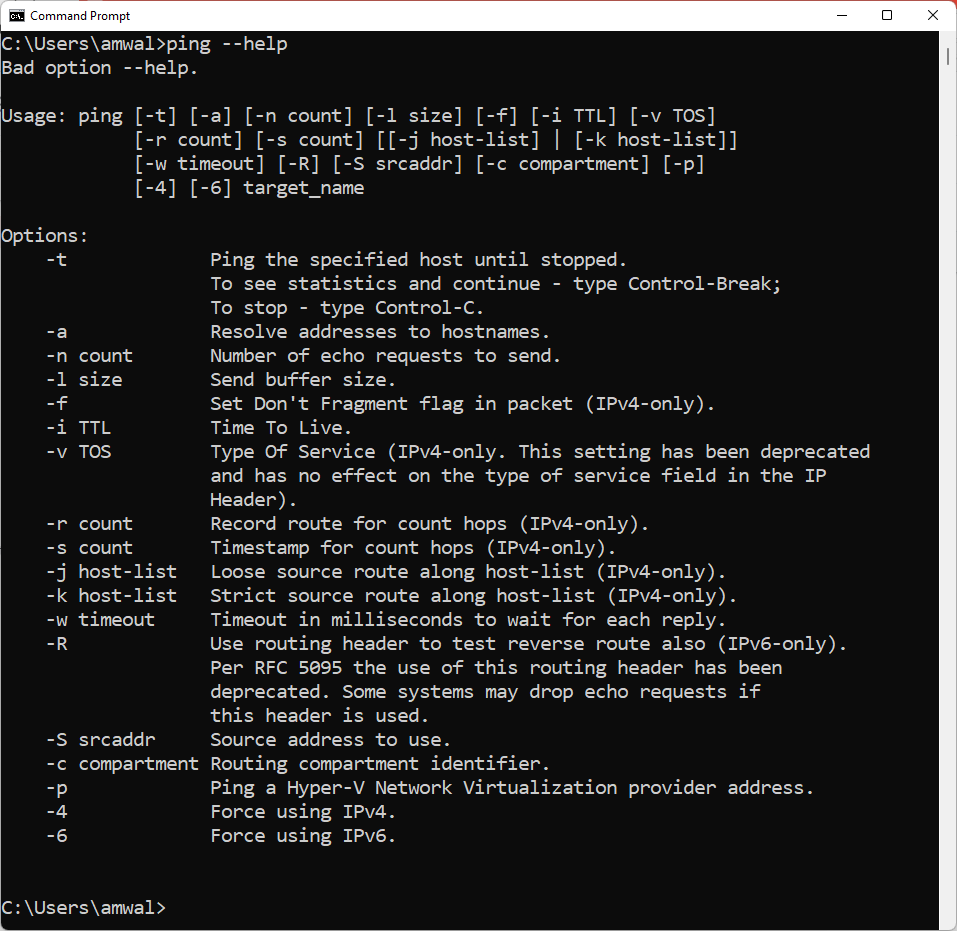
You can ofcourse force IPv4 or IPv6 – I would refer you to the help outputs at the top of the article.
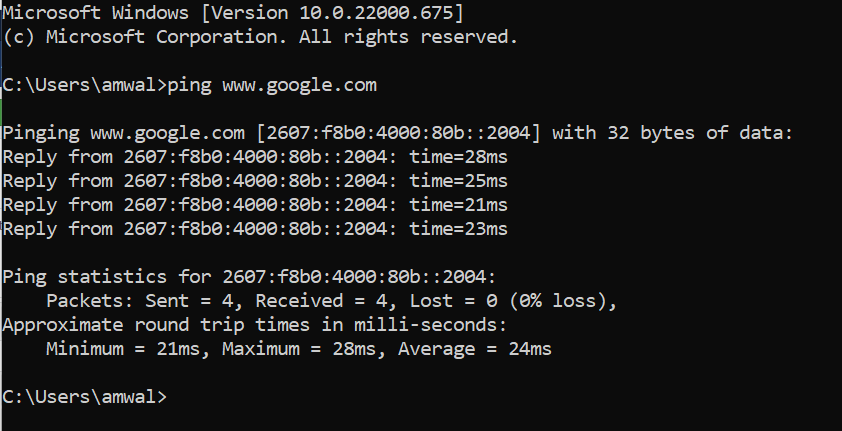
What About VPN?
Being in a VPN can change everything. Look at my changes:
I went from IPv6 to IPv4 only. Interestingly things got faster! That is usually not the case.
What about Wireshark? Let’s look:
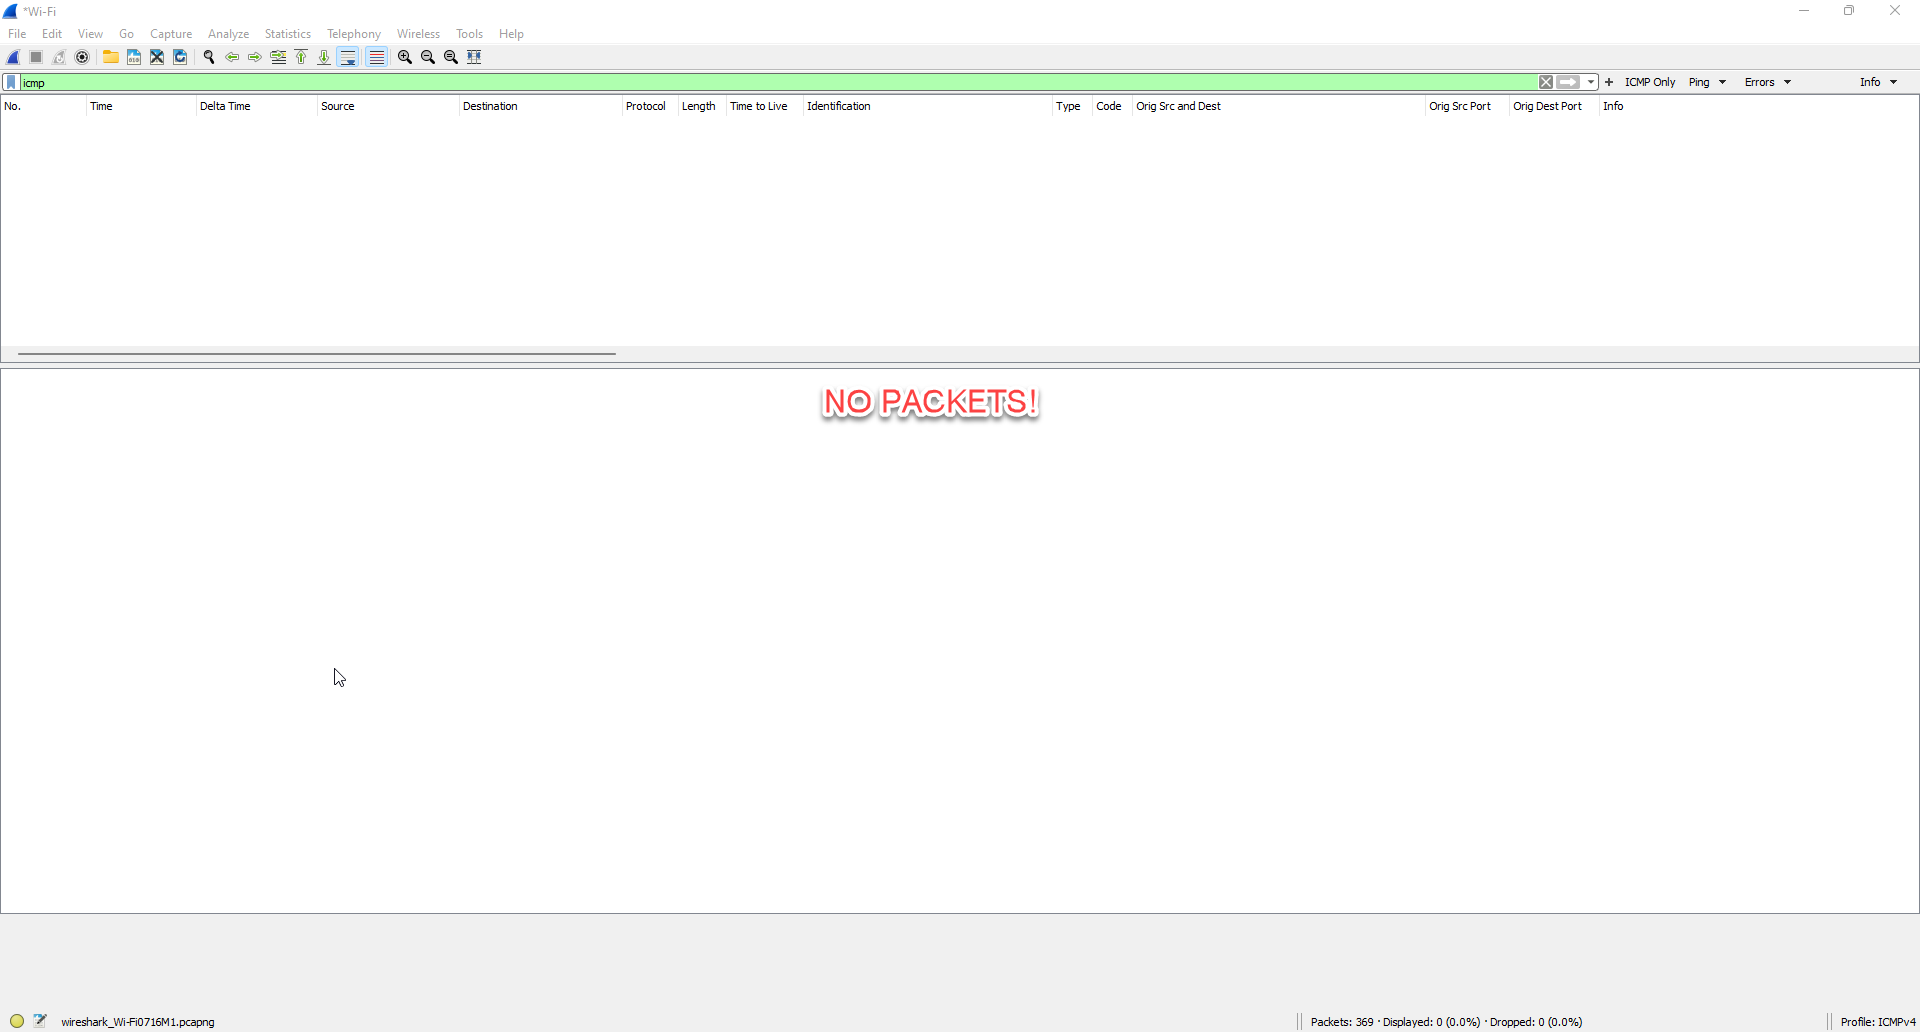
No packets! Well, no ICMP packets anyway. The reason for that is my VPN is encrypted traffic so it just looks like UDP traffic with a bunch of random characters! Not very helpful. Now you could decrypt, but that is an entirely different set of issues.
What Ping Options do you use?
Please comment below on what ping options you use when troubleshooting networks.
When Something Goes Wrong
What does it mean when ping fails? There are many scenarios that are possible, but let’s cover the basics.
Timed Out
If you get “Timed Out” — meaning the ping never completes at all — this means exactly what is being reported. Ping sent the echo request but timed out waiting for a reply. If you are certain that the remote target is powered up and is working, you should troubleshoot on your end. Try extending the timeout:
[extend timeout command]
Or try running traceroute to see where network reachability is being broken.
Network Unreachable
If the ping returns “Network Unreachable,” first check your physical network connection. Next, if you’re trying to reach the local network, check your netmask and IP address. If you can’t ping the Internet, check your default gateway.
Unknown Host
If you see “Unknown Host” or something like that, check your DNS settings. Your PC is unable to translate names like “google.com” into the appropriate IP address for the ping.
You can check the DNS using the nslookup command. For more info on DNS and nslookup look here: https://www.cellstream.com/reference-reading/tipsandtricks/355-the-dns-system-in-depth
On that last one, it’s useful to keep handy a couple of known IP addresses on the Internet that you can ping. For example, if I know that our Web server in Dallas is at A.B.C.D; and I can ping that IP address, but “ping www.cellstream.com” doesn’t work, I definitely have a DNS problem. If you can’t ping either of the two, and you know they are working, either your Internet connection is down or your gateway is set incorrectly with no way to get out to the Internet.
Summing Up
In this article I took a detailed look into how we can leverage PING in troubleshooting. This was not all encompassing, and I am sure readers and visitors will have some additional commands they will suggest in comments. We all welcome those pearls of wisdom on this subject.
I hope you find this article and its content helpful. Comments are welcomed below from registered users. You can also leave comments at our Discord server.
If you would like to see more content and articles like this, please support us by clicking the patron link where you will receive free bonus access to courses and more, or simply buying us a cup of coffee!