
Scenario
Let’s say you have a DHCP server running on a Cisco Switch that is behaving strangely and you want to examine the traffic over a couple of hours while not creating a gigantic unmanageable capture file.
A note here: I am doing this on a Cisco switch, but most all vendor switches support this port mirror or span port capability.
You can also get a small switch that does this. I have one listed that I carry in my “go bag” – look here.
Just substitute how your switch/system does this in the process outlined below.
Many years ago I wrote an article on this in my Cisco How To’s that you can also refer to here.
What you will need:
- A Switch that support port mirroring or span ports – we like this one: link to our Amazon Associate product
- A Gigabit Ethernet Cable
- A Laptop running Wireshark.
Procedure
In this example we are using Cisco IOS. Cisco calls this ability to mirror traffic SPAN and RSPAN. For Cisco specific info on SPAN and RSPAN see: https://www.cisco.com/c/en/us/td/docs/switches/lan/catalyst3560/software/release/12-2_52_se/configuration/guide/3560scg/swspan.html
Step 1
On the switch, in privileged mode, go into config mode (config t)
Step 2
Enter the following command to specify which port you wish to “mirror”. You can specify multiple ports if you wish, but be careful here. If you combine multiple ports and they are running at more than 50% capacity, you are likely to drop packets going to the single mirror port.
monitor session 1 source interface gigabitethernet0/1
What is happening above we are creating a “session 1” sourced from GigE0/1.
Step 3
Now enter:
monitor session 1 destination interface gigabitethernet0/4 encapsulation replicate
This is specifying which port we will be mirroring to. Make sure the GigE0/4 is not shut down.
Step 4
Now connect the cable from GigE0/4 to the laptop ethernet interface.
Step 5
Open Wireshark on the laptop.
Select the Ethernet interface from the Wireshark home screen – just click once – it will be highlighted.
Step 6
I always like to start with a quick test: just start capturing, and verify you are seeing traffic. You may want to ping the DHCP server and see if you see those ICMP packets in the capture. There are some clever ways to ping and you can see my article on using Ping for Troubleshooting here.
In the following screen shot you can see a little test network that I set up to illustrate:
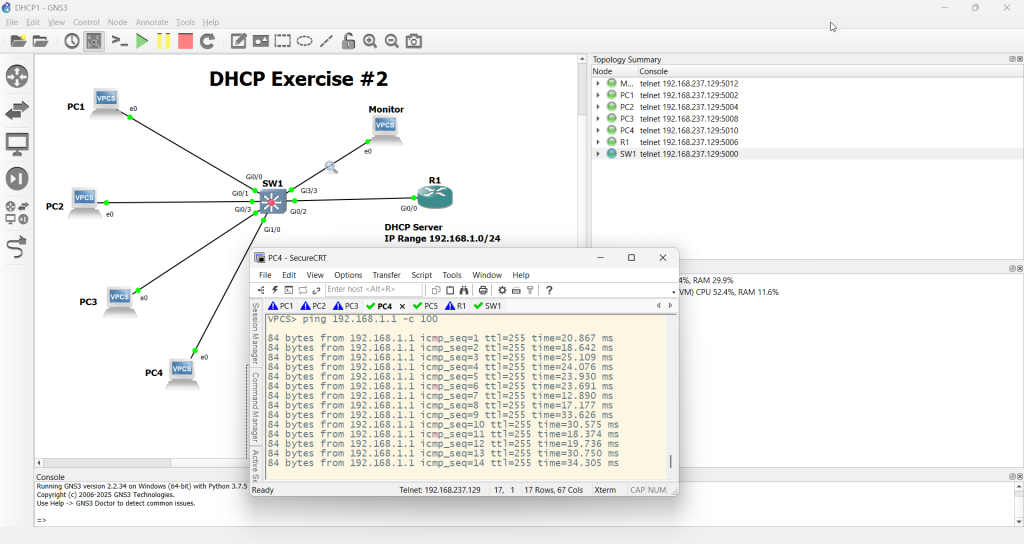
The monitor is attached to the span or mirror port (in this case Gig3/3). All the other ports are being mirrored to that port.
You can also see that I am pinging 192.168.1.1 which is the DHCP server.
These pings are running simultaneously from all the PC’s.
So on the monitor port, I should see them all, and indeed I do:
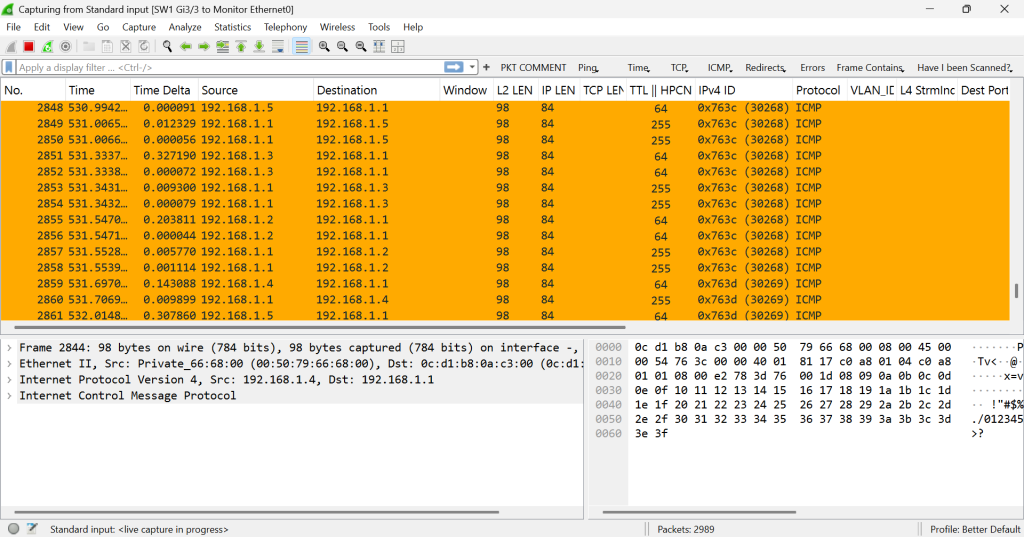
We see 192.168.1.2, 3, 4, and 5 all pinging away proving my span or mirror port is doing what I have asked.
OK – back to the steps.
Step 7
If all looks good, stop the capture without saving.
Step 8
Start a new capture, this time we will leverage Wireshark’s Ring Buffer feature. Why should you know this, well consider for a moment when you capture multiple ports of data, your capture is going to get big very quickly. So the best thing to do, especially if you are trying to find a problem that is unpredictable or intermittent, is to use the Ring Buffer. It will ensure you are capturing across many files, and not have to worry about running out of disk space.
Click on Capture> Options. You will get the following pop up:
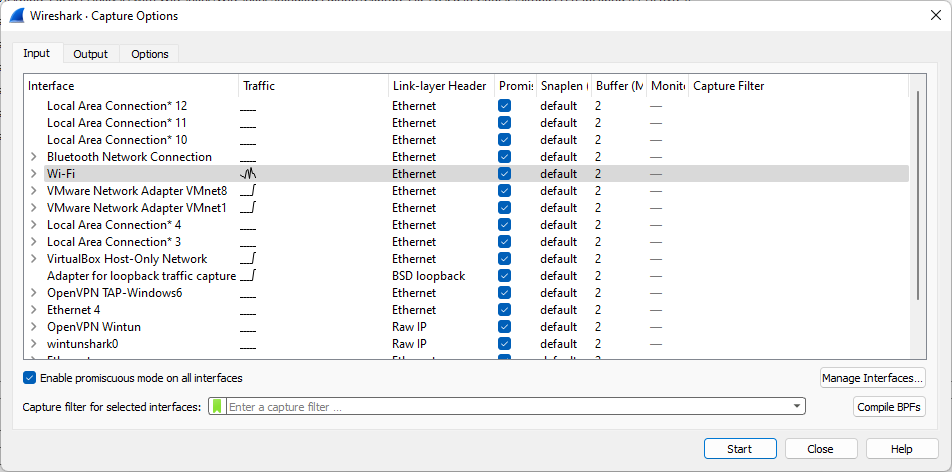
Yours will have different interfaces. Make sure the promiscuous mode checkboxes are checked.
Again – your Ethernet interface should be highlighted here as well.
Now click on the Output Tab:
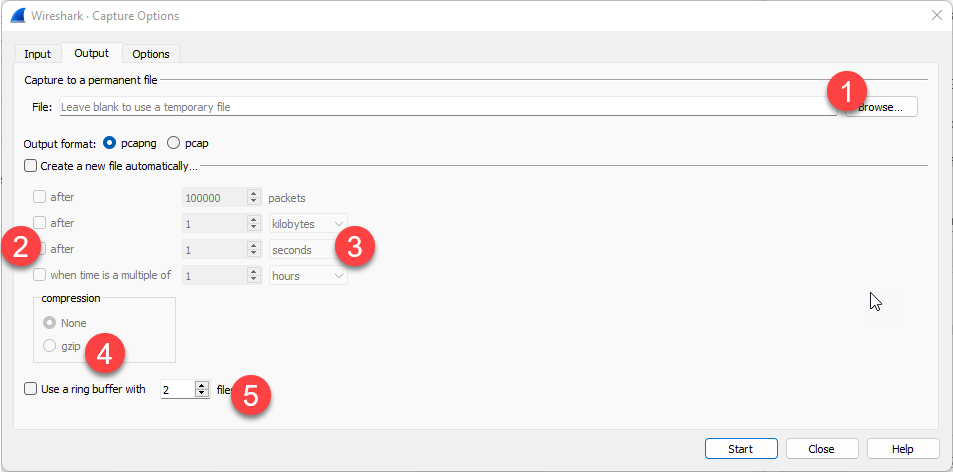
Then:
1. Click the browse button and select desktop, and start the filename with a seed (remember I used the word Test). Say OK and you should return to this pop up with the path and filename populated.
2 and 3. Select After next to time, enter 10 and change #3 to minutes. So each file will have 10 minutes of traffic
4. Choose the gzip button.
5. Set the number of files to 12
The result of this is that Wireshark will create 12 files – each with 10 minutes of traffic – resulting in 2 hours of capture.
NOTE: you should adjust this as necessary. Sometimes 12 files each containing 5 minutes – that is 1 hour – is good. In your network you may want to vary these settings as needed.
Now you can either click start at this point, or you can select the options tab, and at the bottom tell Wireshark to stop automatically after 12 files.
If you are not sure when the problem occurs – like an intermittent issue, I would let this run as Wireshark’s ring buffer feature will overright the oldest file with a newer file – like a sliding window, you will always have the last 2 hours of traffic.
Packet Analysis Step
At this point we have 12 files, each containing 10 minutes of traffic on the DHCP server we wanted to analyze and troubleshoot. I would open these one at a time, examining the traffic in Wireshark. I would use my DHCPv4 Wireshark Profile (look here) to then perform an analysis of the traffic. I would walk through each of the 12 files in the same manner, looking for changes in protocol behavior, pattern changes, time changes and so forth. Going deeper into specifically troubleshooting DHCP is beyond the scope of this article, but I hope this has launched you in the right direction.
Final Step
If everything worked, we need to turn off the port mirroring on the switch with this command:
no monitor session 1
Summing Up
In this article I took a detailed look into how we can leverage using port mirroring/SPAN ports and Wireshark packet analysis in troubleshooting. This was not all encompassing, and I am sure readers and visitors will have some additional steps or suggestions they use in the comments. We all welcome those pearls of wisdom on this subject.
If you would like to help support the continued development of independent networking, broadband, Wi-Fi, VoIP, and packet analysis content, please consider joining our Patreon community where you will gain access to exclusive technical resources, downloadable labs and PCAPs, bonus course content, troubleshooting guides, and additional member-only material. Comments and technical discussion are always welcomed at our Patreon community or on our Discord server. You can also support our work by simply buying us a coffee — every contribution helps us continue creating practical, real-world network science education for professionals and enthusiasts alike.