

If you use Windows and you are a Networking person technical or non-technical, you will find our toolkit to put all the useful Windows capabilities at your fingertips in a simple menu driven batch file. Before we start, you can download and install this toolkit here (instructions for installing are provided on that page).
When you first run the batch file, it will run an Admin Privilege check:
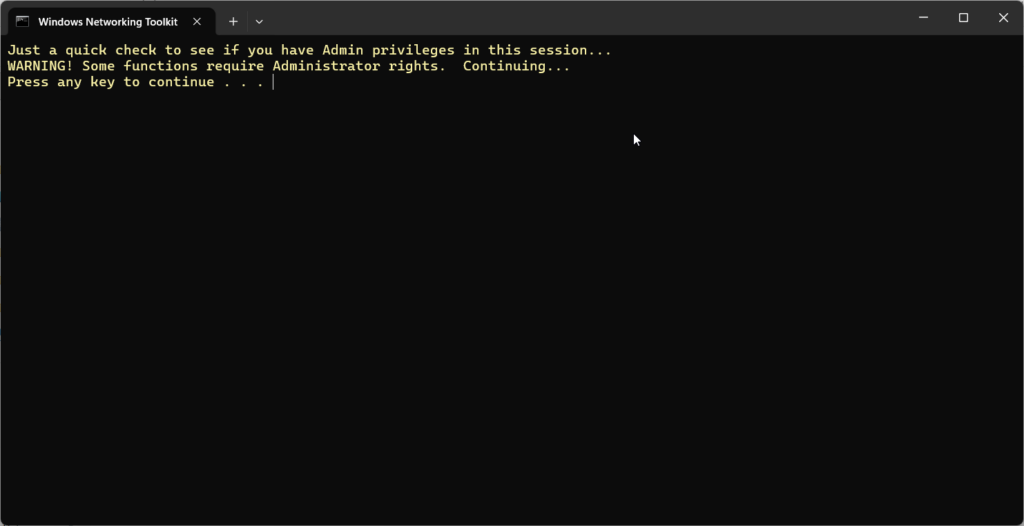
This is a simple reminder that some menu items require Admin Privileges – but most do not, so hit any key to continue.
Here is what the main menu of the toolkit looks like:
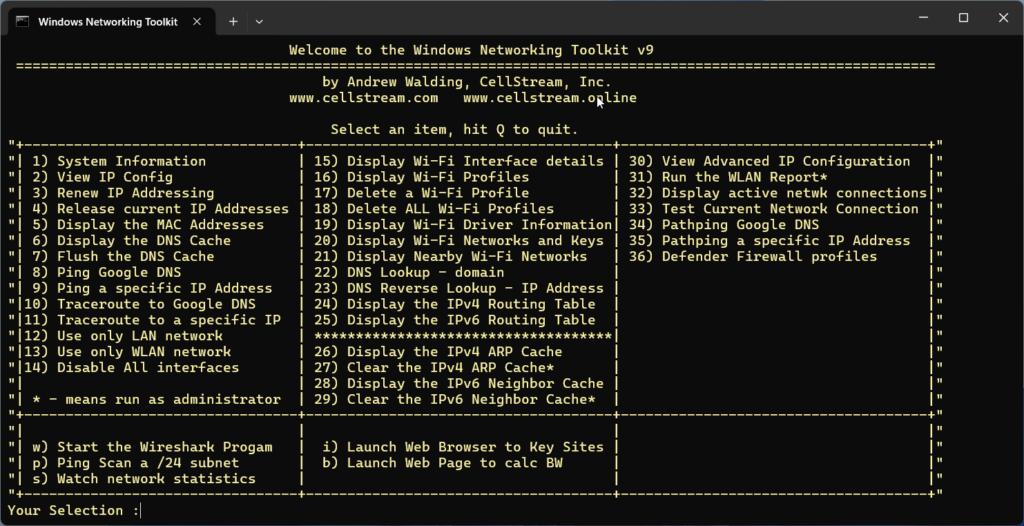
This post will cover each of the menu items and describe what each item does in order.
At the “Your Selection :” you simply enter the menu item (number or letter), “Q” to quit.
After each item is executed, you will press any key to return to this main menu.
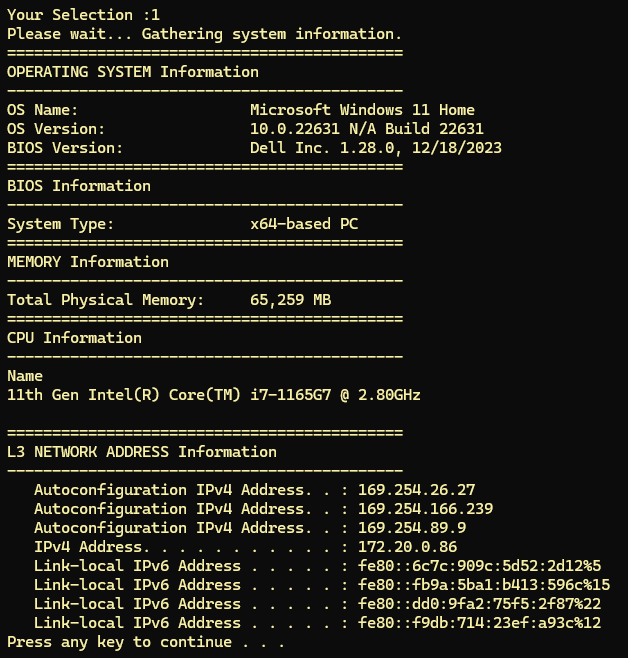
1) System Information
This menu item takes a few moments to run, and will gather information about your system and display what it can find. The main items it will attempt to display are:
- Operating System Details
- BIOS Information
- System Type
- Memory Information
- CPU Information
- L3 Network Addressing
Here is an example output (of course your system will be different):
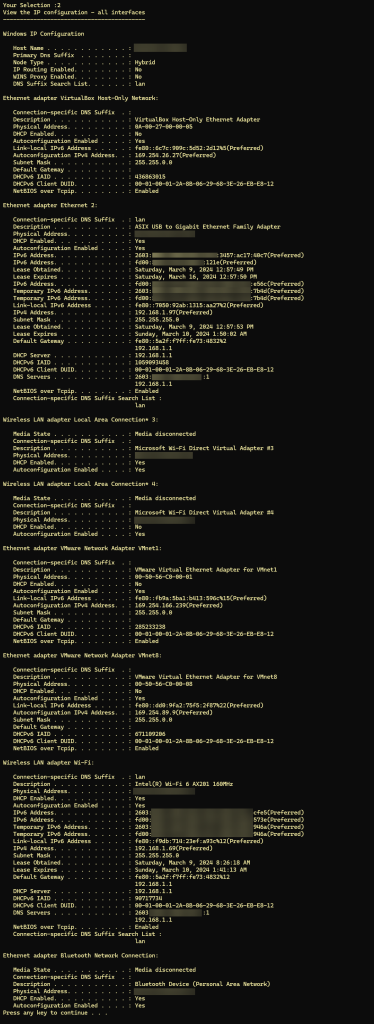
2) View IP Config
This menu item outputs the “ip config” command that displays all interface information. The output will likely scroll and to see everything you will need to scroll back up/then down. This menu option allows users to view the IP address of the device on the network, along with the subnet mask and default gateway for each network interface. It shows detailed information about each network interface, including whether it’s enabled, its MAC address, and whether it’s receiving/sending data.
Here is an example output (once again your system output will differ).
3) Renew IP Addressing
Using this menu item to renew your IP address in Windows can be beneficial for several reasons:
- Resolve IP Address Conflicts: Sometimes, two devices on the same network might accidentally be assigned the same IP address, leading to conflicts and connectivity issues. Renewing your IP address can resolve this by requesting a new, unique IP address from the DHCP server.
- Renew Lease on DHCP: When your computer connects to a network using DHCP (Dynamic Host Configuration Protocol), it is leased an IP address for a certain period. Renewing your IP address can ensure that your device gets a new lease before the current one expires, preventing potential connectivity disruptions.
- Troubleshooting Connectivity Issues: If you’re experiencing issues connecting to the internet or network resources, your IP configuration might be a factor. Renewing your IP address can help troubleshoot and possibly resolve such connectivity problems by ensuring your computer has a valid, correctly configured IP address.
- Network Changes: If there have been changes to the network configuration (like updates to the DHCP server settings or the addition of new network segments), renewing your IP address can ensure that your device’s network settings are up to date and compatible with the current network environment.
- Security Reasons: In some scenarios, you might want to change your IP address frequently for security reasons, to make it harder for potential attackers to target your device. Renewing your IP address can be a simple step in this direction.
Be aware that if you force the system to renew, you could loose connectivity to existing logged in sites, and you will have to re-log in.
4) Release current IP address
Using this menu item to release your IP address in Windows can be beneficial for several reasons, often related to network management, troubleshooting, and security:
- Changing Networks: If you’re moving your device between different networks (e.g., from one office location to another or from a home network to a public Wi-Fi), releasing your IP address can help prevent conflicts and ensure that your device properly obtains a new IP address appropriate for the new network environment.
- Troubleshooting Network Issues: Releasing and then renewing your IP address is a common step in troubleshooting connectivity problems. This process can resolve issues caused by incorrect or stale IP configurations that might be preventing your device from accessing the network or internet.
- Resolving IP Address Conflicts: IP address conflicts occur when two devices on the same network are assigned the same IP address. Releasing your IP address and then obtaining a new one can resolve such conflicts by ensuring your device gets a unique IP address.
- Security Considerations: In certain scenarios, you might want to change your device’s IP address for security reasons, such as minimizing the risk of targeted attacks. Releasing your IP address can be a step towards obtaining a new one, thereby altering your network footprint.
- Preparing for Network Changes or Maintenance: Before making significant changes to your network settings or performing network maintenance, you might release IP addresses on connected devices to ensure that they correctly receive new configurations or updates from the DHCP server.
- Optimizing DHCP Server Performance: In environments with a limited pool of IP addresses, releasing IP addresses when devices are not in use or before moving them to a different network can help optimize the use of IP addresses and ensure availability for other devices.
This menu item will drop the current IP address assigned to your device. Usually, after releasing your IP address, you would follow up with menu item 3 to obtain a new IP address from the DHCP server, completing the refresh cycle of your device’s network configuration.
5) Display the MAC Addresses of the system
This menu item is useful for several reasons, as it provides detailed information about the network interfaces on a computer. Here are some of the key reasons for using this command:
- Identifying Network Interfaces: The command lists all network interfaces on the computer, both physical and virtual. This is useful for identifying which network adapters are installed and active.
- Viewing MAC Addresses: It displays the Media Access Control (MAC) addresses of each network interface. The MAC address is a hardware identification number that uniquely identifies each device on a network. Knowing the MAC address is essential for various network configuration and security purposes, such as setting up MAC address filtering on a router to restrict network access to specific devices.
- Network Troubleshooting: When diagnosing network connectivity issues, knowing the MAC addresses and the status of network interfaces can help in determining whether the problem lies with a particular piece of hardware.
- Network Configuration: For network administrators, the command provides valuable information for configuring network settings, such as assigning static IP addresses based on MAC addresses in DHCP settings.
- Inventory and Documentation: In an organizational environment, documenting the MAC addresses and network interfaces of devices can help in inventory management and in the creation of network topology diagrams.
- Security Auditing: Security professionals may use the command to verify the MAC addresses of devices connected to the network as part of security audits. It can help in detecting unauthorized devices or verifying that network security policies are being enforced.
- Understanding Network Adapter Properties: The verbose output includes not just the MAC addresses but also the type of network adapter (whether it’s Ethernet, Wi-Fi, or something else), its status (whether it’s operational or disconnected), and its connection name. This comprehensive view aids in a deeper understanding of the network configuration of a system.
Here is an example output, your system will be different:
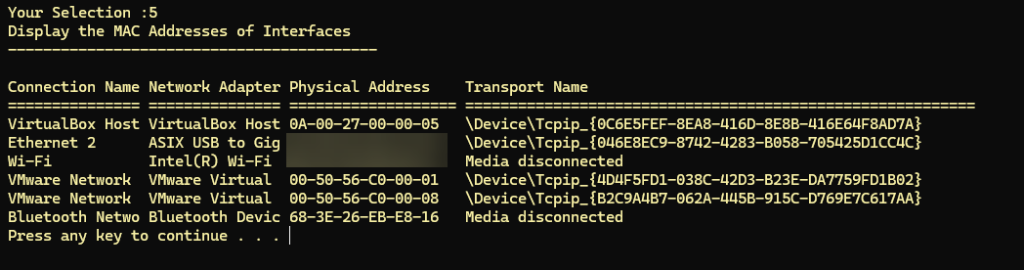
Note: some MAC addresses have been blurred above for security purposes.
6) Display the DNS Cache
Displaying the DNS cache of your Windows system is important in troubleshooting network issues for several reasons:
- Identifies DNS Resolution Issues: By examining the DNS cache, you can see which domain names have been resolved to their respective IP addresses. This can help you determine if a website’s DNS query is being resolved correctly, which is crucial for successful network communication.
- Detects Incorrect DNS Entries: Sometimes, the DNS cache might contain outdated or incorrect entries. These can lead to problems such as being unable to access certain websites or services. By examining the cache, you can identify such anomalies and take steps to flush the DNS cache to clear these entries.
- Troubleshoots Website Access Problems: If you’re having trouble accessing a particular website, checking the DNS cache can help you understand if the issue is related to DNS resolution. For instance, if the website’s domain name is not in the cache, there might have been a problem with DNS resolution.
- Reveals Malicious Activity: Malware or phishing attempts may manipulate DNS entries to redirect users to malicious websites. Inspecting the DNS cache can expose suspicious entries, indicating potential security issues.
- Assists in Network Performance Optimization: By analyzing the DNS cache, you can identify frequently accessed domains. This information can be useful for network optimization techniques, such as implementing local DNS caching or adjusting the network configuration for better performance.
- Facilitates Faster Troubleshooting: Knowing the contents of your DNS cache can speed up troubleshooting by immediately pinpointing whether a connectivity issue is related to DNS. It eliminates the guesswork, allowing for a more directed approach to solving network problems.
This menu item provides a snapshot of all the domain names that have been resolved by the system and their corresponding IP addresses, aiding in the diagnosis and resolution of network issues. Here is a truncated example output:
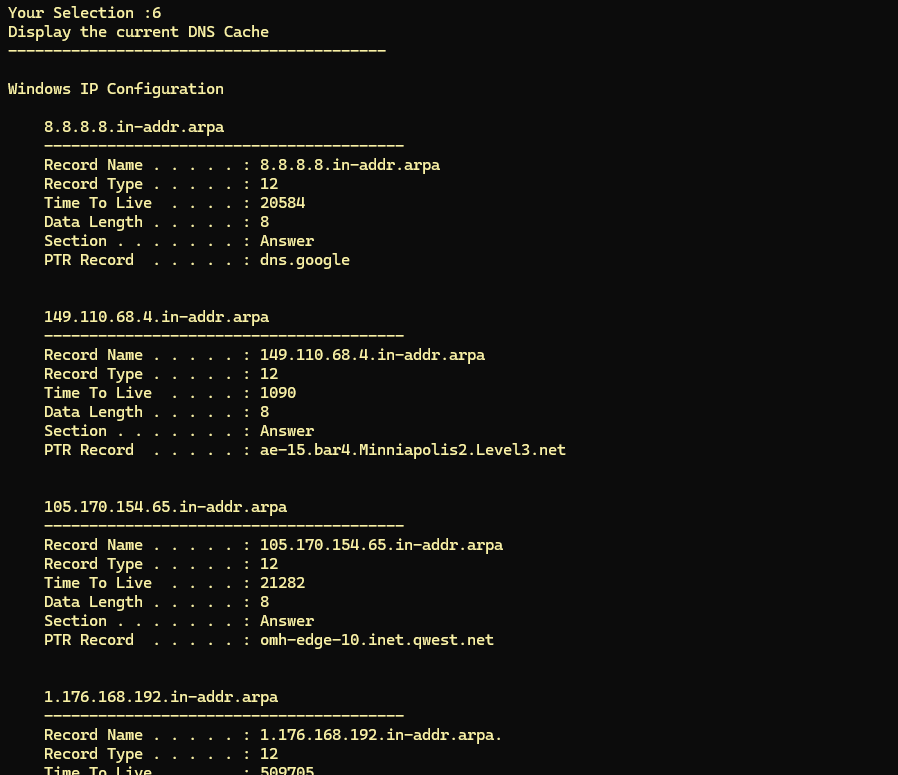
Often this cache will get big, or it could contain outdated information. To correct this, you need to flush the DNS cache. See menu item #7.
7) Flush the DNS Cache of the system
Flushing the DNS cache on your Windows system can be necessary for several reasons, all aimed at resolving connectivity issues, improving security, and ensuring that you access the most up-to-date information on the internet. Here are the primary reasons for flushing the DNS cache:
- Resolving Connectivity Issues: Cached DNS entries can become outdated or corrupt, leading to errors when trying to access websites. Flushing the cache removes these outdated entries, forcing your computer to fetch fresh DNS information, which can resolve connectivity problems.
- Updating DNS Records: Websites may change their IP addresses, and if your cache holds an old record, you might not be able to access the site. Flushing the DNS cache ensures that your system queries for the most current DNS information.
- Fixing DNS Spoofing Issues: DNS spoofing or poisoning attacks can redirect you to malicious websites by altering DNS entries. Flushing the cache removes these malicious entries, reducing the risk of accidentally accessing a dangerous site.
- Privacy Reasons: Your DNS cache can reveal the websites you have visited. Flushing it can help protect your privacy, especially if you’re using a public or shared computer.
- Troubleshooting DNS Resolution Problems: Sometimes, DNS resolution problems can cause websites to be inaccessible or not function correctly. Flushing the DNS cache can help troubleshoot these issues by eliminating potentially problematic cached data.
- Improving Internet Connection Performance: Over time, the DNS cache can become cluttered with numerous entries, some of which might no longer be relevant. Flushing it can sometimes improve the performance of your internet connection by ensuring that DNS queries are resolved more efficiently.
This operation is generally safe and can be an effective first step in troubleshooting various network-related issues on your Windows system.
Here is the output of running this command:
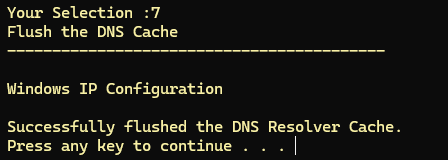
You can check the cache has been flushed by re-running Menu Item 6.
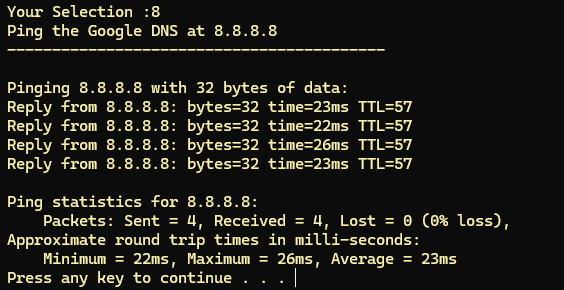
8) Ping the Google DNS
Exactly what it says – a simple ping test to the Google DNS.
Pinging the Google DNS server, typically using the IP address 8.8.8.8 or 8.8.4.4, is a popular method for testing internet connectivity for several reasons:
- High Availability: Google’s DNS servers are designed to be highly reliable and are among the most widely used DNS services globally. This means they are almost always up and available for a ping test, making them a reliable endpoint for testing internet connectivity.
- Global Network Presence: Google’s infrastructure spans across the globe, offering fast and consistent response times. Pinging their DNS servers can help gauge your network’s latency to a well-connected global service.
- Simple Troubleshooting: If you can successfully ping 8.8.8.8 but cannot access websites, the issue might be related to DNS resolution rather than your internet connection. This helps differentiate between connectivity problems and DNS configuration issues.
- Unrestricted Access: Unlike some websites or services that might be blocked or restricted in certain networks or countries, Google’s DNS servers are generally accessible, making them a useful tool for an internet connectivity test.
- Consistency: Since the IP addresses of Google’s DNS servers are easy to remember and consistently available, they provide a standardized method for troubleshooting connectivity across different systems and networks.
By using the ping command to test connectivity to Google’s DNS servers, users can quickly ascertain if their internet connection is active and if the latency is within an acceptable range. This test can effectively isolate problems and help in identifying if the issue lies with the user’s local network, their ISP, or beyond.
Here is an example output:
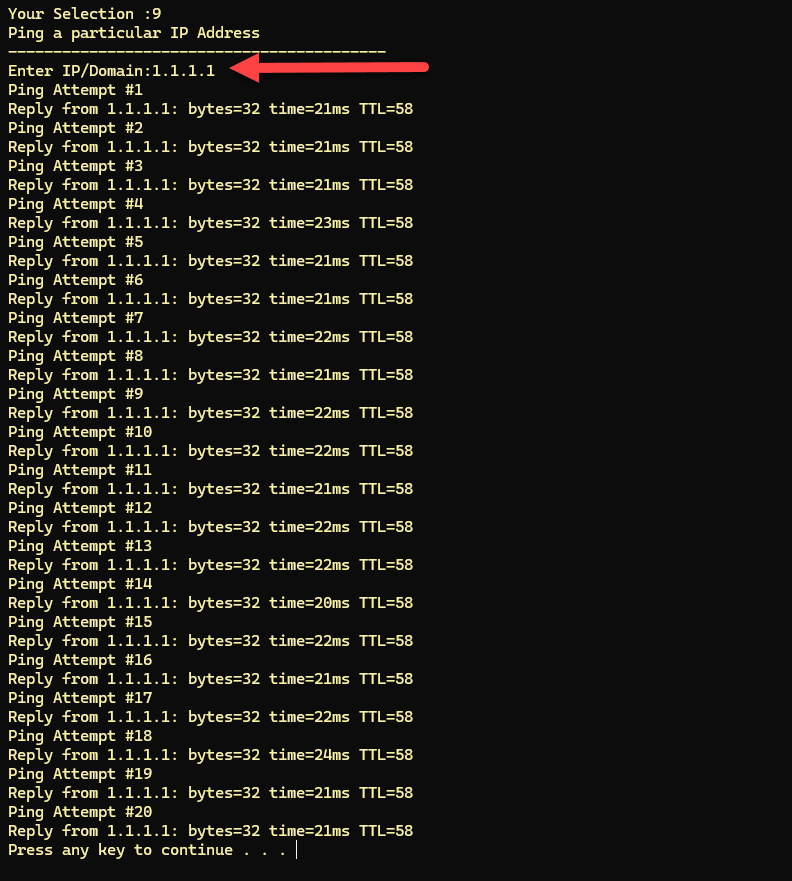
9) Ping a specific IP Address
This menu item allows you to specify an IPv4 address to ping. You will be prompted to enter the IPv4 address (chose 1.1.1.1 in my example below). It will then ping that destination 20 times.
10) Traceroute to the Google DNS
Using this menu option to run a tracert (on Windows) [or traceroute on Unix/Linux-based systems] to the Google DNS servers (8.8.8.8 or 8.8.4.4) is a good idea for several reasons, especially when diagnosing network issues. This tool traces the path that a packet takes from your computer to the destination host, providing insight into the route and identifying any potential problems along the way. Here’s why it’s particularly useful:
- Identifying Routing Issues:
tracertcan show you each hop along the route your data takes to reach Google’s DNS servers. By analyzing the hops, you can identify where delays or drops are occurring, which might be causing connectivity or performance issues. - Determining Network Latencies: Each hop’s response time is shown, allowing you to see where latency spikes occur. Consistent high latency or timeouts at a particular hop can indicate a problem at that point in the network.
- Diagnosing Internet Connectivity: If you can’t reach a specific website or service, tracing the route to a known, reliable endpoint like Google DNS can help you understand if the problem is with your local network, your ISP, or beyond. It helps in distinguishing between local network issues and broader internet connectivity problems.
- Global Reachability: Given Google DNS’s global presence and reliability, it serves as a useful endpoint for testing internet connectivity. If your trace to Google DNS is successful, it’s likely that the issue lies with the specific website or service you’re trying to reach, rather than with your internet connection.
- Verifying Network Path Changes: After changes to network configurations or trying to route traffic through a different network path, running a
tracertcan verify that traffic is being directed through the expected routes. - Network Performance Benchmarking: Regularly running
tracertto Google DNS can help establish a performance baseline for your network. Over time, you can identify changes in routing or performance that might affect your internet connectivity or speed.
In summary, using tracert to Google DNS is an effective diagnostic tool for identifying and analyzing network routing, connectivity issues, and performance bottlenecks. Its ease of use, combined with the reliability and global reach of Google DNS, makes it an invaluable resource for network troubleshooting and performance evaluation.
Here is an example of using this menu option:

11) Traceroute to a Specific IP
Using this menu option to run a tracert (on Windows) [or traceroute on Unix/Linux-based systems] to a specific IP address is a good idea for several reasons, especially when diagnosing network issues. This tool traces the path that a packet takes from your computer to the destination host, providing insight into the route and identifying any potential problems along the way. Here’s why it’s particularly useful:
- Identifying Routing Issues:
tracertcan show you each hop along the route your data takes to reach Google’s DNS servers. By analyzing the hops, you can identify where delays or drops are occurring, which might be causing connectivity or performance issues. - Determining Network Latencies: Each hop’s response time is shown, allowing you to see where latency spikes occur. Consistent high latency or timeouts at a particular hop can indicate a problem at that point in the network.
- Diagnosing Internet Connectivity: If you can’t reach a specific website or service, tracing the route to a known, reliable endpoint like Google DNS can help you understand if the problem is with your local network, your ISP, or beyond. It helps in distinguishing between local network issues and broader internet connectivity problems.
- Global Reachability: Given Google DNS’s global presence and reliability, it serves as a useful endpoint for testing internet connectivity. If your trace to Google DNS is successful, it’s likely that the issue lies with the specific website or service you’re trying to reach, rather than with your internet connection.
- Verifying Network Path Changes: After changes to network configurations or trying to route traffic through a different network path, running a
tracertcan verify that traffic is being directed through the expected routes. - Network Performance Benchmarking: Regularly running
tracertto Google DNS can help establish a performance baseline for your network. Over time, you can identify changes in routing or performance that might affect your internet connectivity or speed.
In summary, using tracert to an IP of your choice is an effective diagnostic tool for identifying and analyzing network routing, connectivity issues, and performance bottlenecks. Its ease of use, combined with the reliability and global reach of Google DNS, makes it an invaluable resource for network troubleshooting and performance evaluation.
Here is an example of using this menu option:

12) Use only the LAN Network
This menu item turns on your Ethernet Interface, and turns off the Wi-Fi interface. This forces your system to only use the Ethernet LAN interface.
13) Use only the WLAN Network
This menu item turns on your Wi-Fi/WLAN Interface, and turns off the Ethernet interface. This forces your system to only use the Wi-Fi/WLAN interface.
14) Disable all Interfaces
CAREFUL!! This menu item will essentially put all your network interfaces into a “down” state. Disabling all network interfaces on a Windows machine might seem like a drastic measure, but there are several scenarios where it could be beneficial or necessary:
- Security Measures: In situations where you suspect your system may be compromised or to prevent unauthorized access, disabling all network interfaces can effectively isolate your computer, protecting it and the data it contains. This is a common step when you want to ensure a system is completely off the network while investigating a security breach or performing a forensic analysis.
- Troubleshooting Network Issues: To diagnose and troubleshoot complex network issues, you might disable all network interfaces to systematically test and re-enable them one at a time. This approach helps identify which specific interface might be causing problems.
- Preventing Network Interference: During certain sensitive operations, such as software installations, updates, or configurations, network activity might interfere with the process. Disabling network interfaces can ensure a stable environment free from unexpected network-based interruptions.
- Conserving Power: On mobile devices or laptops, disabling network interfaces (especially wireless ones) can save battery life when you do not need internet or network access, as network hardware can consume a significant amount of power even when idle.
- Compliance and Data Protection: In environments subject to strict data protection regulations or compliance standards, disabling network interfaces can be a part of securing data. For instance, to prevent data exfiltration or ensure that sensitive data is not transmitted outside a controlled environment.
- Network Configuration and Management: Before reconfiguring network settings or performing major updates to network infrastructure, disabling interfaces can prevent conflicts or issues during the process. It’s also useful when changing the role of a computer in a network, ensuring that no network traffic is sent or received during the transition.
- Testing and Development: Developers and IT professionals might disable network interfaces to test software behavior in offline modes or to simulate network failures. This can be crucial for developing applications that should handle network outages gracefully.
It’s important to note that disabling all network interfaces will cut off all network connectivity, so you should ensure that you have alternative access methods (like direct console access) if remote access to the system is necessary for your work or if you need to re-enable connectivity later on. You can do this be using menu items 11 and 12 above.
15) Display Wi-Fi Interface Details
This menu option gathers and display the details of the Wi-Fi interface on your system. The output is self explanatory, and here is an example:
I like to use this when I am connected to a Wi-Fi network as I will see what frequency and channel I am using, as well as what potential speed is available. Further the MAC addresses of my interface and the Access Point are shown.
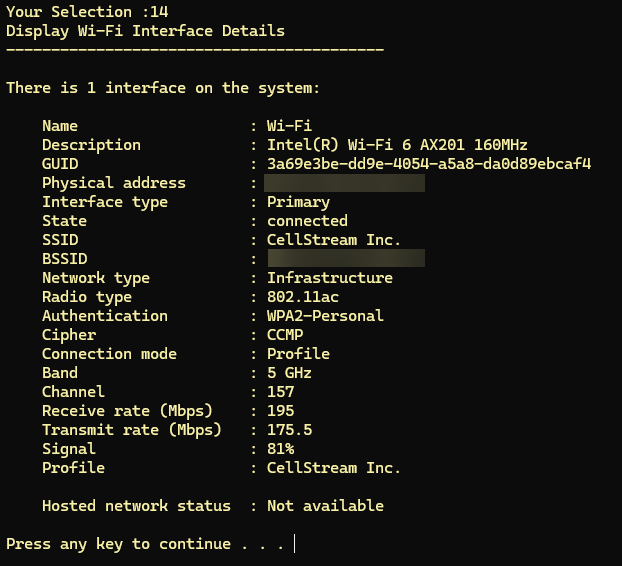
The MAC addresses have been obscured/blurred for security purposes.
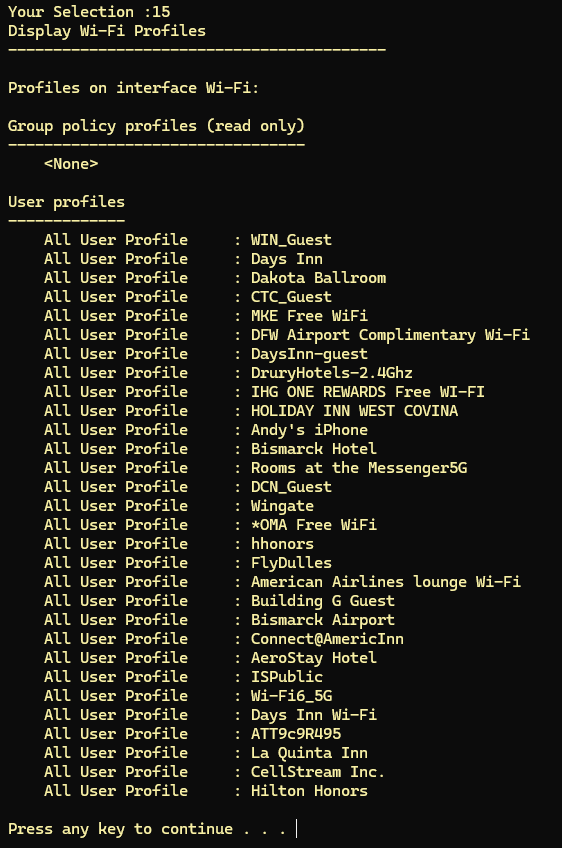
16) Display Wi-Fi Profiles
Windows Wi-Fi profiles are configurations that Windows uses to connect to Wi-Fi networks. Each profile contains specific settings related to a Wi-Fi network that your computer has previously connected to. These settings include the network’s name (SSID), the security type (WPA2, WPA, WEP, etc.), the encryption type used by the network, and sometimes a saved network security key (password) if the network is secure.
When you connect to a Wi-Fi network, Windows will save a profile for that network, allowing your computer to automatically reconnect to the network in the future without requiring you to enter the network details again. This is particularly useful for networks you connect to regularly, such as your home or work Wi-Fi.
This menu option displays all the saved profiles in your system. Here is an example (of course yours will be unique to your system):
Having a large number of Wi-Fi profiles stored on your Windows system can have a few negative implications, primarily related to security, performance, and management. Here are the main reasons why it’s not advisable to keep an excessive number of Wi-Fi profiles:
Security Risks
- Outdated Security Protocols: Older Wi-Fi profiles may use outdated security protocols (like WEP or early versions of WPA) that are no longer considered secure. Automatically connecting to such networks can expose your device to vulnerabilities.
- Automatic Connections to Unsecure Networks: If your device is set to automatically connect to previously used networks, it may connect to less secure or untrusted networks without your knowledge, potentially exposing your data.
- Increased Attack Surface: Each saved profile is a potential vector for attacks. An attacker could set up a rogue access point with the same SSID and security settings as a saved profile, tricking your device into connecting to it.
Performance Issues
- Slower Connection Times: When connecting to a Wi-Fi network, Windows scans the list of saved profiles to find a match. A longer list can marginally slow down the connection process as the system sorts through more profiles to find the right one.
- Clutter and Overhead: Maintaining a large number of profiles can lead to unnecessary clutter in your system’s network settings, making it harder to manage and potentially causing minor performance overheads as the system handles more data.
Management and Usability
- Difficulty Managing Profiles: With many profiles, it becomes cumbersome to manage and prioritize network connections effectively. Identifying and deleting obsolete or rarely used profiles can become a tedious task.
- Conflicts and Connection Issues: In dense urban environments or workplaces with many networks, having numerous similar profiles (e.g., “CompanyWiFi-1”, “CompanyWiFi-2”) can cause conflicts or confusion, leading to connection issues or difficulties in connecting to the preferred network.
Best Practices
To mitigate these issues, it’s a good practice to regularly review and clean up your Wi-Fi profiles, removing those that are no longer needed or secure. This can be done through the Windows Settings app, Control Panel, or using command-line tools. Regularly updating your device and being mindful of the networks you connect to can also help minimize these risks.
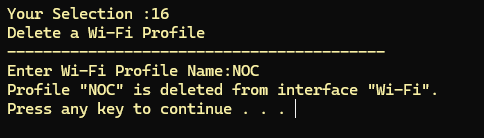
17) Delete a Wi-Fi Profile
Use this menu item to delete a specific Wi-Fi Profile from the list shown in menu option 15. You must use the exact characters:
18) Delete ALL Wi-Fi Profiles
This menu item is a shortcut to delete all Wi-Fi profiles on your system.
CAUTION: that will include any network you are connected to and therefore, your Wi-Fi connection, if in use, will drop, requiring you to reconnect.
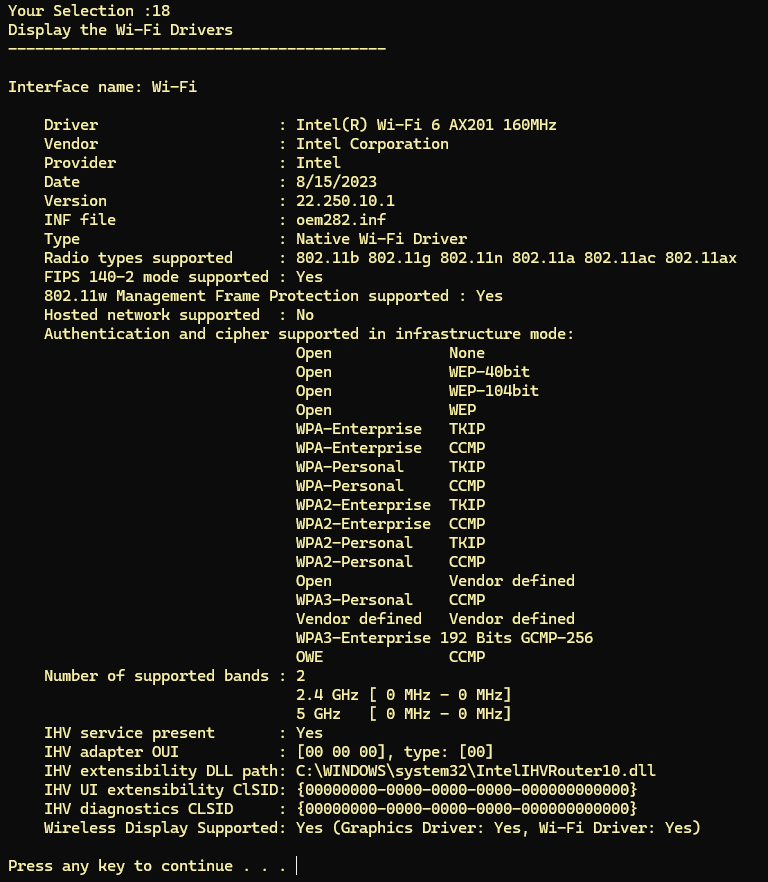
19) Display Wi-Fi Driver Information
Using this menu item to display the Wi-Fi drivers configuration on your Windows system can be essential for several reasons, mainly related to ensuring optimal performance, troubleshooting connectivity issues, and maintaining security. Here are some of the key reasons why you might want to examine your Wi-Fi drivers:
- Troubleshooting Connectivity Problems: If you’re experiencing issues connecting to Wi-Fi networks, or if the connection is unstable, slow, or drops frequently, the problem could be related to your Wi-Fi drivers. Examining the drivers can help determine if they are outdated, corrupted, or incompatible with your operating system or hardware, which could be causing the connectivity issues.
- Optimizing Performance: Drivers are crucial for the optimal performance of hardware components. By examining and updating your Wi-Fi drivers, you can ensure that your wireless adapter operates at its best, potentially unlocking new features, improving signal reception, and increasing data transfer speeds. This is particularly important for tasks that require high bandwidth or low latency, such as streaming, gaming, or video conferencing.
- Ensuring Compatibility: After a system update or when installing a new operating system version, there might be compatibility issues between your Wi-Fi hardware and the operating system. Examining the Wi-Fi drivers can help ensure they are fully compatible with the current version of your operating system, preventing potential connectivity problems or system instability.
- Security: Drivers, like any other software, can have vulnerabilities that, if exploited, could compromise your system’s security. By examining and updating your Wi-Fi drivers, you can ensure that any known vulnerabilities are patched, helping to protect your system from attacks that target outdated or vulnerable drivers.
- Device Configuration and Management: Examining Wi-Fi drivers can provide valuable information about the wireless adapter, such as the manufacturer, model, supported frequencies, and other capabilities. This information can be useful for network configuration, optimizing your Wi-Fi settings, or when seeking technical support.
- Preparing for Hardware Upgrades: If you’re planning to upgrade your Wi-Fi adapter or considering purchasing a new one, examining the current drivers can help determine what features and specifications you need. This can guide your purchase to ensure compatibility and that the new hardware meets your requirements.
- Supporting Advanced Features: Some Wi-Fi adapters support advanced features such as Wi-Fi Direct, virtual Wi-Fi, or the ability to operate in specific bands. Examining the drivers can help you understand whether these features are supported and how to enable them, allowing you to make full use of your hardware’s capabilities.
20) Display Wi-Fi Networks and Keys
Windows stores several important pieces of information in Wi-Fi profiles to facilitate automatic connections to known networks and manage network preferences. Each Wi-Fi profile contains:
- SSID (Service Set Identifier): The name of the Wi-Fi network, which helps Windows identify and connect to the correct network.
- Security Type: Specifies the security protocol used by the network, such as WEP, WPA, WPA2, or WPA3. This determines how your device authenticates to the network and ensures secure communication.
- Encryption Type: Alongside the security type, the encryption type (like TKIP or AES) is also stored, detailing how data is encrypted over the network for protection against eavesdropping.
- Network Security Key: If the network is secured (which most are), the profile includes the network security key or password. This key is encrypted and stored securely by Windows to automate connections.
- Connection Mode: Indicates whether the connection to the network is automatic (the device connects whenever the network is in range) or manual (requires user intervention to connect).
- AutoConnect: A setting that determines if Windows should automatically connect to this network when it’s in range, provided the network profile indicates it’s safe to do so.
- Profile Name: A unique identifier for the profile, typically the same as the SSID, but it can be customized in certain scenarios, such as when managing profiles via command line or scripts.
- Network Type: Specifies whether the network is for public or private use. This setting can affect firewall rules and sharing settings on your device.
- MAC Randomization Setting: Some profiles may contain information on whether MAC address randomization is used. This feature enhances privacy by using a random MAC address for each connection to a network.
By storing this information in profiles, Windows can manage wireless network connections efficiently, ensuring that the user can automatically reconnect to familiar networks without needing to enter the configuration details each time. This system simplifies the management of wireless networks, although it’s essential to manage these profiles and ensure they are up-to-date and secure.
This menu item will extract the profile information and save it in a text file in whatever directory you have this tool saved. If the tool is running on the desktop, then you will find the output of this menu item on your desktop. You can open the output and look through the profiles that contain the information described above. The WLAN password are saved as security keys. You can read more here: https://www.cellstream.com/2022/07/07/wifi-passwords-win/
21) Display Nearby Wi-Fi Networks
This menu item allows you to see any nearby Wi-Fi networks. When connected to Wi-Fi it will only show the network you are connected to as mine did in the example below:
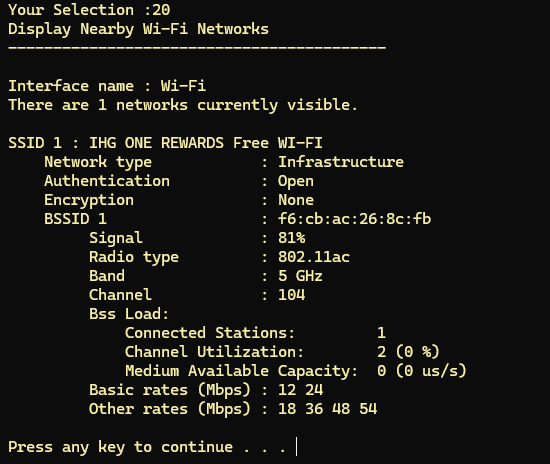
Disconnect from any Wi-Fi networks to get a much longer list!
Viewing nearby Wi-Fi networks in Windows can be beneficial for several reasons, ranging from practical connectivity considerations to more advanced network management and security tasks. Here are some key reasons why you might want to view the available Wi-Fi networks:
- Connecting to the Best Available Network: By viewing nearby Wi-Fi networks, you can identify and connect to the strongest and fastest network available, ensuring optimal internet speed and reliability. This is particularly useful in areas with multiple overlapping networks, such as offices, apartment buildings, or public spaces.
- Troubleshooting Connectivity Issues: If you’re experiencing problems with your Wi-Fi connection, viewing the available networks can help diagnose the issue. For example, if no networks appear, there might be a problem with your Wi-Fi adapter or driver. If your network appears with a weak signal, you might need to move closer to the router or troubleshoot potential interference issues.
- Network Management and Optimization: For network administrators or tech-savvy users, viewing available networks can provide insights into network congestion and channel usage. This information can be used to optimize your own network’s settings (such as changing the Wi-Fi channel) to minimize interference and improve performance.
- Security Assessment: Viewing nearby networks can also help identify unauthorized or rogue access points that may pose security risks. For instance, a network with a name similar to your own could be a malicious attempt to capture sensitive information (a tactic known as “Evil Twin”). Identifying such networks can prompt security measures to protect your data.
- Verifying Network Coverage and Range: By viewing available networks, you can assess the coverage area and signal strength of your Wi-Fi network throughout your home or workplace. This can help identify dead spots where a Wi-Fi extender or a mesh network system might be needed to ensure full coverage.
- Identifying Overlapping Networks: In densely populated areas, Wi-Fi interference from overlapping networks can significantly affect your network’s performance. Viewing nearby networks allows you to see how many other networks are operating on the same or adjacent channels, providing insight into potential sources of interference.
- Educational Purposes: For those learning about networking, viewing available Wi-Fi networks provides a practical way to understand how Wi-Fi works, including the visibility of SSIDs (Service Set Identifiers), signal strength indicators, security protocols used by different networks, and more.
- Configuring Connected Devices: When setting up smart home devices or other Wi-Fi-enabled gadgets, you might need to view available networks to ensure these devices connect to the correct network, especially if you operate multiple networks within the same area.
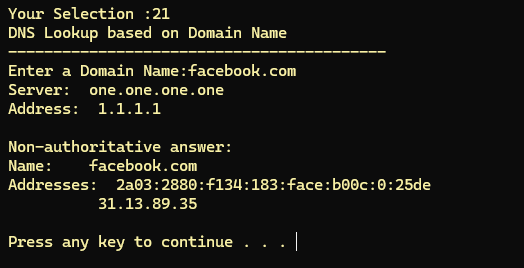
22) DNS Lookup – domain
This menu option performs a Domain Name Service lookup using a domain name such as “facebook.com”. Here a an example:
Why would you use this menu item?
1. Troubleshooting DNS Issues
- Diagnosing Resolution Problems: If you’re experiencing difficulties accessing websites or online services, this can help you determine whether the issue lies with DNS resolution.
- Checking DNS Records: You can use it to verify that DNS records are correctly set up and propagated, which is especially useful for website administrators and IT professionals.
2. Gathering Information About Domains
- Finding IP Addresses: this can quickly provide the IP address(es) associated with a domain name, useful for network configuration and troubleshooting.
- Querying Specific DNS Record Types: It allows you to query specific types of DNS records, such as MX (Mail Exchange) records, NS (Name Server) records, and TXT records. This capability is useful for verifying configurations for email, domain name delegation, and other DNS-based services.
3. Testing DNS Server Responses
- Comparing DNS Servers: By specifying a particular DNS server, you can compare how different DNS servers respond to the same query. This comparison can be useful in identifying misconfigurations or performance issues.
- Checking DNS Propagation: this can help check if a recent change to DNS records (like changing your website’s IP address) has propagated across the internet.
4. Learning and Education
- Understanding DNS: For students and professionals learning about network technologies, this provides a hands-on tool to explore how the Domain Name System works in practice.
5. Scripting and Automation
- Integrating into Scripts: Because this can be used from the command line, it can be easily integrated into scripts for automated tasks, such as monitoring the status of DNS records or automating the collection of network information.
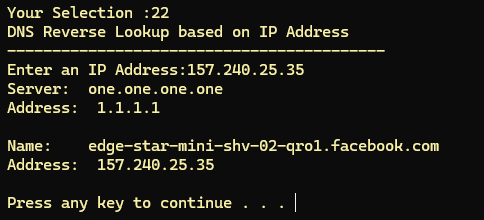
23) DNS Reverse Lookup – IP Address
A reverse DNS lookup is a process used to determine the domain name associated with an IP address. While a standard DNS lookup translates a domain name to an IP address (forward DNS lookup), a reverse DNS lookup does the opposite: it queries the DNS system to find the domain name associated with a specific IP address. This is particularly useful in various network diagnostic and administrative tasks, such as verifying where an IP address is assigned, ensuring network security, and troubleshooting.
This menu item will prompt you for the IP address you wish to look up:
The usage of this menu item include:
- Email Servers Verification: Reverse DNS lookups are used in anti-spam techniques. Many email servers perform a reverse DNS lookup on the IP address of an incoming email to verify that it matches the domain name claimed by the sender.
- Network Troubleshooting: Reverse DNS can help identify unknown IP addresses in logs, helping administrators understand who is accessing their systems.
- Security: Identifying the domain names associated with IP addresses can help in assessing potential security threats or unauthorized accesses.
Reverse DNS lookups rely on PTR (pointer) records in the DNS. Not all IP addresses have PTR records set up, so a reverse DNS lookup might not always return a domain name. Setting up and maintaining accurate PTR records is primarily the responsibility of the IP address block’s owner, typically an ISP or hosting provider.
24) Display the IPv4 Routing Table
This menu option is used to display the IPv4 routing table of the computer. This command is particularly useful for various networking diagnostics and configuration tasks. Here’s why you might use this menu option:
Understanding Network Routes
- Viewing Routing Table: The routing table contains information about the paths that data packets take from your computer to reach other networks or devices. It shows the network destinations, the gateways or interfaces data packets are sent through, and the metrics that determine the preferred paths.
Network Troubleshooting
- Identifying Route Issues: If you’re experiencing connectivity problems, this menu option can help you identify whether a route to a particular network or host is missing, incorrect, or suboptimal. For instance, if data packets are not being routed through the expected path, it might result in increased latency or connectivity issues.
Security Checks
- Detecting Unexpected Routes: Checking the routing table can also help you spot any unusual routes that could indicate a misconfiguration or a security breach, where an attacker might have altered the routes to intercept or redirect network traffic.
Networking Configuration Verification
- Confirming Route Additions: After adding static routes to direct traffic through specific gateways or interfaces, you can use this menu option to verify that the routes have been added correctly to the routing table.
Here is an example of the menu option output:
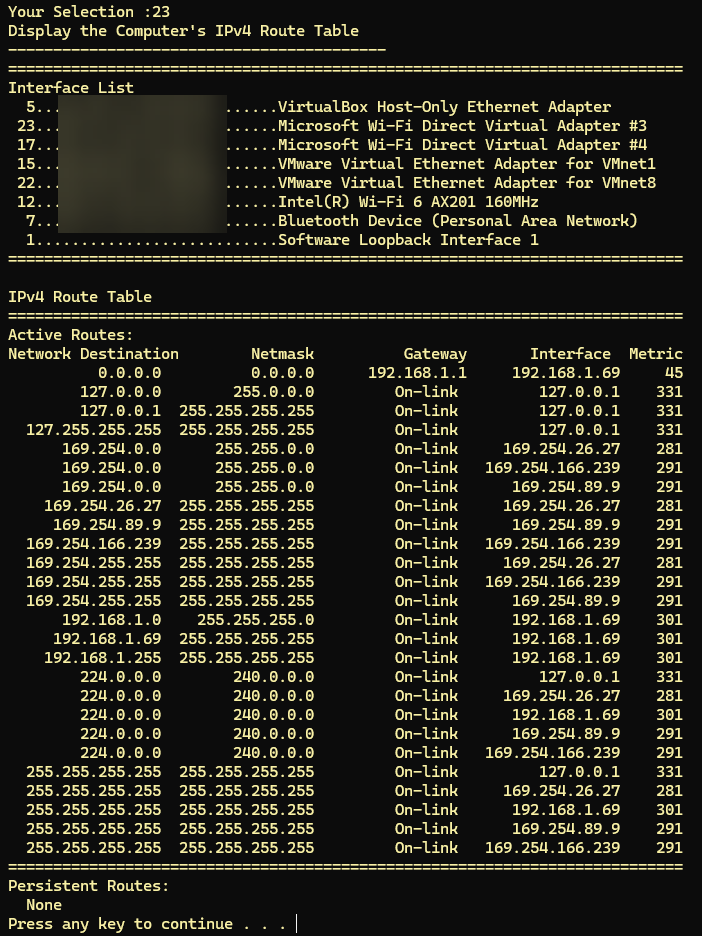
Note: MAC Addresses were deliberately blurred above for security purposes.
25) Display the IPv6 Routing Table
Similar to menu item 23, this item will display the IPv6 routing table of your Windows computer.
The output includes several critical pieces of information about each route, such as:
- Destination: The IPv6 address or network to which the route applies.
- Prefix Length: Indicative of the subnet mask in IPv6, specifying the portion of the address that represents the network segment.
- Next Hop: The address of the next hop router or gateway that packets should be forwarded to, on their path to the destination.
- Interface: Identifies the local network interface through which packets are sent to reach the next hop or destination.
- Metric: A value that represents the cost of using the route, with lower values being preferred over higher ones. This is crucial in determining the best route among multiple possible paths.
26) Display the IPv4 ARP Cache
This menu item displays the ARP cache. The ARP cache on your Windows PC is a table that the operating system uses to store the IP addresses and their corresponding MAC addresses on your local network. ARP, which stands for Address Resolution Protocol, is a protocol used for mapping an Internet Protocol address (IP address) to a physical machine address that is recognized in the local network.
When your computer needs to communicate with another device on the same local network, it looks up this ARP cache to find the physical address (MAC address) associated with the IP address it wants to communicate with. If the mapping is not found in the ARP cache, your computer will broadcast an ARP request to the local network to find out the MAC address of the device with the specific IP address.
The ARP cache is dynamic, meaning entries are added and sometimes removed over time. Entries in the ARP cache may expire after a certain time period, which can vary depending on the operating system’s configuration. This expiration mechanism prevents the ARP cache from becoming outdated, especially in environments where devices frequently change IP addresses or are only temporarily connected to the network.
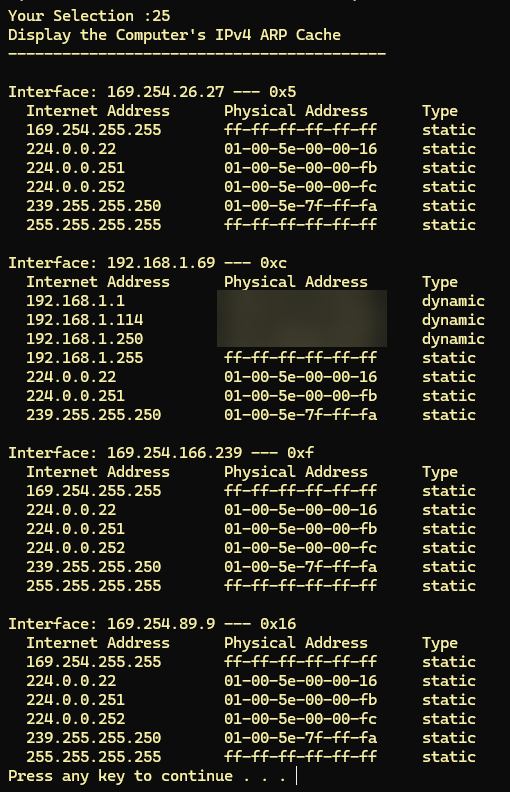
Some MAC addresses have been obscured above for security reasons.
The use of this is to see if you have communication to certain devices. To see all devices on the LAN, use menu item “p” first, to run a ping scan of the subnet. Then check this command again, looking for the “dynamic” entries – you can count how many devices exist on the LAN.
27) Delete the IPv4 ARP Cache
This item requires escalated privileges, meaning you have to run the tool as administrator to run this command. Assuming you have administrator privileges, this will clear your IPv4 ARP cache and immediately, your system will begin rebuilding the cache.
Clearing the IPv4 ARP (Address Resolution Protocol) cache on your computer can help resolve various network-related issues. Here are some reasons why you might want to do it:
- Resolve Network Connectivity Issues: Sometimes, the ARP cache may contain incorrect or outdated entries that can cause connectivity problems. Clearing the ARP cache ensures that the system can correctly map IP addresses to MAC addresses.
- Network Changes: If there have been changes in the network, such as new devices being added or old devices being removed, clearing the ARP cache can help the system recognize and communicate with these devices properly.
- Security: In some cases, malicious entities might poison the ARP cache with incorrect entries, leading to Man-in-the-Middle (MitM) attacks. Flushing the ARP cache can remove such malicious entries.
- Troubleshooting: As part of troubleshooting network issues, clearing the ARP cache can be a useful step to ensure that outdated or incorrect ARP entries are not causing problems.
- Performance: Over time, the ARP cache can become cluttered with unnecessary entries. Clearing it can help improve network performance by ensuring only relevant and up-to-date entries are used.
28) Display the IPv6 Neighbor Cache
The IPv6 Neighbor Cache on your Windows PC serves a similar purpose to the ARP cache used in IPv4, but it is used within IPv6 networks. The Neighbor Cache is part of the Neighbor Discovery Protocol (NDP), which is a component of the IPv6 protocol suite designed to perform several functions, including the discovery of other IPv6 nodes on the same link (local network), determining their link-layer addresses, finding routers, and maintaining reachability information about the paths to active neighbors.
The Neighbor Cache stores entries that map IPv6 addresses to their corresponding link-layer addresses (MAC addresses), just like the ARP cache does for IPv4. In addition to these mappings, the Neighbor Cache also stores the state of the neighbor unreachability detection algorithm, which keeps track of whether a neighbor is reachable, the path to the neighbor is being verified, or the neighbor is considered unreachable.
Each entry in the Neighbor Cache may include the following information:
- IPv6 address: The IPv6 address of the neighbor.
- MAC address: The link-layer address (MAC address) of the neighbor.
- Is Router: A flag indicating whether the neighbor is a router.
- State: The state of neighbor unreachability detection for this neighbor, such as “REACHABLE”, “STALE”, “DELAY”, “PROBE”, etc.
- Interface: The local network interface through which the neighbor is reachable.
Here is a snipped view of the output of this menu item:
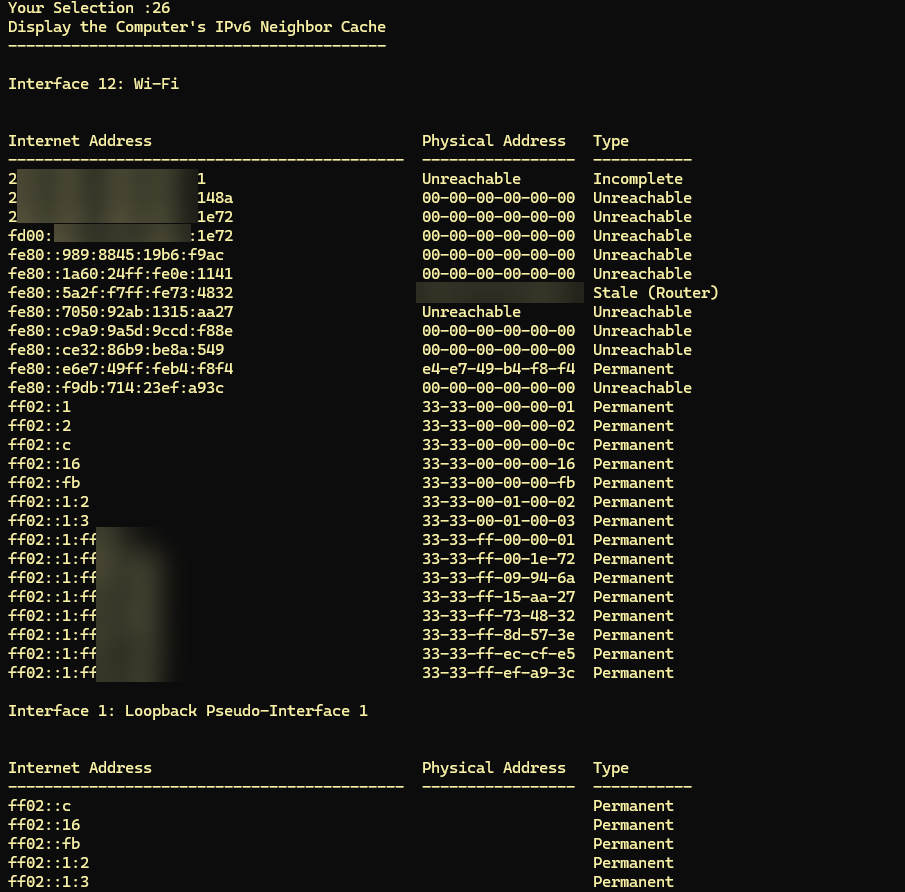
Once again, I have blurred some addressing information for security purposes.
29) Delete the IPv6 Neighbor Cache
This item requires escalated privileges, meaning you have to run the tool as administrator to run this command. Assuming you have administrator privileges, this will clear your IPv6 Neighbor cache and immediately, your system will begin rebuilding the cache.
Clearing the IPv6 Neighbor cache on your computer can help resolve various network-related issues. Here are some reasons why you might want to do it:
- Resolve Network Connectivity Issues: Sometimes, the Neighbor cache may contain incorrect or outdated entries that can cause connectivity problems. Clearing the Neighbor cache ensures that the system can correctly map IPv6 addresses to MAC addresses.
- Network Changes: If there have been changes in the network, such as new devices being added or old devices being removed, clearing the Neighbor cache can help the system recognize and communicate with these devices properly.
- Security: In some cases, malicious entities might poison the Neighbor cache with incorrect entries, leading to Man-in-the-Middle (MitM) attacks. Flushing the Neighbor cache can remove such malicious entries.
- Troubleshooting: As part of troubleshooting network issues, clearing the Neighbor cache can be a useful step to ensure that outdated or incorrect Neighbor entries are not causing problems.
- Performance: Over time, the Neighbor cache can become cluttered with unnecessary entries. Clearing it can help improve network performance by ensuring only relevant and up-to-date entries are used.
30) View Advanced IP Configuration
The ipconfig /allcompartments /all command is an advanced Windows networking diagnostic command that displays detailed TCP/IP configuration information for all network compartments configured on a computer. While the standard ipconfig /all command shows the configuration of normal network adapters, the /allcompartments switch expands the output to include additional networking contexts used internally by Windows. These compartments are commonly created by technologies such as VPN clients, Hyper-V virtual switches, Docker, Windows Subsystem for Linux (WSL), virtual machines, mobile hotspot features, and other advanced networking or security applications. The command displays information such as IPv4 and IPv6 addresses, subnet masks, gateways, DNS servers, DHCP status, MAC addresses, and interface details for every networking compartment on the system.
This command is especially useful for advanced troubleshooting and packet analysis because modern Windows systems often contain multiple hidden or virtual networking layers that can affect connectivity, routing, DNS resolution, or packet capture visibility. For example, a VPN tunnel, Hyper-V adapter, or virtual Ethernet switch may exist in a separate compartment and not be obvious when using standard networking commands. By viewing all compartments, network engineers and technicians can identify hidden interfaces, understand how traffic is being routed, diagnose conflicts between virtual and physical adapters, and troubleshoot issues involving virtualization, VPNs, Wi-Fi analysis, or complex Layer 3 routing behavior. It is an excellent command for broadband technicians, cybersecurity analysts, and Wireshark users working in modern multi-interface Windows environments.

31) Run the WLAN Report*
The Windows WLAN Report is a detailed wireless networking diagnostic report generated by the command netsh wlan show wlanreport. When executed, Windows creates an HTML-based report that provides a comprehensive history of Wi-Fi activity and wireless connection events on the computer over the previous several days. The report includes information about wireless adapters, driver versions, SSIDs, connection attempts, roaming events, authentication failures, disconnect reasons, signal conditions, and wireless session timelines. It also documents system-level Wi-Fi events such as adapter resets, driver problems, DHCP failures, and network transitions. The report is automatically saved as an HTML file, typically located at C:\ProgramData\Microsoft\Windows\WlanReport\wlan-report-latest.html, where it can be opened in any web browser for detailed analysis.
The WLAN Report is extremely valuable for troubleshooting intermittent Wi-Fi issues because it provides a visual timeline of wireless connectivity events and errors that are often difficult to identify with simple command-line tools. Network engineers, broadband technicians, and Wi-Fi support personnel can use the report to diagnose roaming problems, weak signal conditions, authentication failures, adapter instability, driver crashes, and repeated disconnect/reconnect behavior. It is particularly useful when troubleshooting complaints such as “Wi-Fi randomly disconnects,” “slow wireless performance,” or “can’t reconnect after sleep mode.” The report also helps correlate user-reported issues with actual wireless events recorded by Windows, making it an excellent companion tool for Wireshark captures, Wi-Fi spectrum analysis, and wireless infrastructure troubleshooting.
32) Display Active Network Connections
The netstat -ano command is a powerful Windows networking diagnostic tool used to display active network connections, listening ports, protocol statistics, and the Process ID (PID) associated with each connection. The command combines three important switches: -a displays all active connections and listening ports, -n shows IP addresses and port numbers numerically without attempting DNS name resolution, and -o displays the owning process ID for each network session. The output includes details such as the local IP address and port, remote destination address and port, connection state (such as LISTENING or ESTABLISHED), and the PID of the application responsible for the connection. This information allows administrators and technicians to identify exactly which applications or services are using specific network ports or communicating across the network.
The netstat -ano command is extremely valuable for network troubleshooting, cybersecurity investigations, and packet analysis because it provides real-time visibility into system network activity. Technicians can use it to identify unwanted or suspicious outbound connections, determine which application is listening on a particular port, troubleshoot port conflicts, or correlate active traffic with packet captures in Wireshark. It is especially useful when diagnosing malware activity, VoIP communication problems, browser sessions, VPN connections, or server application issues. By combining the PID information with commands such as tasklist or PowerShell’s Get-Process, users can quickly determine which executable owns a network session, making netstat -ano one of the most important command-line tools for Windows networking and security analysis.

33) Test the Current Network Connection
The PowerShell command powershell -NoProfile -ExecutionPolicy Bypass -Command "Test-NetConnection" is a modern Windows network diagnostic command used to test connectivity between a computer and a remote system or service. The command launches PowerShell without loading the user’s profile (-NoProfile) and temporarily bypasses local PowerShell script execution restrictions (-ExecutionPolicy Bypass) to ensure the command runs cleanly and consistently. The Test-NetConnection cmdlet itself performs a variety of network connectivity tests, including DNS resolution, ICMP ping tests, TCP port connectivity tests, routing information, and interface selection details. Unlike traditional tools such as ping or telnet, Test-NetConnection provides structured and detailed diagnostic information about whether a host or specific application port is reachable across the network.

This command is extremely valuable for troubleshooting modern Windows networking issues because it combines multiple network tests into a single tool and provides detailed Layer 3 and Layer 4 diagnostics. Network engineers and broadband technicians commonly use it to verify Internet access, test application ports such as HTTPS (443), DNS (53), SIP (5060), or RDP (3389), troubleshoot firewall filtering, confirm VPN connectivity, and validate routing behavior. For example, running Test-NetConnection google.com -Port 443 can confirm both DNS resolution and HTTPS port reachability in a single operation. The command is also highly useful when correlating connectivity issues with packet captures in Wireshark, because it helps verify whether traffic is successfully reaching a remote destination or being blocked somewhere along the network path.
34) Pathping to the Google DNS
A pathping test to Google Public DNS, such as pathping 8.8.8.8, is an advanced Windows network diagnostic command used to analyze the path and performance between a local computer and a remote destination on the Internet. The command combines the functionality of both tracert and ping by first identifying every Layer 3 router hop along the route to the destination and then performing packet loss and latency analysis at each hop. In this example, 8.8.8.8 represents Google Public DNS, one of the most commonly reachable and globally distributed Internet services. The output displays each router hop, round-trip timing information, and packet loss statistics, helping technicians identify where latency, congestion, or packet loss may be occurring within the network path.
A pathping test to Google DNS is especially valuable for broadband, Wi-Fi, and Internet troubleshooting because it helps isolate whether connectivity issues originate inside the local network, at the ISP, or somewhere deeper in the Internet path. Broadband technicians and network engineers frequently use this command to diagnose slow Internet performance, intermittent packet loss, poor VoIP quality, streaming problems, gaming latency, or unstable VPN connections. Because Google DNS is highly reliable and globally accessible, it serves as an excellent reference destination for testing Internet reachability and path quality. The command is also useful when correlating packet loss or routing behavior with captures in Wireshark, allowing analysts to compare observed packet retransmissions, latency spikes, or connection instability against the actual network path conditions revealed by pathping.

35) Pathping to an IP address of your choice
A pathping test to an IP address of your choice is an advanced Windows network diagnostic procedure used to analyze the network path, latency, and packet loss between a local computer and a specified destination system. The command works by first performing a route discovery process similar to tracert, identifying each Layer 3 router hop between the source and destination. After mapping the route, pathping sends multiple probe packets to every hop along the path and calculates packet loss and round-trip timing statistics. This allows technicians to determine not only whether a destination is reachable, but also where along the network path delays, congestion, or packet loss may be occurring. A typical command example would be pathping 192.168.1.1 for a local gateway or pathping 8.8.8.8 for a public Internet host.
This command is extremely valuable for troubleshooting broadband, enterprise, Wi-Fi, VPN, and Internet connectivity issues because it provides visibility into the quality of every segment of the network path. Network engineers and broadband technicians commonly use pathping to diagnose intermittent packet loss, high latency, VoIP call quality problems, gaming lag, streaming interruptions, routing instability, or ISP-related issues. By allowing the destination IP address to be chosen dynamically, technicians can test local devices, ISP gateways, cloud services, enterprise servers, or remote VPN endpoints depending on the troubleshooting scenario. The results can also be correlated with packet captures in Wireshark to compare observed retransmissions, jitter, or connection failures against the actual path conditions identified during the pathping analysis.
36) Display the Windows Defender Firewall Profiles
The netsh advfirewall show allprofiles command is a Windows security and networking diagnostic command used to display the configuration and operational status of all Windows Defender Firewall profiles on a system. Windows maintains separate firewall profiles for different network environments, including Domain, Private, and Public networks, each with its own security policies and filtering behavior. When executed, this command displays whether the firewall is enabled or disabled for each profile, the inbound and outbound traffic policies, notification settings, logging configuration, and remote management status. The command provides administrators and technicians with a centralized view of how the Windows firewall is configured across all active and inactive network profiles.
This command is extremely valuable for troubleshooting connectivity and security issues because many network communication problems are caused by firewall filtering or incorrect network profile classification. Broadband technicians, network engineers, and cybersecurity analysts frequently use it to determine whether inbound traffic is being blocked, whether outbound filtering policies are in place, or whether a device has mistakenly classified a trusted network as a Public network with stricter firewall rules. It is especially useful when diagnosing issues involving VoIP applications, remote desktop access, VPNs, Wi-Fi connectivity, file sharing, or application-specific communication failures. The command also complements packet-level analysis in Wireshark by helping determine whether missing or blocked traffic is the result of Windows firewall policies rather than network transport or routing problems.
w) Start the Wireshark Program
This menu item simply starts the Wireshark Packet Analyzer – assuming you have it installed on your system. If you do not have Wireshark installed you can find it at www.wireshark.org and you will likely need administrator privileges to install it. I put this menu item here for convenience.
p) Ping Scan a /24 Subnet
This tool helps you to see what systems exist on the LAN you are connected to. It essentially walks through all the addresses in a /24 subnetwork, pinging each address. The results are then saved in a file. Here is what you will see at the end of the process:
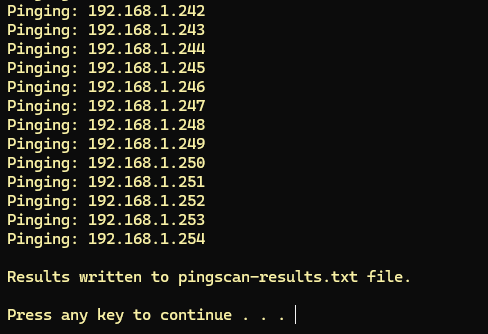
The file will be called pingscan-results.txt and it will be in whatever location the tool is in (i.e. your desktop).
If you then use the file explorer to navigate to that location, and open the pingscan-result.txt file, you will get something like the following:
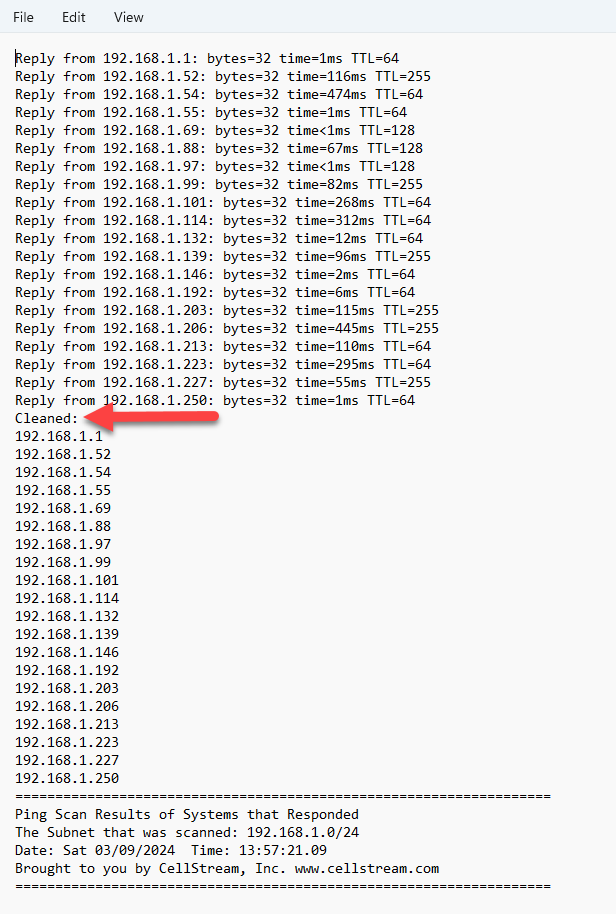
You will see what systems responded at the top. Then after the Cleaned note, you will see a simple list of the active IP addresses.
Ping scans, can be used to identify systems on a local network. However, whether they can identify all systems depends on various factors, including the configuration of the network and the individual systems themselves. Here’s a breakdown of the effectiveness and limitations:
Effectiveness:
- Simple and Fast: For smaller networks, ping scans can quickly provide a snapshot of which devices are online.
- Widely Supported: Almost all networked devices respond to ICMP requests by default, though this can be changed by network policies.
Limitations:
- Firewalls and Host Configurations: Many devices and firewalls are configured to block ICMP Echo Requests, making some systems invisible to ping scans.
- Dynamic IP Addresses: DHCP-assigned dynamic IP addresses can change, meaning a device that responds to a ping scan at one time might have a different IP address later.
- Network Segmentation: Devices on different VLANs or subnets might not be reachable via a ping scan from a different segment without proper routing.
For a more comprehensive scan or to deal with networks configured to block ICMP/ping requests, third-party network scanning tools like Nmap or Advanced IP Scanner can be used.
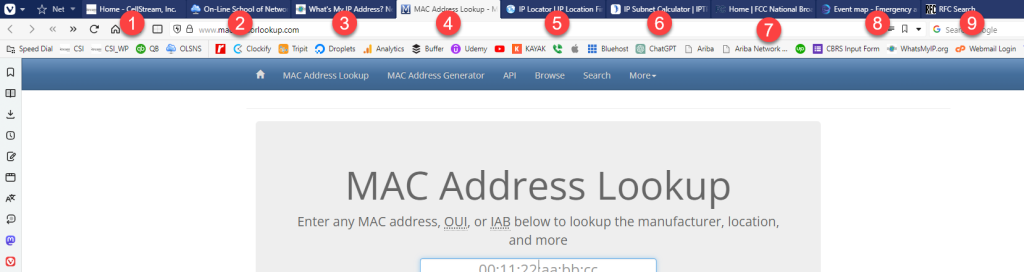
i) Launch Web Browser to key Sites
This is a convenience item! It launches the following tabs in your web browser:
- CellStream Main Web site
- The Online School of Network Sciences web site
- The What’s my IP address web site
- MAC Address lookup tool – I use this to try to determine manufacturer of the interfaces all the time
- The IP locator Web Site
- IPv4 and IPv6 Subnet Calculator
- The home page of the FCC
- The worldwide event map – just cool
- The RFC editor search page
Here is an example:
Last Word
Thank you for using our tool. We hope you find the tool and all this explanation helpful. Join our Patreon where we always have the latest development version. You can find it here.
Comments and technical discussion are always welcomed from registered users below, and you are also invited to continue the conversation with the community on our Discord server. If you would like to help support the continued development of independent networking, broadband, Wi-Fi, VoIP, and packet analysis content, please consider joining our Patreon community where you will gain access to exclusive technical resources, downloadable labs and PCAPs, bonus course content, troubleshooting guides, and additional member-only material. You can also support our work by simply buying us a coffee — every contribution helps us continue creating practical, real-world network science education for professionals and enthusiasts alike.