
One of the latest developments in compute and storage has been the NVM (Non-Volatile Memory) Express (aka NVMe) that has revolutionized SSD use and speed. NVM Express (NVMe) is also known as Non-Volatile Memory Host Controller Interface Specification (NVMHCIS) – it is an open, logical-device interface specification for accessing a computer’s non-volatile storage media usually attached via the PCI Express bus.
NVMe uses “capsules” to transport data to and from the SSD and these capsules contain data as well as various commands to perform transfers. Beware – the NVMe specifications are huge with the base spec being well over 400 pages.
A second part of this development of NVMe has been what is called NVMe-oF. This stands for NVMe over Fabric, which offers up a separate specification defining how to transport these NVMe capsules over TCP/IP and RDMA over Ethernet, even Fibre Channel.
We are not going to dive into what NVMe or NVMe-oF are specifically in this article. If you are like me, I was fascinated and I wanted to see what these capsules looked like on an Ethernet or on TCP/IP. So I went looking. The Wireshark capture files directory had some stuff, but it really was not up to the latest standards, so I even asked around. I posted in the Wireshark Discord server, I sent countless emails to people who had YouTube content or were listed in in specifications and white papers. After weeks, I received nothing.
Why? Well, I am sure that partly this has to do with the fact that the NVMe-oF is still relatively new and perhaps there is simply little information. The other factor could be that these packet captures contain disk I/O data that is probably not encrypted and folks are scared to share. Bottom Line: I needed to generate this traffic myself if possible and get past all these possible road blocks and excuses.
If you want to set up a lab to experiment with NVMe-oF, like I did, here is one option to do this: Create two Linux Virtual Machines (Ubuntu supports NVMe) and use one as an NVMe target and the other as a client on a host only network with static IP’s and see if we can get this to work. If so, then capture the traffic on the virtual interface and we are there.
Special note: capturing between VM’s is a horrendous rabbit hole. Please see my article on solving this issue here: https://www.cellstream.com/2018/08/29/wiresharinvboxvm/
Part 1 – Creating Two Ubuntu Server VMs
First you will need to download the .iso for Ubuntu server. I used 22.04.2 LTS. You can grab the latest version here: https://ubuntu.com/download/server
Once you have the download you will also need VirtualBox. You can grab that here: https://www.virtualbox.org/wiki/WikiStart
With VirtualBox, you will create two VM’s, both running the Ubuntu server iso you downloaded. I called one VM “nvmetargetnode” and the second “nvmeclientnode”.
Most of the installation process you will leave all the defaults with two exceptions:
Exception #1: Make sure you install OpenSSH servers on both VM’s – this is done during the OS installation process.
Exception #2: It is important that as you create the VM’s in the VirtualBox Manager, that you set up a second adapter on both as a Host-only Adapter in the VirtualBox Manager before you install the OS (go to Settings> Network> Adapter 2), and then during the installation of the OS that you specify this adapter to be static IPv4 as follows:
- nvmetargetnode: enp0s8 as IPv4, in the network 10.10.10.0/24 with a address of 10.10.10.2
- nvmeclientnode: enp0s8 as IPv4, in the network 10.10.10.0/24 with an address of 10.10.10.3
You can leave the first adapter as defaulted NAT.
Hopefully this network arrangement is separate from any others you may have in your lab environment. If not, then select a different addressing schema.
If you have done this correctly, you should be able to ping between the two VM’s when they have rebooted after installation.
Part 2 – Getting NVMe-oF Up and Working
Now that you have the two Ubuntu Server VM’s up and running with these second interfaces and can ping between the VM’s, we need to actually enable NVMe and add some NVMe disks. The work begins on the nvmetargetnode VM:
cd /etc/modules-load.d/
sudo nano modules.conf
Insert the following lines at the end of the modules.conf file:
nvmet
nvmet-tcp
Save the file and exit the nano editor.
Now back at the system prompt:
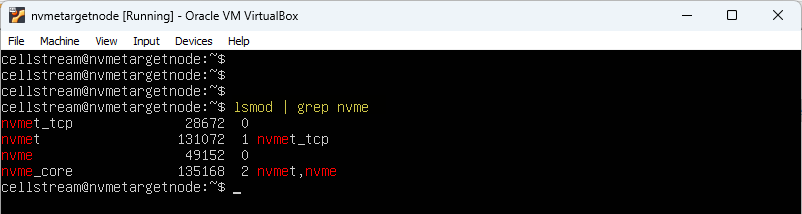
sudo modprobe nvmet
sudo modprobe nvmet-tcp
Check to see if the mods are running using the following command:
lsmod | grep nvme
Now switch to the nvmeclientnode VM:
cd /etc/modules-load.d/
sudo nano modules.conf
Insert the following lines at the end of the modules.conf file (note this is different that the prior in that the “t” is left off, so don’t be caught using copy and paste:
nvme
nvme-tcp
Save the file and exit the editor.
Now back at the system prompt:
sudo modprobe nvme
sudo modprobe nvme-tcp
Let’s check to see if the mods are running:
lsmod | grep nvme
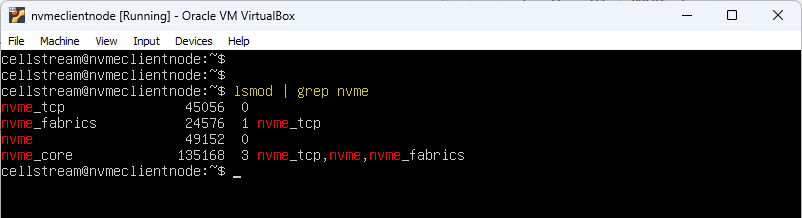
NVMe support has now been enabled on both VM’s.
Now go back to the nvmetargetnode and begin by shutting the system down:
sudo poweroff
With the nvmetargetnode VM powered off, select the VM in the Virtualbox Manager, select settings, then under storage, select the Add a controller button (lower left) and add an NVMe Controller. This was not present previously as an option.
Then under the NVMe controller create two additional virtual disks 25Gigs each.
Now power up the target and log in.
On the nvmetargetnode VM run the following command:
lsblk
You should see the two nvme disks listed: nvme0n1 and nvme0n2.
Now we need to make some folders on the nvmetargetnode.
sudo mkdir /sys/kernel/config/nvmet/subsystems/nvmetarget1
Now lets change to that directory we just created:
cd /sys/kernel/config/nvmet/subsystems/nvmetarget1
Let’s look at the contents:
ls
You should see some files that were automatically added.
Continuing, enter the following commands:
echo 1 | sudo tee -a attr_allow_any_host > /dev/null
sudo mkdir namespaces/1
cd namespaces/1
ls
Again, you should see files.
Continuing, enter the following commands:
echo -n /dev/nvme0n1 | sudo tee -a device_path > /dev/null
echo 1|sudo tee -a enable > /dev/null
sudo mkdir /sys/kernel/config/nvmet/ports/1
cd /sys/kernel/config/nvmet/ports/1
ls
Once again, you should see files.
Continuing, let’s verify the address you statically configured for the target:
ip a
Now issue the following commands to configure nvme with the address and TCP and the port number 4420:
echo 10.10.10.2 | sudo tee -a addr_traddr > /dev/null
echo tcp| sudo tee -a addr_trtype > /dev/null
echo 4420|sudo tee -a addr_trsvcid > /dev/null
echo ipv4| sudo tee -a addr_adrfam > /dev/null
Now let's link mount:
sudo ln -s /sys/kernel/config/nvmet/subsystems/nvmetarget1 /sys/kernel/config/nvmet/ports/1/subsystems/nvmetarget1
Let’s look at the message log:
sudo dmesg | grep "nvmet_tcp"
Everything is now set on the nvmetargetnode VM.
Let’s go back to the nvmeclientnode VM.
lsblk
There should be no NVMe devices.
Coninuing on the nvmeclientnode VM:
sudo apt install nvme-cli
At this point if you do not want to do a packet capture, then skip this next set of steps and jump down to the nvme discover command.
Packet Capture on the nvmecleintnode VM
If you want to do a packet capture, first power down the client node.
In the Virtualbox Manager, go to the clientnode settings, select Network, then under the Advanced drop down change promiscusous mode to “Allow all”. Select OK.
Then open a terminal/cmd window (Start> Run> CMD) on your Windows machine.
Enter the following commands (you may need to change the directory path of the second command to your home directory):
cd /Program Files/Oracle/Virtualbox
VBoxManage modifyvm "nvmeclientnode" --nictrace2 on --nictracefile2 /home/amwal/nvmetcpfile.pcap
Start the nvmeclientnode VM.
The NVMe Discover Command
Continuing on the nvmeclientnode VM:
sudo nvme discover -t tcp -a 10.10.10.2 -s 4420
sudo nvme connect -t tcp -n nvmetarget1 -a 10.10.10.2 -s 4420
lsblk
You should see the NVMe disk now present and available. Ofcourse, this needs to be formated:
sudo parted /dev/nvme0n1
mklabel gpt
mkpart
"xfs"
"0%"
"100%"
q
With the second disk, you change the 1 to 2 in the same commands, lather rinse and repeat, oh and change the port number from 4420 to 4421.
Do you want NVMe specific profiles for Wireshark? I have 2 options:
I hope this works for you.
If you would like to help support the continued development of independent networking, broadband, Wi-Fi, VoIP, and packet analysis content, please consider joining our Patreon community where you will gain access to exclusive technical resources, downloadable labs and PCAPs, bonus course content, troubleshooting guides, and additional member-only material. Comments and technical discussion are always welcomed at our Patreon community or on our Discord server. You can also support our work by simply buying us a coffee — every contribution helps us continue creating practical, real-world network science education for professionals and enthusiasts alike.