

If you work in broadband or networking and use a Windows laptop, you probably already have a pretty capable troubleshooting platform. Windows gives you tools such as ping, tracert, nslookup, PowerShell, SSH, and a growing collection of useful networking commands. Add Wireshark, Nmap, and a few other utilities and you can do quite a bit without ever leaving Windows.
Still, there are times when having Linux available is extremely useful.
That is where the Windows Subsystem for Linux, or WSL, comes in.
WSL allows you to run a Linux distribution such as Ubuntu directly on a Windows computer. You do not have to dual-boot the system, dedicate another computer to Linux, or maintain a traditional desktop virtual machine just to get access to Linux commands.
For someone working in broadband, that is a pretty useful addition to the toolbox.
Why Linux Matters in a Windows-Based Job
Even if your primary workstation is Windows, a surprising amount of the networking world runs on Linux.
Linux shows up in servers, firewalls, network appliances, cloud platforms, containers, embedded systems, monitoring platforms, Raspberry Pi devices, and many other places technicians and engineers encounter every day.
It also means that many troubleshooting examples you find in vendor documentation, support forums, and engineering discussions assume you have access to Linux tools.
Someone may tell you to run:
tcpdumpor:
ip addror:
digIf you only have Windows, you either need an equivalent tool or another machine. With WSL installed, you can simply open a Linux terminal on the same laptop you are already using.
I find that to be one of the best reasons to install it. You are not replacing Windows. You are adding another set of tools to it.
A Much Larger Networking Toolbox
Once Ubuntu or another Linux distribution is installed under WSL (see the installation instructions later in the post), you gain access to thousands of Linux packages through the normal package-management system.
A good basic networking toolkit might include (this is after you have WSL installed):
sudo apt install tcpdump dnsutils traceroute mtr-tiny iperf3 nmap curl wget openssl jq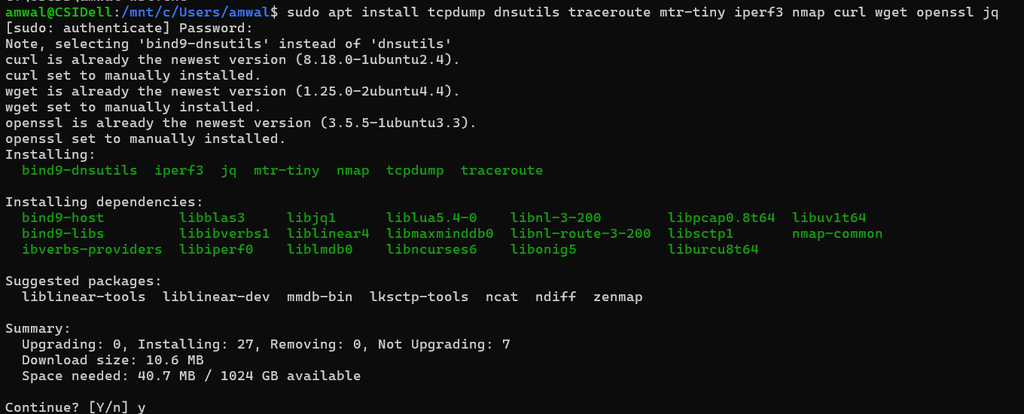
That one command gives you a substantial collection of networking and troubleshooting tools.
Some of them duplicate capabilities that already exist in Windows. That is not necessarily a bad thing.
Take DNS troubleshooting.
On Windows, you might use:
nslookupor PowerShell:
Resolve-DnsNameUnder WSL you can also use:
digFor example:
dig www.example.comor:
dig AAAA www.example.comor:
dig @8.8.8.8 www.example.comYou can learn more about ‘dig’ from this post.
Having more than one way to look at a problem is useful. It also gives technicians experience with commands they will see when working on Linux systems later.
tcpdump Is a Great Example
One of the tools that makes WSL particularly interesting to network people is tcpdump.
Install it with (this was in the command above):
sudo apt install tcpdumpThen you can list the interfaces available to tcpdump:
sudo tcpdump -D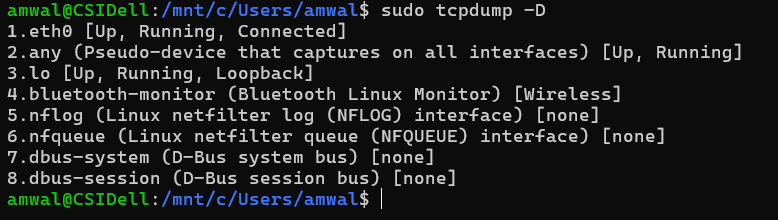
and perform a basic capture:
sudo tcpdump -i eth0 -nn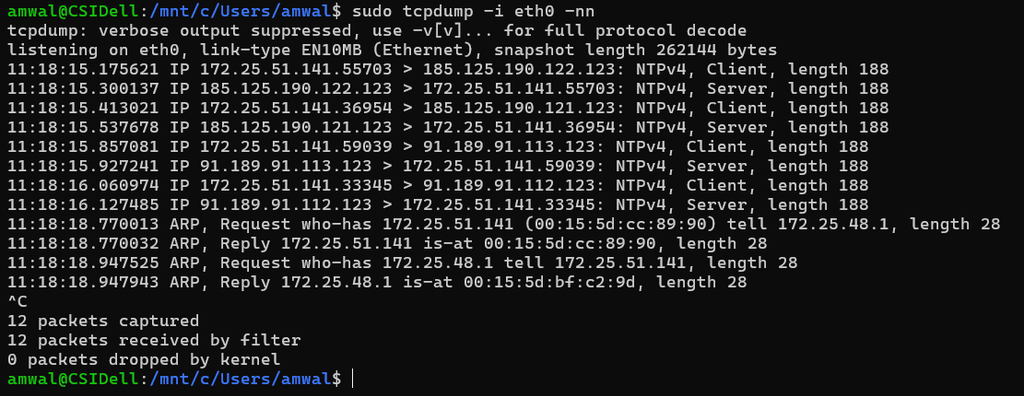
You can narrow the traffic to a particular host:
sudo tcpdump -i eth0 -nn host 192.168.1.100or save packets to a file:
sudo tcpdump -i eth0 -w capture.pcapThat capture can then be opened in Wireshark.
This is a workflow every network technician should understand:
Capture packets with tcpdump, save the PCAP, and perform deeper analysis with Wireshark.
There is an important qualification here, however. WSL 2 has its own networking environment. Capturing traffic on a WSL interface is not necessarily the same thing as capturing directly from the physical Ethernet or Wi-Fi adapter on the Windows host.
So I would not suggest replacing Wireshark and Npcap on Windows with tcpdump running under WSL.
Instead, WSL gives you a convenient way to learn tcpdump and use it in situations where the WSL networking architecture makes sense. It also prepares you for using tcpdump on Linux servers, routers, appliances, cloud systems, and remote hosts.
MTR Is Another Tool Worth Having
Another Linux utility I frequently find useful is mtr. This was installed by that single command earlier.
You can install it with:
sudo apt install mtr-tinyand then run:
mtr www.example.comMTR combines some of the functionality of ping and traceroute and continually measures the path toward a destination:
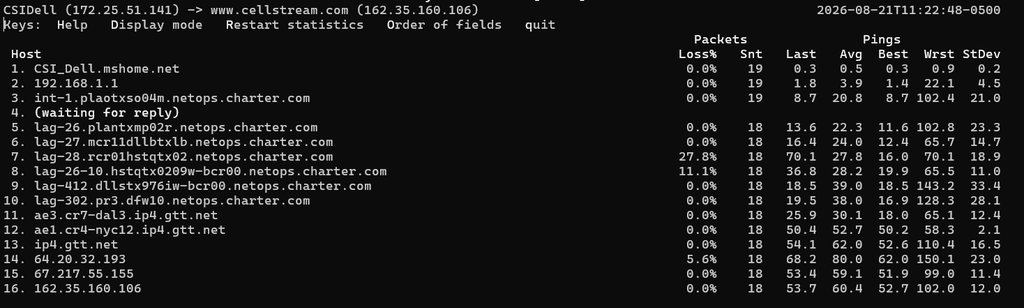
For a broadband technician investigating intermittent latency, packet loss, or routing problems, it can provide a useful view of what is happening along the path. I absolutely love this.
As always, traceroute-style results need to be interpreted correctly. A router that does not respond to a probe, or appears to show packet loss, may simply be deprioritizing ICMP responses. That does not automatically mean it is dropping customer traffic.
Still, MTR is an excellent addition to the troubleshooting toolbox.
WSL Is Also Useful for Performance Testing
Another good example is iperf3. This was also installed in that single tool install command ealier.
Install it:
sudo apt install iperf3One system can act as the server:
iperf3 -sand another system can connect to it:
iperf3 -c 192.168.1.100This can be extremely helpful when trying to separate an Internet problem from a local network problem.
For example, if two systems connected to the same LAN cannot achieve reasonable throughput with iPerf, there is little reason to begin by blaming the broadband connection.
You have already found evidence that the problem may be somewhere closer to home. I won’t dive any further on this here, but you can dive in with this post.
Linux Text Tools Are Surprisingly Valuable
WSL becomes even more useful when you start working with log files, configuration files, command output, and other text-based information. If you want to learn more about Linux in general, start here.
That said, Linux includes a collection of tools that have been used by network and system administrators for decades:
grep
awk
sed
sort
uniq
cut
head
tail
wc
At first glance, these may not seem like networking tools, but they quickly become part of a troubleshooting workflow.
Need to search a large log file for a particular address?
grep "192.168.1.10" logfile.txtWant to watch new entries appear in a log?
tail -f logfile.txtNeed to search an entire directory for the word timeout?
grep -R "timeout" .The real power starts to show up when several Linux commands are connected together with pipes. At that point, very large amounts of diagnostic information can be filtered and summarized quickly.
For technicians who routinely deal with logs, command output, or configuration files, learning these basic Linux tools is time well spent.
Windows and Linux Work Together Better Than You Might Expect
One of the nice things about WSL is that Windows and Linux are not completely isolated from each other.
Your Windows C: drive is normally available from Linux here:
/mnt/cSo, for example:
cd /mnt/c/Userstakes you into the Windows user directory from Linux.
You can also call Linux commands from PowerShell using wsl.
For example:
wsl grep "IPv6" logfile.txtThat means you can use a Windows application to collect information and then process the resulting file with Linux utilities if that happens to be the easiest way to solve the problem.
This ability to move back and forth between the two environments is one of the reasons I prefer WSL over maintaining a separate Linux laptop just for occasional troubleshooting.
Installing WSL
Microsoft has made the installation process much easier than it used to be.
On a current Windows 10 or Windows 11 system, open PowerShell or Windows Terminal as Administrator and enter (this installation will take several minutes, be patient):
wsl --install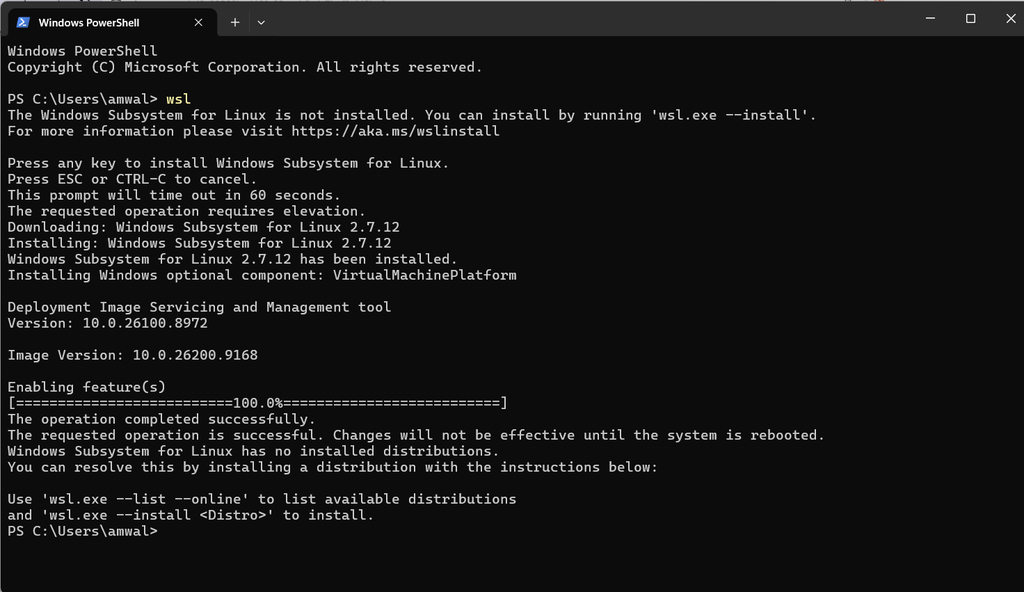
Windows will install the required WSL components and, by default, install Ubuntu. If this all worked you should be able to run WSL:

In my case I got an error:
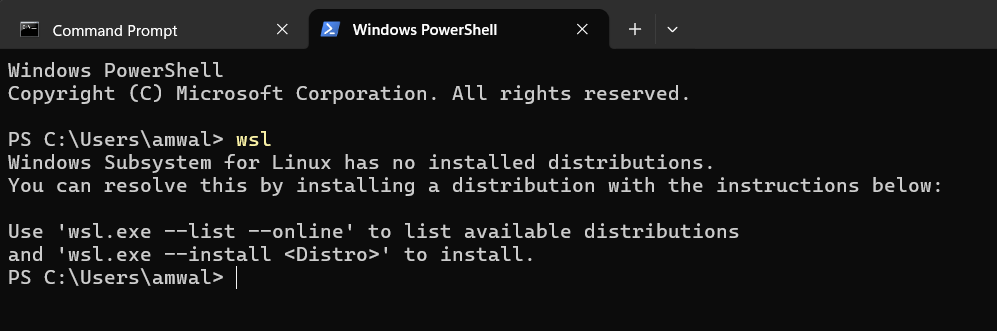
Once installed you will get the following screen which is not Linux, but rather a place you can learn about WSL and much more:
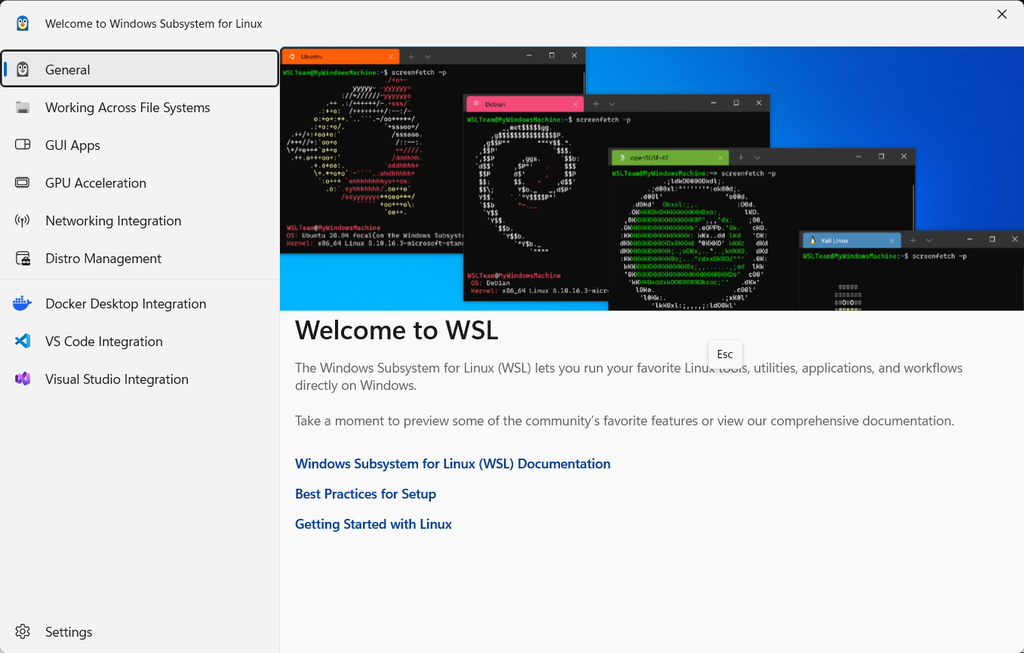
A reboot may be required.
After the reboot, launch Ubuntu. The first time it starts, you will be asked to create a Linux username and password.
wsl.exeYou should see something like this – the $ prompt is your WSL linux prompt:

To exit out of Linux, just type ‘exit’:

In my case, since I installed the distribution separately, I went through the following steps:
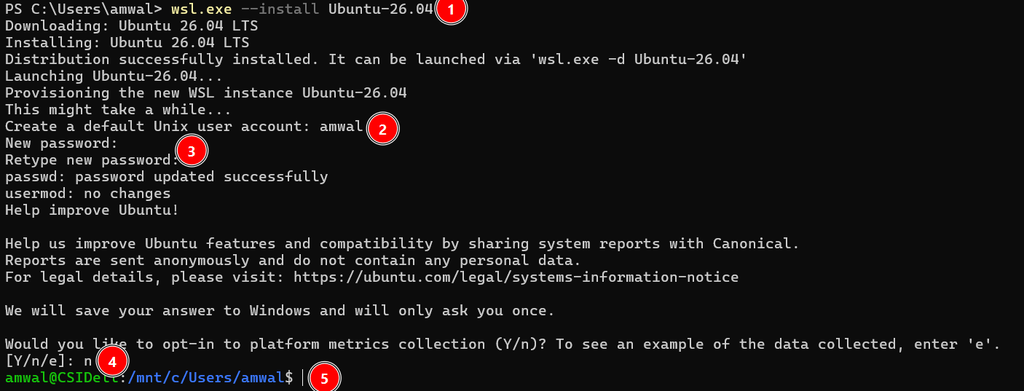
(1) I selected the distribution to install
(2) I was asked to create an account name (I selected the default)
(3) I created a passord – entered it twice
(4) I declined the metrics collection – it’s up to you what you want to do
(5) I ended at the $ prompt
Once you reach the Linux command prompt, I recommend starting with:
sudo apt update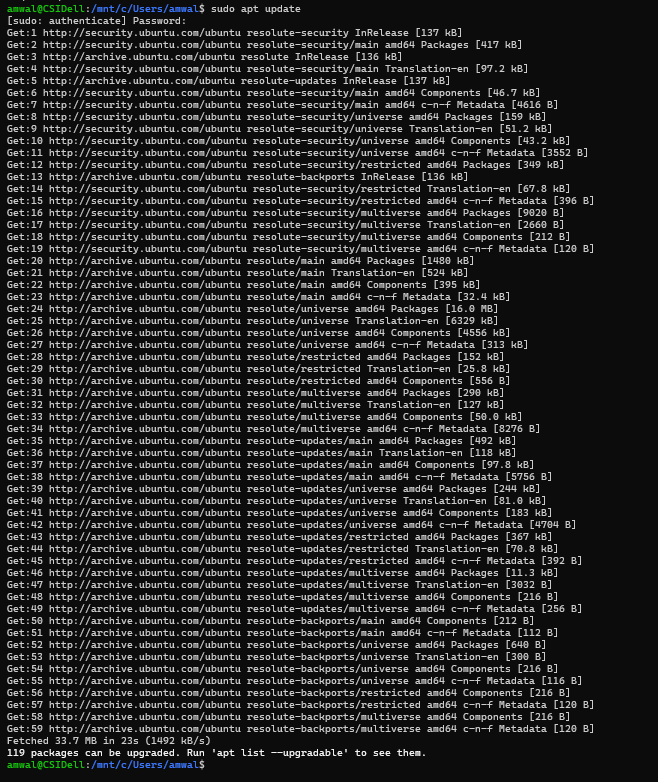
and then:
sudo apt upgradeA list of upgrades will be shown, and then you will be asked if you want to continue: select ‘y’ and then ENTER. The process will take several minutes. These two commands are how you keep the Linux distribution fully upgraded and up to date. In future you may choose to combine these commands as follows (I do this once a month or so):
sudo apt update && sudo apt upgrade -yBack in Windows (not from the Linux command line – so ‘exit’ first), you can check the installation with:
wsl --version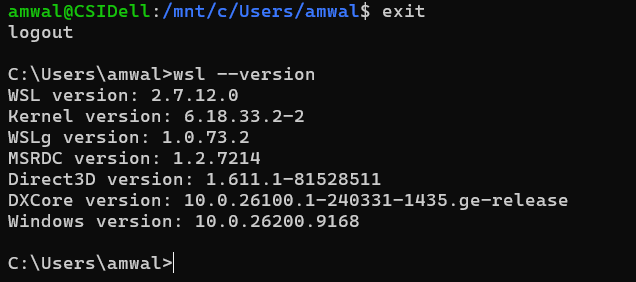
and see the installed Linux distributions with (so you can have more than one, but Ubuntu is usually all you need):
wsl --list --verboseIf you want to see other distributions that are available:
wsl --list --onlineUbuntu is a perfectly good choice for most broadband technicians and network engineers. There is usually no reason to make the first WSL installation more complicated than that.
WSL Does Have Some Limitations
WSL is useful, but it is important to understand what it is and what it is not.
WSL 2 uses virtualization and has its own networking architecture. Depending on the Windows and WSL configuration, the Linux environment may use NAT or newer mirrored networking capabilities.
That means some low-level networking behavior will not be identical to running Linux directly on a physical computer.
This matters especially when you start working with things such as:
- packet capture
- physical network adapters
- Wi-Fi interfaces
- wireless monitor mode
- multicast
- USB networking devices
- specialized hardware
If I need to capture packets directly from the Windows Wi-Fi interface, I am still reaching for Wireshark and Npcap.
Likewise, if I need true Linux access to a specialized wireless adapter in monitor mode, a physical Linux system or purpose-built virtual environment may still be the better choice.
WSL also gives you another operating environment to maintain. You have Linux packages to update, Linux permissions to understand, and another file system to become familiar with.
None of those are serious drawbacks, but technicians should understand that WSL is another tool rather than magic that makes Windows behave exactly like a native Linux machine.
Why I Think It Is Worth Installing
The strongest argument for WSL is not any single command.
It is the combination of Windows and Linux on the same workstation.
On Windows you may already have:
PowerShell
Wireshark
TShark
Dumpcap
Nmap
SSH
Windows networking tools
WSL adds another collection:
Bash
tcpdump
dig
mtr
iperf3
Linux networking commands
Linux scripting tools
Linux package management
More importantly, using WSL gives technicians regular exposure to Linux.
That matters because eventually you will encounter a Linux server, network appliance, cloud instance, container, embedded device, or troubleshooting procedure where commands such as ip, ss, dig, grep, and tcpdump are simply expected knowledge.
WSL gives you an easy place to start building those skills without giving up the Windows environment you already use every day.
For a broadband technician or network engineer carrying a Windows laptop, I think that makes WSL well worth having.
If you would like to help support the continued development of independent networking, broadband, Wi-Fi, VoIP, and packet analysis content, please consider joining our Patreon community where you will gain access to exclusive technical resources, downloadable labs and PCAPs, bonus course content, troubleshooting guides, and additional member-only material. Comments and technical discussion are always welcomed at our Patreon community or on our Discord server. You can also support our work by simply buying us a coffee — every contribution helps us continue creating practical, real-world network science education for professionals and enthusiasts alike.