


My recent blog post regarding Linux being the operating system of choice if you are supporting/testing/operating a network has spawned some great discussion. Emerging the discussion has come a request to write up a starting point list of commands for Linux beginners. I said “Sure, I can do that!” I thought it would be simple and quick. Then I started writing. The work below is a result of this effort.
I’ll start by asking readers to add what I have missed in the comments, and encourage others to look in the comments for things I have missed! Thank you all in advance.
If you are new to Linux, there are some basic commands and functions that you need to start practicing with right away. We do have a cheat sheet for Linux that goes much further than this article. You will find the cheat sheet here.
Whether you are running Linux as a virtual machine, on a Raspberry Pi (click here for the one I use, it is our Amazon Associate link and we get a small cut), a Tinkerboard (click here for the one I use, it is our Amazon Associate link and we get a small cut), or you have a native Linux install, get used to opening a terminal window, and get used to learning the basic commands.
Along the way I will likely explain a few operations you need to be aware of. I chose to write this with Debian Linux in mind (Ubuntu, Mint, etc.). I may add BSD later.
Another note before we get started, that almost every command below has a help output – this is seen with: command –help, for example ‘ls –help’ will output the help screen for the ls command. Also every command in Linux has a “manual”. Displaying the manual on a command is simple: ‘man ls’ will display the user manual on the ls command.
What Linux and Version Am I Running?
Simple answer, run any of the following commands:
cat /etc/os-release
hostnamectl
lsb_release -a
To display your Linux kernel version enter:
uname -r
Updating Software and Keeping the System Updated
I like to start here because this is very important. I have actually come to appreciate the software update process of Linux. So once every couple of weeks, I always do this process on my Linux boxes. Managing this update process is a simple process. Most applications you install from a repository on the Internet. So when you install applications, you also have to add then to the repository list. Then updating is a two step procedure:
- Update the repository version information
- Update the the installed packages, including the system itself
- Install any new packages/software always after steps 1 & 2
Another key point here is “sudo”. If you log in as the root user, you automatically have sudo priviledges. If not, some commands (especially ones that modify the system) will require sudo priviledges.
apt-get update
This command does the first part. It looks at all repositories in your list and grabs the latest version information. This information is stored in the following location: /etc/apt/sources.lst
sudo apt-get update
apt-get upgrade
Run this next, and it will use the updated information to install any needed packages. Be aware this can take some time. But if you do this bi-weekly, it usually is fairly fast. You will always be prompted to continue, so answer “Y” for yes.
sudo apt-get upgrade
You can combine both steps with:
sudo apt-get update && sudo apt-get upgrade
apt-get install {package name}
This command will install whatever packages you specify. The trick here is you need to know what the package name is (close does not count). Usually the simplest way to find this out is via a web search. For example, let’s say you wanted to install the nano text editor:
sudo apt-get install nano
apt-get remove {package name}
This command will uninstall whatever packages you specify. The trick here, as before, is you need to know what the package name is (close does not count). Usually the simplest way to find this out is via a web search. For example, let’s say you wanted to uninstall the nano text editor:
sudo apt-get remove nano
apt-cache search {package name}
This command will search for a package in the repository (package list) on your system. Let’s say I wanted to see what packages associated with Wireshark exists in my repository:
sudo apt-cache search wireshark
dpkg -l
This command will list all packages in the repository (package list) on your system (it usually does not require a sudo):
dpkg -l
We are off to a great start!
File System Management
I think this is the next very important set of commands that you need to learn. Managing files, directories and subdirectories is often much easier in a graphical File Manager. Everything in a Linux operating system is stored in a tree of directories and subdirectories. Navigating this tree is a very important skill.
tree
This command will display the directory structure as a tree. You may have to install this utility (sudo apt install tree). I urge you to do so. It is small and very helpfull.
tree
Here is an example of the output:

You can see that this is my user directory structure, but it is not the root system tree (it is huge). Each user has their own file space and directory tree. Let’s not go too crazy yet.
pwd
This little command simply tells you what directory you are in. Trust me, in a complex tree, this can be a life saver.
pwd
ls
Another way to look at what is in the current or specified directory is to use the command. By adding the -latr options you can see details:
ls !try using this: ls -latr
ls ./Downloads
ls ./Documents
cd <path>
This command is used to change your directory. Let’s say I want to change to my documents directory:
cd /Documents
mkdir <folder>
This command will create a new subdirectory in the current or specified directory.
mkdir newfolder
mkdir ./Documents/newfolder
cp <file> <destination>
This command copies a file or a directory to the destination. To copy all contents of a directory you need to add the -r parameter (recursive).
cp myfile.txt /Documents/
cp -r /Downloads /Documents
mv <source filename or dir> <destination filename or dir>
This command simply moves a file or a directory to the destination specified.
mv myfile.txt /Documents/
rm <file or dir>
This command removes/deletes the specified file or directory. If you are deleting a directory you need to add the -rf parameters (recursive and force).
rm myfile.txt
rm /Mydirectory -rf
find <partial or complete name>
This command will search the tree and attempt to locate any file or directory that matches the character string you provide. Wildcards can be used. There are lots of options here, so I encourage you to play and use the –help.
find *.png
find -iname mercedes
Examining and Editing Files
Most files that control how Linux operates are in configuration files. These are usually simple text (.txt) formated files. There are a number of commands that you can use to examine and edit these files. You have to be careful, of course. I always create backups of these types of files by saving the original with an extension like .old using the copy command discussed above. That way I can easily recover the file if I mess up.
cat <filename>
This simple command will display the contents of the file named to the screen.
cat myfile.txt
more <filename>
One of the problems with the cat command is that a large file will scroll on the screen. To display large files in a page by page format (the More…) will be displayed, use this command. Just hit enter or space bar to continue to the next page, or enter “q” to quit.
more myfile.txt
tail <filename>
Some files always have the most recent changes appended to the end of the file – think log files and the like. So instead of using either of the commands above we just want to look at the end of the file. That is what the tail command does. Optionally you can specify the number of lines to display with the -n parameter (see second example). To watch live updates to a log file you can use the -f parameter (see third example).
tail /var/log/syslog
tail -n10 /var/log/syslog
tail -f /var/log/syslog
head <filename>
This command is the opposite of tail, it simply displays the beginning of a file. It also has the -n parameter.
head /var/log/syslog
head -n10 /var/log/syslog
nano <file>
Nano is my favorite text editor for Linux. If you do not have it, install it. Old time Linux users probably would prefer VI. VI is more powerful and harder to learn for beginners. We have a cheat sheet on VI here. You can find nano help with the –help or the man command. The thing to know right of the bat with nano is that there is a key sequence to write and save your file: it is CTRL-O, Enter, CTRL-X.
nano myfile.txt
grep <characterstring> <file or location>
Get used to this one! Grep is a very powerful character string search tool. I urge you to look at the –help and the man pages on this tool. Let’s start with a simple example:
grep IPv4 /var/log/syslog
Did that output too much? OK, here is a trick: lets repeat the command “piping” the output to the ‘more’ command:
grep IPv4 /var/log/syslog | more
This introduces the concpt of piping processes from the command line.
Trust me, I have only scratched the surface here for the beginners.
Compressing/Decompressing Files with Tar
tar {options} <target filename> <source filename or directory>
The Tar command is used to compress (Zip) file(s). The options include:
-c: create an archive
-v: verbose ourput in the process
-f: filename of the archive to follow in the command
-z: compress files with gzip
-x: extracts contents of the specified file (see second example)
It is recommended that you experiment with this on simple files first, and look at the –help and man pages for details and more examples.
tar -cvfz myarchive.tar.gz /Documents/
tar -xvfz myarchive.tar.gz
Basic Network Configuration/Commands
By no means is this an extensive list. That was written some time ago and you can find it here.
Another note to make, is that over the past couple of years (actually since 2009), Linux has changed the nomenclature used for the network interfaces. For example your wired Ethernet interface used to be called ‘eth0’ or ‘eth1’. On newer distributions you will see that interface now called “enp3s0” or “enp3s1”. This is because the Linux kernel detects device hardware locations in terms of PCI bus number, slot number, and device number. I hope the following helps you decode the new nomenclature:
- Firmware-numbered interfaces embedded on the motherboard: en01, en02, … and em1, em2, …
- Firmware-numbered PCIe hotplug interfaces: ens1, ens2, …
- At PCI bus address 02:00.0: enp2s0
- A card plugged into PCIe slot #7: p7p1
ifconfig
When you issue this command you will see the network interfaces, with flags, MTU, address configuration (both IPv4 and IPv6), the MAC address, then some statistics (received and transmitted packets as well as associated errors). When you run this command you may see more interfaces including your wlan interface.
The equivalent command using ‘ip’ is the ‘ip addr show’ commands.
ifconfig
ip
ip addr show
ifup {interface} and ifdown {interface}
Usually requiring sudo priviledges, these commands will enable (ifup) of disable (ifdown) interfaces. Use these commands when wanting to reset your IP address, or when shutting off the Wi-Fi interface.
sudo ifdown wlan0
sudo ifup wlano0
sudo ifup eth0
ping {ip address}
This is the most common command used to verify connectivity to a device (assuming you know the other device IP address).
ping 192.168.1.1
Managing the System
history
This command allows you to recall a history of commands entered in the Linux command line. You can clear history with the -c parameter. You can also delete a specific history entry (using the history line number with the -d # parameter.
history
history -c
history -d 10
shutdown -h now
This command will shut down the system immediately.
sudo shutdown -h now
reboot
This command will initiate a reboot/restart of the system immediately
sudo reboot
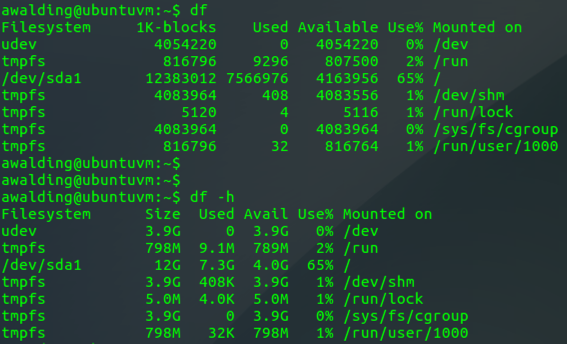
df
This command displays a partition list and diskspace used by each partition.
df
df -h
ps
This command will display all running processes/services on your system.
ps aux
Here is a truncated output example:
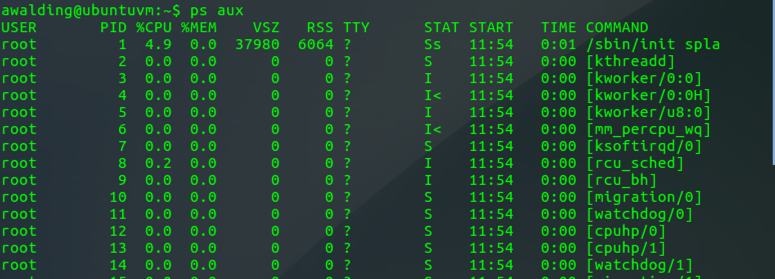
You will note that services are listed with a USER and PID, or process identifier.
You can also display services by user assuming you know the user name: ps -u {user}
kill {pid}
You can use the process identifier to kill any process:
kill 98765
To kill a process and related processes, use the -9 option:
kill -9 98765
To kill multiple instances of a running program you can use:
killall wireshark
service {servicename} {action}
As with most operating systems, there are multiple programs/services running at any given time. This is typical of background programs. You need to know the name of the service or program running. The actions sometimes depend on services.
To display what actions you can use on a given service:
service wireshark
Typical actions include start, stop, reload and restart. So let’s say tou wanted to stop a service:
service wireshark stop
I hope that was fun and got you off to a great start.
Hey Linux experts and newcommers alike, what would you add? I hope you find this article and its content helpful. Comments are welcomed below. If you would like to see more articles like this, please support us by clicking the patron link where you will receive free bonus access to courses and more, or simply buying us a cup of coffee!, and all comments are welcome!