

Originally published November 9, 2006 | Updated November 2026
Back in November 2006, I published a short troubleshooting tip suggesting that Windows XP users could improve startup performance by occasionally deleting the contents of the Windows Prefetch folder.
The thinking at the time was that Windows might accumulate information about too many applications, eventually slowing down the computer’s startup process.
It sounded reasonable, and it became a fairly common recommendation in Windows optimization discussions.
But after nearly twenty years of Windows development, we understand that this is not a good general-purpose troubleshooting technique.
In fact, routinely deleting Prefetch files can have the opposite effect.
Let’s examine what Windows Prefetch actually does, why deleting the files is generally unnecessary, and what we should investigate when a Windows 11 computer takes too long to start.
1. What Is the Windows Prefetch Folder?
Windows has used various performance optimization techniques for many years.
One of these is known as Prefetching.
The basic idea is fairly straightforward. When Windows starts an application, it may need to read numerous executable files, libraries, and other resources from storage. Rather than treating every application launch as a completely new event, Windows can collect information about the resources that applications access.
This information helps Windows optimize subsequent loading operations.
The Prefetch folder is normally located at:
C:\Windows\PrefetchYou can examine the folder by pressing Windows + R and entering:
%SystemRoot%\PrefetchThe folder commonly contains files with the .pf extension.
These are Prefetch trace files maintained by Windows. They are not ordinary user documents or simply leftover temporary files waiting to be deleted.
Windows uses this information as part of its performance optimization mechanisms.
The exact behavior and implementation have evolved considerably since Windows XP, and not every application or system configuration behaves identically.
2. Why Did People Recommend Deleting Prefetch Files?
In the original Windows XP era, the argument was that Prefetch data might accumulate over time. The assumption was that Windows would become increasingly busy loading information about applications that were no longer used. The proposed solution was to delete everything in the Prefetch folder and allow Windows to rebuild it.
This recommendation confused retained optimization information with active resource consumption.
A Prefetch file being present does not mean that Windows loads the associated application into memory at every startup. Nor does it mean that an old Prefetch entry is continuously consuming CPU resources.
Windows also manages its Prefetch information automatically.
Consequently, deleting the contents of the folder on a regular basis is not an effective general-purpose method for improving Windows 11 startup performance.
3. What Happens if You Delete Prefetch Files?
In a typical Windows installation, deleting ordinary Prefetch trace files does not permanently damage Windows. Windows can generally regenerate the information as applications are executed.
However, there are some consequences.
Applications may take longer to load initially because Windows no longer has the previously collected information available.
The operating system must rebuild that optimization data over time.
There is also usually very little storage space to recover compared with the capacity of modern SSDs.
In other words, you have removed information that Windows created to assist performance, potentially making some operations slower until the information is rebuilt.
This is why I no longer recommend clearing the Prefetch folder as a routine maintenance activity.
If a particular Prefetch-related problem has been identified through diagnostic evidence, specialized troubleshooting may be appropriate. But that is very different from deleting the folder’s contents simply because the computer feels slow.
4. What About Superfetch and SysMain?
Another Windows performance feature worth understanding is SysMain.
Older Windows users may recognize the name Superfetch, which was associated with technologies designed to improve application responsiveness by anticipating resource usage.
In modern Windows, the related service is known as SysMain.
SysMain is designed to improve system performance over time by managing aspects of application and memory usage. Its behavior depends on the Windows version, storage hardware, workload, and system configuration. Some Internet troubleshooting guides recommend disabling SysMain whenever a computer experiences high disk activity.
I would not do that as a first step.
High disk activity can be caused by Windows updates, antivirus scanning, paging, indexing, application activity, or storage problems. A busy disk does not automatically indicate that SysMain is malfunctioning.
Disabling a Windows performance service without understanding the underlying problem can produce unpredictable results and may reduce performance.
My recommendation is to leave SysMain at its default configuration unless diagnostic evidence identifies it as a contributor to a particular problem.
Microsoft discusses SysMain in its Windows configuration and performance documentation. Keep in mind that some of Microsoft’s guidance on adjusting SysMain applies to specialized virtual desktop environments, not necessarily ordinary Windows 11 computers.
5. First, Determine What Is Actually Slow
Before trying to improve Windows startup performance, we should define what we mean by a slow startup.
Are we talking about the time between pressing the power button and seeing the Windows sign-in screen?
Or does Windows reach the desktop quickly but then become unresponsive for another minute?
Perhaps the computer starts normally, but the first application takes a long time to open.
These are different symptoms.
A slow startup can involve firmware initialization, hardware detection, Windows boot processing, driver loading, user sign-in, or applications starting in the background.
Understanding where the delay occurs is much more valuable than indiscriminately deleting cached files.
Measure Startup Performance
One of the simplest places to start is Windows Task Manager.
Press Ctrl + Shift + Esc.
Select Startup apps.
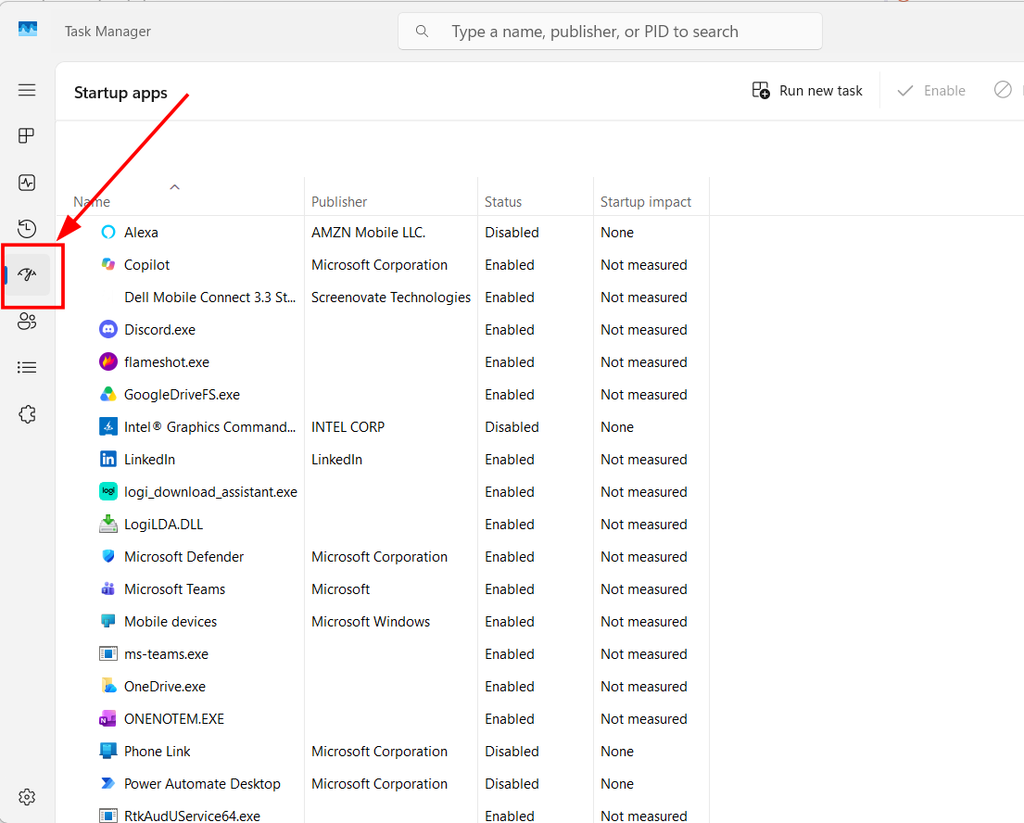
Here you can examine applications configured to start automatically when you sign in.
Depending on the Windows configuration, Task Manager can also display the startup impact of individual applications and the last BIOS time.
The last BIOS time, when available, reflects firmware initialization time rather than the complete Windows boot process.
That distinction matters.
A computer spending considerable time initializing hardware before Windows begins loading will not be fixed by removing startup applications.
6. Examine Windows Startup Applications
Startup applications are a common reason Windows appears to take a long time to become usable.
Many applications automatically launch background components when you sign in.
Cloud synchronization software, messaging applications, hardware utilities, update agents, and other applications may all compete for system resources.
Some of these processes are necessary. Others may be optional.
Open Task Manager and select Startup apps.
Examine the enabled applications and their reported startup impact. If you recognize an application that does not need to start automatically, consider disabling it. For example, an application you use once a month probably does not need to run every time you sign in.
However, be cautious about disabling security software, hardware management utilities, or components you do not recognize.
You can also manage many startup applications through:
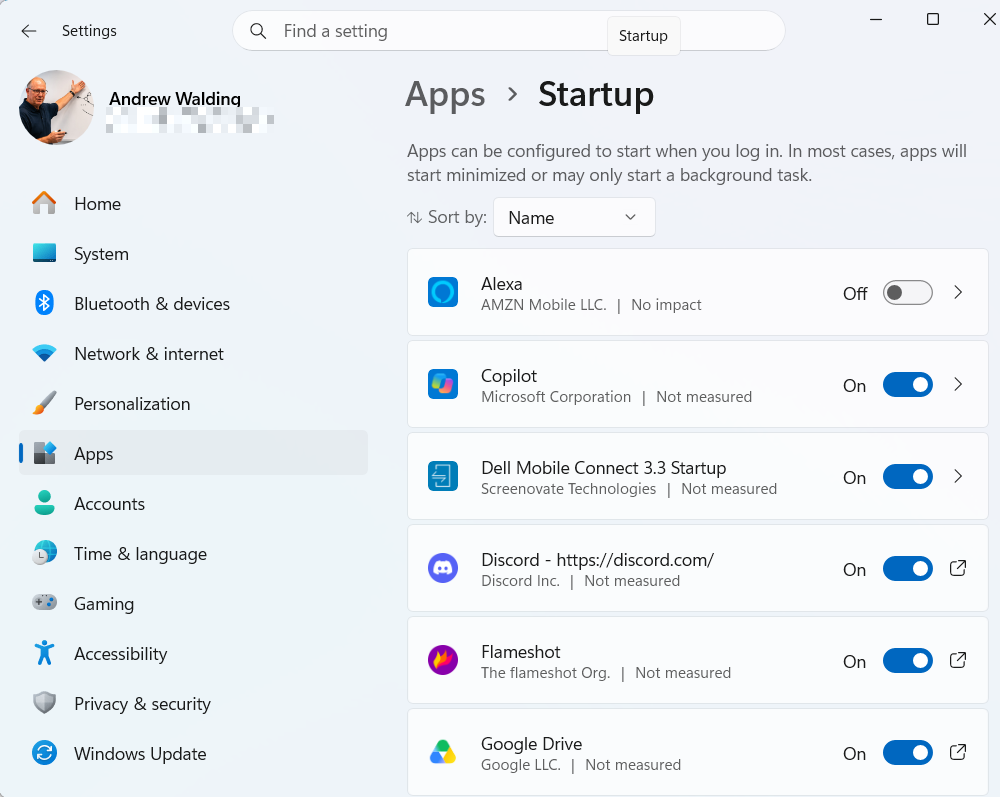
Settings > Apps > Startup
Microsoft explains these options in Configure Startup Applications in Windows.
I recommend making one or two changes, restarting the computer, and observing the results.
This approach gives us a much better understanding of what actually influences startup performance.
7. Check CPU, Memory, and Disk Activity
If Windows reaches the desktop quickly but remains unresponsive, examine resource usage.
Open Task Manager and select Processes.
Look at CPU, Memory, and Disk utilization.
Is one application consuming a large amount of CPU time?
Is memory usage extremely high?
Is disk activity remaining elevated long after Windows has started?
These observations may point toward background applications, insufficient memory, storage performance problems, or other resource bottlenecks.
Remember that utilization alone is not always enough to explain a problem. A computer can report high disk utilization while transferring relatively little data if the storage device is experiencing long response times. Similarly, high CPU utilization may be entirely normal while Windows performs an update or another demanding task.
For more detailed information, Windows includes Resource Monitor.
Press Windows + R and enter:
resmonResource Monitor can provide additional visibility into disk activity, CPU usage, memory, and network activity.
This is considerably more useful than deleting Prefetch files without evidence of a problem.
8. Use Windows Reliability Monitor
Another Windows utility I frequently recommend is Reliability Monitor.
Press Windows + R and enter:
perfmon /relReliability Monitor provides a historical view of system stability, application failures, and other significant events.
If your computer suddenly began taking much longer to start, consider whether the change coincided with a software installation, driver update, Windows update, or recurring application failure.
Reliability Monitor may help identify an event worth investigating.
It does not directly measure every phase of the boot process, but it can provide useful context when startup problems are accompanied by system instability.
9. Examine Windows Boot Performance Events
For a more advanced investigation, Windows maintains diagnostic information associated with system startup.
Open Event Viewer:
eventvwr.mscThen navigate to:
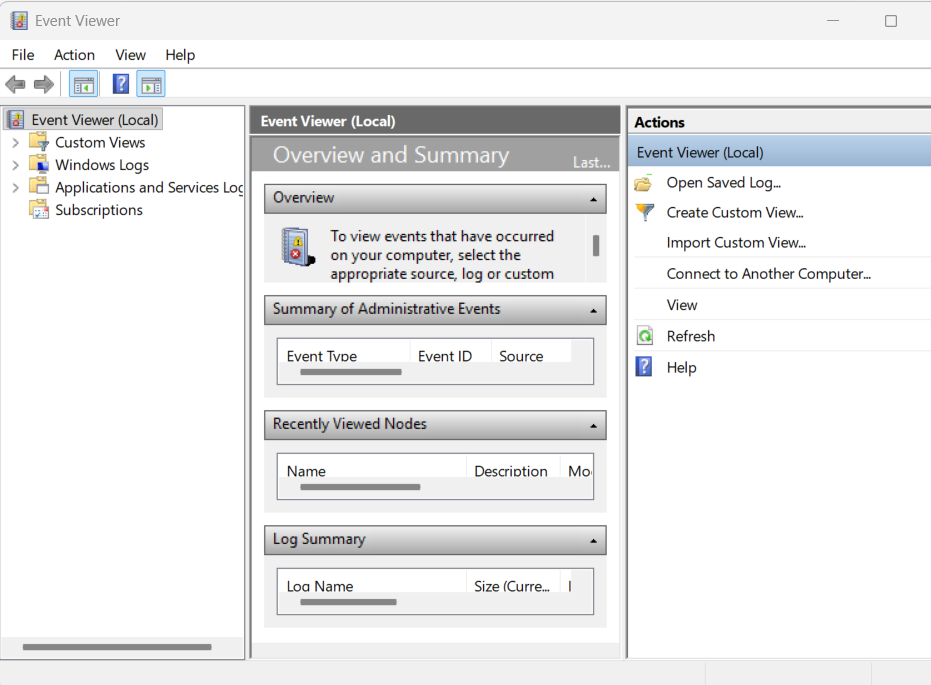
Applications and Services Logs > Microsoft > Windows > Diagnostics-Performance > Operational
On systems where this log is available and enabled, Event ID 100 can contain information about Windows boot performance.
For example, you may see information about total boot duration and other timing measurements.
Related diagnostic events may identify services, drivers, or applications contributing to unusually long startup times.
However, these measurements require careful interpretation. A reported Windows boot duration is not necessarily identical to the time measured with a stopwatch from pressing the power button until the computer becomes usable. Firmware initialization, Fast Startup, user sign-in behavior, and background application activity can affect what you observe.
The value of these logs is that they can help identify where time is being spent.
For a deeper analysis, Microsoft also provides the Windows Performance Toolkit, including Windows Performance Recorder and Windows Performance Analyzer.
These tools are intended for more advanced performance investigations and can be useful when ordinary Windows diagnostics do not explain a recurring problem.
10. Understand the Difference Between Restart and Shutdown
Windows 11 includes a feature called Fast Startup.
When enabled, Fast Startup can reduce startup time after a shutdown by preserving certain system state information rather than performing a completely traditional cold startup.
This behavior is different from restarting Windows. A normal Restart performs a more complete Windows startup cycle and is often preferable when troubleshooting drivers, updates, or other system problems. This distinction is particularly important when comparing boot times.
For example, measuring startup performance after selecting Shut down may not produce the same results as measuring the time following Restart.
For troubleshooting, I recommend recording which method you used and comparing results under consistent conditions.
Do not assume that a quick shutdown followed by power-on represents the same boot process as a full restart.
11. Check Storage Health and Available Disk Space
Modern computers commonly use SSDs rather than traditional mechanical hard drives. SSDs have significantly improved storage performance, including Windows startup and application loading. However, storage problems can still contribute to slow performance.
Begin by checking available space:
Settings > System > Storage
Windows includes Storage Sense and cleanup recommendations for managing unnecessary files. If available storage is critically low, freeing space may improve overall system behavior.
Microsoft provides additional recommendations in Tips to Improve PC Performance in Windows.
For general storage maintenance, use the Windows Optimize Drives utility rather than attempting manual optimization of system folders.
Windows handles HDD and SSD optimization differently, including appropriate operations such as defragmentation for hard drives and retrim for SSDs.
If you suspect storage failure, investigate the device’s health before performing additional maintenance.
Repeatedly stressing a failing drive can make recovery more difficult.
12. What About Device Drivers?
A defective or incompatible driver can also contribute to slow startup, repeated crashes, or delayed hardware initialization.
However, an old driver is not automatically defective. Start with Device Manager and look for hardware reporting problems. Review any driver or device-related failures recorded around the time startup performance deteriorated.
If a problem began following a driver update, consider whether rolling back the driver is appropriate.
I recently updated two related CellStream articles that explore these issues:
These articles explain how to inspect hardware drivers, use Device Manager, and examine driver packages with PnPUtil.
Remember that removing unused device entries is not a general-purpose Windows performance optimization technique either.
Investigate whether a driver is actually contributing to the problem before changing it.
13. Try Microsoft Sysinternals Tools
For those who want to investigate Windows startup activity more deeply, Microsoft offers several free utilities through its Sysinternals collection.
One particularly useful utility is Autoruns. Microsoft Autoruns displays a wide range of applications and components configured to start automatically. It provides considerably more information than the Startup apps section of Task Manager.
However, that additional detail comes with additional responsibility. Autoruns can display services, drivers, scheduled tasks, browser components, and other system startup entries. Disabling the wrong component can affect Windows operation.
I recommend beginning by examining the information rather than making immediate changes.
Another useful utility is Process Explorer, which provides more detailed information about running processes and their relationships.
These tools can help identify the actual source of a slowdown rather than relying on assumptions.
14. A Practical Windows Startup Troubleshooting Workflow
When investigating slow Windows startup performance, I recommend the following process:
- Define the delay. Does it occur before Windows loads, during startup, or after signing in?
- Measure the problem. Record approximate startup times and distinguish Restart from Shut down.
- Check startup applications. Use Task Manager to identify applications configured to launch automatically.
- Monitor resource utilization. Examine CPU, memory, disk activity, and background processes.
- Review system history. Use Reliability Monitor and Event Viewer to look for relevant events.
- Check storage and hardware. Verify available space and investigate potential hardware failures.
- Examine drivers and services. Look for evidence of startup delays associated with particular components.
- Make controlled changes. Disable or modify one item at a time.
- Restart and compare. Determine whether the change actually improved startup performance.
- Document the results. Keep track of what you changed and what you observed.
The goal is to identify the cause of the slowdown, not simply perform a collection of cleanup operations.
Final Thoughts
When I originally published this article in 2006, clearing the Windows Prefetch folder was a commonly suggested technique for improving startup performance.
Today, I would not recommend it.
Windows manages Prefetch information automatically, and removing those files generally provides no meaningful performance advantage. In some cases, it can temporarily make application loading slower while the information is regenerated.
If a Windows 11 computer is taking too long to start, there are much better places to investigate.
Task Manager, Reliability Monitor, Resource Monitor, Event Viewer, and Microsoft Sysinternals utilities provide useful information about what the computer is actually doing.
And that brings us back to one of my favorite troubleshooting principles.
If you do not know what is causing the problem, randomly deleting files or disabling services is not a troubleshooting strategy.
Collect evidence, identify the cause, make a controlled change, and verify the result.
For additional PC and network troubleshooting information, see my PC and Network Troubleshooting: Practical Tips and Tools article.
If you would like to help support the continued development of independent networking, broadband, Wi-Fi, VoIP, and packet analysis content, please consider joining our Patreon community where you will gain access to exclusive technical resources, downloadable labs and PCAPs, bonus course content, troubleshooting guides, and additional member-only material. Comments and technical discussion are always welcomed at our Patreon community or on our Discord server. You can also support our work by simply buying us a coffee — every contribution helps us continue creating practical, real-world network science education for professionals and enthusiasts alike.