

Originally published November 9, 2006 | Updated November 2026
Back in 2006, I wrote a short article explaining how to locate and remove unused device drivers in Windows. The original technique involved setting a Windows environment variable, opening Device Manager, displaying hidden devices, and uninstalling devices that were no longer present. At the time, this was a useful way to examine older hardware configurations. However, Windows has changed considerably since then, and some of the assumptions in that original article are no longer correct.
For example, an installed device driver does not necessarily load every time Windows starts. Likewise, a device that appears faded in Device Manager is not necessarily wasting system resources.
So, is there still a reason to remove unused device drivers? Absolutely. But we need to understand what we are removing and why.
Let’s examine how Windows 11 manages devices and driver packages, and how to safely identify and remove components that are no longer needed.
1. Understanding Devices, Drivers, and Driver Packages
Before removing anything, it helps to understand three important concepts.
A device is a physical or virtual component recognized by Windows. Examples include Ethernet adapters, Wi-Fi adapters, USB devices, printers, storage controllers, and virtual network interfaces.
A driver package contains the software and installation information Windows uses to support a particular device. These packages are typically installed and maintained in the Windows Driver Store.
A loaded driver is driver code that Windows has loaded into memory to provide a particular function.
These three things are related, but they are not interchangeable.
For example, you may have connected a USB Ethernet adapter to your laptop several months ago. Windows installed the appropriate driver package and configured the device. You later disconnected the adapter. Windows may retain information about the device and its driver package, allowing the adapter to work again if you reconnect it. That does not mean Windows is continually loading that device’s driver into memory or consuming significant CPU resources because the adapter is absent.
This is an important distinction.
Removing unused drivers should generally be considered a driver management or troubleshooting activity, not a routine performance optimization technique.
For more background on diagnosing driver problems, see my companion article, Troubleshooting Windows Device Drivers.
2. What Are Non-Present Devices?
Windows keeps track of devices it has detected and configured. Some devices remain connected all the time, such as an internal graphics controller or Ethernet adapter. Others may be connected temporarily, such as USB drives, docking stations, printers, and external network adapters.
When a device is disconnected, Windows may retain its configuration.
Such devices are often referred to as non-present devices, sometimes called phantom devices.
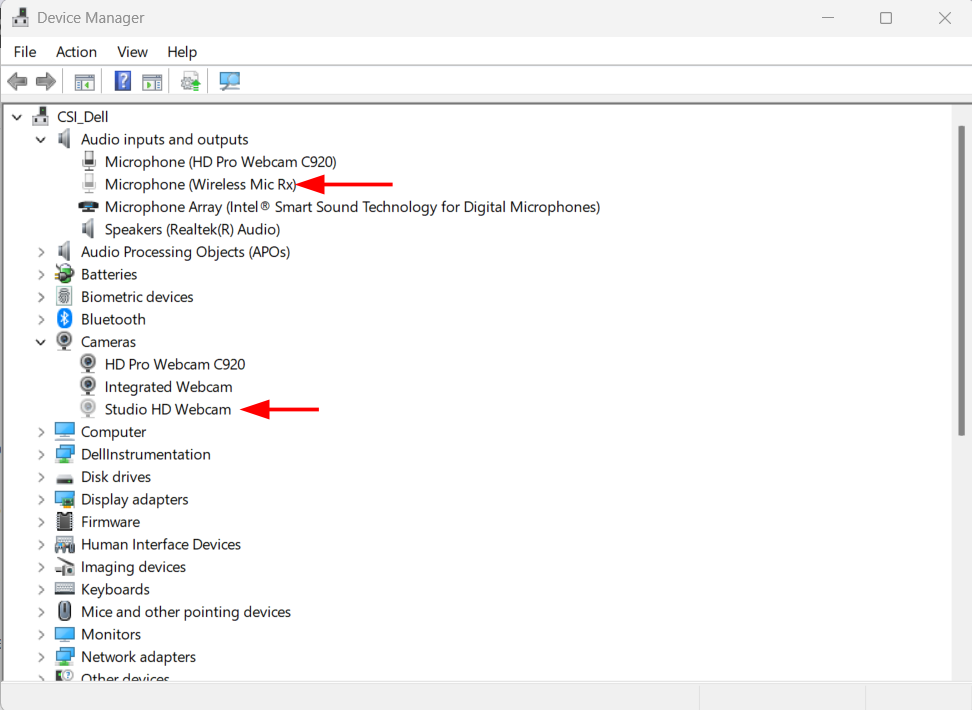
In Device Manager, certain non-present devices appear with faded or semi-transparent icons when hidden devices are displayed. This does not necessarily mean the device has a problem or that its driver is wasting resources. It simply indicates that Windows retains information about a device that is not currently present.
Microsoft explains this behavior in its Viewing Hidden Devices documentation.
There are legitimate reasons for retaining these entries. If you reconnect the hardware, Windows may be able to restore the device’s configuration without requiring a completely new installation.
3. Displaying Hidden Devices in Windows 11
Let’s begin with the updated version of the original procedure.
In Windows 11:
- Press Windows + X and select Device Manager.
- Alternatively, press Windows + R and enter
devmgmt.msc. - In Device Manager, select View > Show hidden devices.
- Expand the various device categories.
- Look for devices displayed with faded icons.
Depending on your system, you may find entries associated with previously connected USB devices, older network adapters, printers, Bluetooth devices, or virtual hardware.
What Happened to the Environment Variable?
In the original 2006 article, I instructed readers to create a Windows environment variable:
DEVMGR_SHOW_NONPRESENT_DEVICES=1
This was necessary on certain older versions of Windows to display non-present devices.
That procedure is no longer required in Windows 11.
Microsoft explains that the additional environment variable was required before Windows 8. Today, the Device Manager option to show hidden devices is sufficient.
There is no reason to add the old environment variable when following this procedure on Windows 11.
4. Should You Remove Every Faded Device?
No, and this is probably the most important point in this article. A faded device icon does not mean the device is defective, unnecessary, or consuming excessive system resources. You may see non-present devices associated with USB storage, external displays, Bluetooth accessories, docking stations, and other hardware that you intend to use again.
Removing those device entries can cause Windows to rediscover and reconfigure the hardware the next time it is connected. This is usually not catastrophic, but it can introduce unnecessary work and occasionally lead to configuration changes.
I generally recommend leaving non-present devices alone unless you have a specific reason to remove them.
There are exceptions. For example, a previously installed network adapter may retain configuration information that interferes with assigning a static IP address to a replacement adapter. Or perhaps you are troubleshooting an application that continues to reference a retired USB or serial device.
In those cases, removing the obsolete device entry may be appropriate.
The key is to have an identifiable problem or maintenance objective rather than removing devices simply because their icons are faded.
5. Safely Uninstalling a Device in Device Manager
If you have identified a device that is no longer needed, Windows provides a supported method for uninstalling it.
First, verify that you have selected the correct device.
For removable hardware, disconnect it before beginning the uninstall process.
Then:
- Open Device Manager.
- Select View > Show hidden devices.
- Expand the appropriate device category.
- Right-click the device you want to remove.
- Select Uninstall device.
- Review the confirmation dialog before proceeding.
Depending on the device and Windows configuration, you may see an additional option to attempt to remove the driver package from the system.
Do not automatically select this option.
Uninstalling a device entry and removing its driver package are different operations.
If the driver package is shared by other devices, removing it may affect their operation.
If your objective is simply to remove an old device configuration, uninstalling the device entry may be sufficient.
Microsoft provides additional guidance in Using Device Manager to Uninstall Devices and Driver Packages.
6. Understanding the Windows Driver Store
Windows maintains a collection of driver packages known as the Driver Store. When Windows installs a driver package, the package is staged in this managed location so that Windows can use it to install or configure compatible devices.
The Driver Store is located under:
C:\Windows\System32\DriverStoreOne important subdirectory is FileRepository, which contains staged driver package files. However, the Driver Store is managed by Windows.
Do not manually delete folders or files from the Driver Store.
Manually modifying its contents can damage driver installations and cause problems with device detection, updates, or recovery. Instead, use supported Windows driver management tools.
One of the most useful is PnPUtil.
7. Using PnPUtil to Identify Installed Driver Packages
PnPUtil is a Microsoft command-line utility included with modern Windows systems. It can examine devices, list driver packages, export packages, and perform various driver management operations.
Open Command Prompt or Windows Terminal as Administrator.
To display third-party driver packages staged in the Driver Store, enter:
pnputil /enum-driversThe results include information such as the published name, original INF name, provider, device class, driver date, version, and signer.
For example, you might see a package with the published name:
oem42.infThe published name is important because PnPUtil uses it to identify the particular driver package when performing management operations.
Do not assume a particular oem#.inf number always identifies the same driver. These identifiers are specific to the Windows installation.
Identify Devices That Are Not Connected
PnPUtil also provides an option to enumerate disconnected devices:
pnputil /enum-devices /disconnectedThis can be useful when investigating devices that Windows remembers but that are no longer connected.
For additional information, try:
pnputil /enum-devices /disconnected /deviceidsThe device instance IDs and hardware IDs can help you determine what hardware a particular entry represents.
Remember that the list of disconnected devices and the list of third-party driver packages describe different things.
A disconnected device may use a driver package that is still required by another device.
Examine Devices With Problems
Another useful command is:
pnputil /enum-devices /problemThis displays devices that Windows has identified as having problems.
I would generally investigate these devices before attempting to remove old driver packages. Microsoft documents these commands and their options in the PnPUtil Command Syntax reference.
8. Back Up Driver Packages Before Making Changes
Before removing driver packages, I recommend preserving the packages currently installed on the computer.
PnPUtil can export third-party driver packages from the Driver Store.
First, create a destination folder:
mkdir C:\DriverBackupThen run:
pnputil /export-driver * C:\DriverBackupWindows exports the third-party driver packages to that folder. You can copy the backup folder to an external drive for safekeeping.
However, there are some limitations.
Exporting drivers does not create a full Windows backup. It does not necessarily preserve vendor applications, hardware utilities, firmware, device settings, or every component required to restore a particular hardware configuration.
If you are planning significant system maintenance, consider creating a proper system backup as well.
Also, know how to access the Windows Recovery Environment and your BitLocker recovery key before changing critical device configurations.
9. Removing an Unnecessary Driver Package With PnPUtil
Now we come to the actual removal process.
PnPUtil allows a driver package to be deleted from the Windows Driver Store.
For example:
pnputil /delete-driver oem42.infIn this example, oem42.inf is only a placeholder.
You must first identify the actual published name of the driver package you intend to remove.
This command attempts to delete the specified package. If that package is in use, Windows may prevent its removal.
That is a safety mechanism, not an inconvenience to work around automatically.
What About the /uninstall and /force Options?
PnPUtil supports additional removal options.
For example:
pnputil /delete-driver oem42.inf /uninstallThe /uninstall option removes the specified driver package from devices using it and may cause Windows to select another compatible driver.
If another suitable driver is not available, affected hardware may stop functioning.
PnPUtil also supports /force, which can force package deletion even when the package is in use. I strongly discourage using /force as part of routine cleanup.
If Windows reports that a driver package is still required, investigate why it is in use.
For critical devices such as storage controllers, chipset components, and network adapters, driver removal can have significant consequences.
Again, the objective is not to remove the largest possible number of driver packages. It is to remove only those that you have confirmed are no longer needed.
10. Special Considerations for Network Adapters
Network adapters deserve additional attention.
Windows computers may have accumulated configurations for Ethernet adapters, Wi-Fi adapters, VPN interfaces, USB network adapters, virtual machine network interfaces, and other network components. Some of these devices may appear as non-present or hidden in Device Manager.
That does not necessarily mean they should be removed. For example, a virtual network adapter may be associated with virtualization software, a VPN client, or another networking application that is not currently running.
Removing that adapter could interfere with the application the next time it starts.
Similarly, removing a network adapter driver could temporarily eliminate the very connectivity you need to download its replacement.
Before changing network drivers, I recommend examining the existing configuration.
Open Command Prompt and run:
ipconfig /allThis displays IP addressing, interface information, default gateways, DNS settings, and other configuration details.
For additional information about wireless adapters, try:
netsh wlan show driversYou can also inspect network adapters in PowerShell:
Get-NetAdapter -IncludeHiddenThis displays network adapter information, including hidden adapters exposed through the networking stack.
However, a hidden adapter is not necessarily an obsolete or non-present device.
Use the CellStream Windows Networking Toolkit
If you regularly troubleshoot Windows networking, you may find my free CellStream Windows Networking Toolkit useful.
It provides convenient access to many built-in Windows networking commands and diagnostic functions.
If your original symptom is an Internet connectivity problem, I also recommend reading Troubleshooting Using Ping before making changes to network drivers.
A DHCP, DNS, routing, Wi-Fi, or Ethernet connectivity issue should not automatically be treated as a driver problem.
11. When Driver Removal Is Not the Answer
I want to emphasize something that is often overlooked in Windows optimization discussions.
Removing old driver packages will not necessarily make your computer faster. An installed package that is not actively used generally occupies storage space but does not continuously consume CPU resources merely because it exists.
If Windows is running slowly, start by examining what is actually consuming resources. Task Manager, Reliability Monitor, and Microsoft’s Sysinternals utilities can provide valuable information.
If you suspect a hardware compatibility problem, first identify the actual hardware installed in your computer.
My CellStream article Identify Your Computer’s Hardware Components in Detail explains several useful tools for identifying hardware, firmware, processors, memory, and other components.
A driver version that appears old is not automatically defective or unnecessary. In some cases, a manufacturer-supported older driver may be more appropriate for a particular hardware configuration than a newer generic driver.
If a device works reliably, there should be a reason to change its driver rather than updating or removing it simply because a newer version exists.
12. A Practical Driver Cleanup Workflow
If I were preparing to remove obsolete device drivers from a Windows computer, I would follow a process like this:
- Identify the objective. Are you resolving a specific problem, retiring hardware, or investigating an obsolete configuration?
- Confirm the hardware. Identify the physical or virtual device and determine whether it is still required.
- Inspect Device Manager. Use Show hidden devices to examine non-present hardware entries.
- Review driver packages. Use
pnputil /enum-driversto identify relevant third-party packages. - Check for dependencies. Determine whether other devices or applications still use the package.
- Preserve recovery options. Export relevant driver packages and ensure you have a suitable backup.
- Remove only what is necessary. Use Device Manager or PnPUtil according to the actual maintenance objective.
- Restart if required. Allow Windows to complete any pending device changes.
- Verify operation. Check Device Manager, network connectivity, peripherals, and relevant applications.
- Document the results. Record the devices and packages removed, along with any observed changes.
Most importantly, I would make one controlled change at a time.
If you remove several device entries and driver packages simultaneously, it becomes much more difficult to determine which change caused an unexpected problem.
Final Thoughts
The original version of this article was published nearly twenty years ago, when Windows handled some aspects of device management differently.
Today, Windows 11 provides better tools for identifying devices and managing driver packages. Device Manager remains useful for examining non-present hardware, while PnPUtil offers considerably more detailed driver package management capabilities. But the basic troubleshooting principle has not changed.
Before removing a driver, understand what it does, why it is installed, and what depends on it.
There is very little value in removing a driver simply because it is old or because a device appears faded in Device Manager.
On the other hand, carefully removing a genuinely obsolete or problematic driver package can be an appropriate part of troubleshooting or system maintenance. As with most technical troubleshooting, understanding the system is far more valuable than simply knowing which command to run.
I hope you find this updated discussion helpful. Comments and questions are always welcome.
If you would like to help support the continued development of independent networking, broadband, Wi-Fi, VoIP, and packet analysis content, please consider joining our Patreon community where you will gain access to exclusive technical resources, downloadable labs and PCAPs, bonus course content, troubleshooting guides, and additional member-only material. Comments and technical discussion are always welcomed at our Patreon community or on our Discord server. You can also support our work by simply buying us a coffee — every contribution helps us continue creating practical, real-world network science education for professionals and enthusiasts alike.