
I recently came across a social media post on LinkedIn suggesting that five Windows commands could tell you whether your computer had been hacked. The commands were netstat, tasklist, net user, schtasks, and wmic:
1️⃣ netstat -ano: shows every connection your PC has open right now. If it’s talking to an address you don’t know, that’s your first clue
2️⃣ tasklist: every program running in the background. Scroll it — anything with a weird name or no reason to be there?
3️⃣ net user: every account on the PC. If there’s a name you didn’t create, someone else made it
4️⃣ schtasks /query: things set to run on their own, on a timer. Hackers use this to come back after a restart
5️⃣ wmic startup list brief: what launches the moment you turn the PC on. Same idea — look for anything you didn’t install
My initial reaction was that these are legitimate diagnostic tools. In fact, I use several of them regularly when troubleshooting Windows systems. But the post made the process sound much simpler than it really is.
For example, it suggested that if your PC is communicating with an IP address you don’t recognize, that might indicate it has been hacked. Or that an unfamiliar running process could be malicious.
Well, perhaps. But neither observation is particularly compelling evidence on its own. A modern Windows computer normally has dozens of processes running in the background and communicates with numerous Internet services. Microsoft, cloud providers, content delivery networks, web browsers, antivirus products, and application updates all contribute to this activity.
So rather than simply repeat the original five commands, I thought it would be useful to expand the list to ten and explain what each command actually tells us. Along the way, we will use some PowerShell alternatives, replace an obsolete Windows command, and discuss what suspicious activity really means.
Before We Begin
These examples are intended primarily for modern Windows 11 systems. Many also work on Windows 10 and Windows Server.
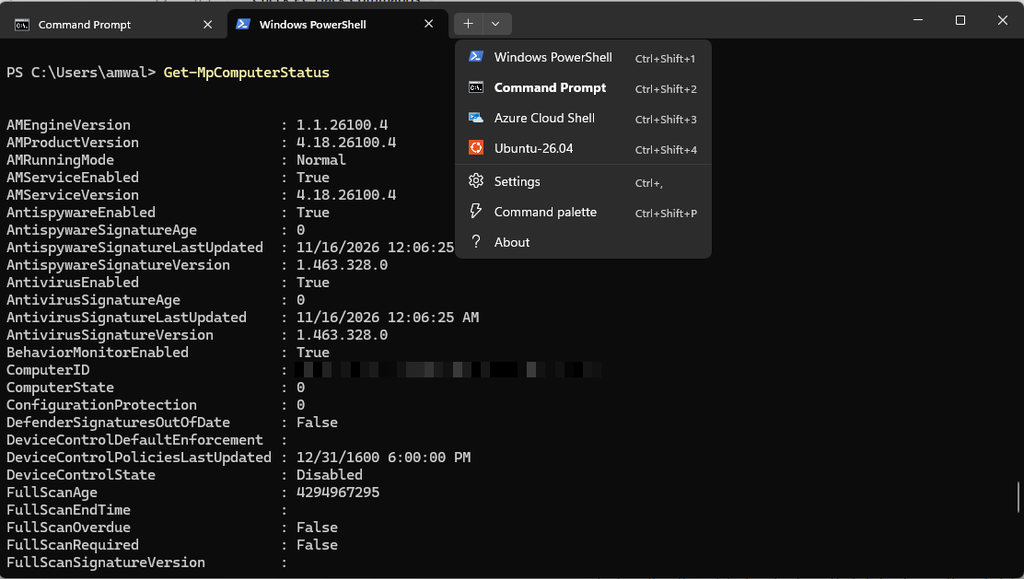
We will use both Command Prompt (cmd.exe) and PowerShell, identifying which is appropriate for each example. You can open PowerShell by right-clicking the Windows Start button and selecting Terminal or Terminal (Admin), depending on your Windows configuration.
Some commands require administrative privileges to display all available information. Where possible, start with ordinary user permissions and elevate when needed.
The commands in this article are investigative and read-only. We are not deleting files, terminating processes, disabling services, or changing security configurations. That is intentional. If a computer genuinely has been compromised, we don’t want to destroy potentially useful evidence before understanding what happened.
1. Examine Network Connections
Original command:
netstat -anoThis is a useful command, and one that networking professionals should recognize.
The options mean:
-adisplays active connections and listening ports.-ndisplays addresses and port numbers numerically.-odisplays the owning Process ID (PID).
You can improve the command by adding the -b option:
netstat -abnoThis attempts to display the executable responsible for each connection. Run it from an elevated terminal, and be aware that gathering the additional information can take longer.
In PowerShell, we have another option:
Get-NetTCPConnection -State Established |
    Select-Object LocalAddress,LocalPort,
        RemoteAddress,RemotePort,OwningProcess
This displays established TCP connections, including the remote IP address, port number, and owning process.
If we find a connection we want to investigate, we can take its PID and examine the process:
Get-Process -Id 1234Replace 1234 with the actual PID.
What should we look for?
Unexpected processes communicating with unfamiliar remote systems, unusual destination ports, or connections that occur repeatedly without an obvious explanation are worth investigating.
However, an unknown IP address is not proof of malicious activity.
Also remember that a TCP connection listing is a snapshot. It doesn’t tell us about connections that existed yesterday, and it doesn’t cover UDP traffic. For UDP endpoints, PowerShell provides Get-NetUDPEndpoint, although that does not identify remote UDP peers.
For additional networking diagnostics, see my CellStream Windows Networking Toolkit, which includes netstat and numerous other commands.
2. Examine Running Processes
Original command:
tasklistThe tasklist utility identifies processes currently running on a Windows computer.
We can obtain additional information using:
tasklist /vOr examine which Windows services are associated with processes:
tasklist /svcPowerShell provides considerably more information:
Get-CimInstance Win32_Process |
    Select-Object ProcessId,Name,
        ExecutablePath,CommandLine
This can show the executable location and command-line arguments used to launch a process.
Why is that important? Consider a process named svchost.exe. That is a legitimate Windows executable used to host services. Seeing it in a process list is entirely normal. However, if a program named svchost.exe is running from an unexpected directory, such as a temporary folder or a user’s Downloads directory, I would investigate further.
A malicious program can imitate the name of a legitimate Windows component. But we need to be equally careful in the opposite direction. An unfamiliar process name is not necessarily malware. Many legitimate applications use executable names that aren’t particularly meaningful to users.
The executable’s location, publisher, signature, and associated behavior are usually more useful than its name alone.
3. Examine User Accounts and Administrative Privileges
Original command:
net userThis lists local user accounts on the Windows computer. If an attacker has obtained sufficient privileges, one possible method of maintaining access is to create an additional account.
But I would take this investigation one step further:
net localgroup administratorsThis displays the members of the local Administrators group. An account with administrative privileges can potentially make significant changes to a Windows system.
What should we look for?
Check for accounts you don’t recognize, particularly those with administrative privileges. Also consider whether an account was intentionally created by an administrator, support technician, or management application.
Keep in mind that net user primarily examines local accounts. Domain accounts, Microsoft Entra ID identities, and other methods of remote access require additional investigation.
Also, the presence of an unfamiliar account doesn’t establish that the computer was compromised. We need supporting evidence.
4. Examine Scheduled Tasks
Original command:
schtasks /queryWindows Task Scheduler allows applications and administrators to execute programs automatically based on time, user logon, system startup, and other triggers.
That makes scheduled tasks useful for legitimate administration—and potentially attractive as a persistence mechanism for malicious software.
A better version of the original command is:
schtasks /query /fo LIST /vThe verbose output provides additional information about configured tasks.
PowerShell also offers:
Get-ScheduledTask |
    Select-Object TaskPath,TaskName,State
To inspect the executable or script associated with a particular task:
Get-ScheduledTask -TaskName "TaskName" |
    Select-Object -ExpandProperty Actions
Replace TaskName with the actual name of the task.
What should we look for?
Unexpected scheduled tasks that launch executables from unusual locations, run scripts with unexplained arguments, or were recently created without a known reason deserve examination.
One caution: Windows and installed applications create many legitimate scheduled tasks. Don’t disable or delete a task simply because you don’t recognize its name.
5. Examine Programs Configured to Start Automatically
Original command:
wmic startup list briefThis command needs to be replaced.
Microsoft deprecated the Windows Management Instrumentation Command-line utility (WMIC), and as of August 2026 it has been removed from Windows 11 version 24H2 and later.
Importantly, Windows Management Instrumentation (WMI) itself remains supported.
We can use PowerShell instead:
Get-CimInstance Win32_StartupCommand |
    Select-Object Name,Command,Location,User
This identifies startup commands registered through locations covered by the WMI startup class, including information about the command and its configured location. For example, you might discover a program configured to start whenever you sign in to Windows. That doesn’t make it malicious. Cloud synchronization tools, security utilities, device software, and numerous other applications legitimately start this way. However, unwanted software may also establish persistence through startup entries.
One limitation is that this command doesn’t inspect every possible automatic-start mechanism. We will return to that shortly.
6. Examine Microsoft Defender Status and Detections
This is where I think the original five-command list missed an obvious opportunity.
Windows includes Microsoft Defender Antivirus, and PowerShell provides commands to examine its status and recorded detections.
First:
Get-MpComputerStatusThis provides information about Defender’s state, including antivirus protection and related security components.
Then:
Get-MpThreatDetectionThis retrieves information about active and historical malware detections recorded by Microsoft Defender.
These commands are useful because they let us review security information collected by the operating system rather than relying entirely on our own interpretation of process and connection lists.
However, they have limitations. If another antivirus product is installed, Defender’s operational state may differ. A clean detection history also does not guarantee that the computer has never been compromised.
Nevertheless, checking the security software already installed on the machine seems like a sensible part of any investigation.
7. Examine Windows Security Event Logs
Most of the commands we have discussed examine the current state of the machine.
But what happened yesterday? Last week? Was a new account created? Were there repeated failed logon attempts?
Windows Event Logs can help answer those questions.
In an elevated PowerShell terminal, try:
Get-WinEvent -FilterHashtable @{
    LogName='Security'
    Id=4624,4625,4720,4732
    StartTime=(Get-Date).AddDays(-7)
} | Select-Object TimeCreated,Id,Message
This searches for four important security event types recorded during the previous seven days.
| Event ID | Description |
|---|---|
| 4624 | Successful account logon |
| 4625 | Failed account logon |
| 4720 | User account created |
| 4732 | Member added to a security-enabled local group |
These events can provide useful historical evidence. For example, repeated unsuccessful logon attempts might indicate someone attempting to guess credentials. An unexpected account-creation event deserves further investigation. However, successful logons are common, and failed logons can result from ordinary mistakes or service configuration problems. Security events need to be correlated with account names, logon types, timestamps, and other system activity.
Also remember that Windows only records events enabled by its audit configuration, and retained logs have finite capacity. Not finding a particular event does not prove that the activity never occurred.
8. Examine Windows Services
Windows services perform essential operating-system and application functions, often without an interactive user session. Because some services start automatically, they are another potential persistence mechanism.
We can inspect them using:
Get-CimInstance Win32_Service |
    Select-Object Name,State,StartMode,PathName
This displays the service name, current state, configured startup mode, and executable path.
What should we look for?
Services configured to start automatically that reference unexpected executable paths are worth reviewing. For example, a newly discovered service launching an unfamiliar executable from a temporary directory would deserve considerably more attention than a known Windows service running from its normal system location.
Once again, context matters.
Many applications install their own services, including backup utilities, remote-support software, printers, security products, and hardware management applications.
Don’t disable services simply because their names are unfamiliar.
9. Examine Windows Firewall Configuration
The Windows Firewall is another useful source of information.
We can examine the current firewall profiles with:
Get-NetFirewallProfile |
    Select-Object Name,Enabled,DefaultInboundAction,
        DefaultOutboundAction
This helps identify which firewall profiles are enabled and their default inbound and outbound actions.
Next, examine configured inbound allow rules:
Get-NetFirewallRule -Direction Inbound -Action Allow |
    Select-Object DisplayName,Enabled,Profile
This lists allow rules, including rules that may be disabled or not applicable to the active network profile.
Why examine firewall rules?
Because a program—or someone with sufficient privileges—can potentially modify firewall configuration to permit network access that would otherwise be restricted. An unexpected enabled rule allowing inbound connections to a remote-administration service is worth investigating. But firewall rules alone do not tell us whether the associated program is running, whether a port is listening, or whether an external system can reach it. We need to combine this information with our earlier network connection and process investigations.
10. Examine Executable Digital Signatures
Suppose our investigation identifies an unfamiliar executable. We know its process name, file path, and perhaps which remote systems it communicates with.
What else can we learn?
PowerShell can examine its digital signature:
Get-AuthenticodeSignature -FilePath "C:\Path\program.exe"Replace the example path with the executable you want to investigate. The result can indicate whether the executable has a valid digital signature.
Why does that matter?
Digital signatures help establish whether a file was signed by an identifiable publisher and whether its signed content has been modified. However, we need to avoid another dangerous assumption: signed does not automatically mean safe, and unsigned does not automatically mean malicious. Many legitimate utilities are unsigned, and malicious software can sometimes possess a valid signature.
Think of signature verification as another piece of evidence rather than a final verdict.
Bonus: Microsoft Sysinternals Autoruns
Although we now have ten useful command-line checks, there is one additional tool that I strongly recommend.
Microsoft Sysinternals Autoruns provides a comprehensive view of many locations where programs can be configured to execute automatically. Autoruns can examine startup entries, scheduled tasks, services, drivers, Winlogon entries, and several other persistence mechanisms. It also offers options for verifying digital signatures and checking files against VirusTotal.
Be aware that VirusTotal integration can involve sharing file information, and potentially files themselves depending on the options selected, with an external service. Review those options before using them on sensitive systems.
There is also a command-line companion called autorunsc, which can be particularly useful for scripted investigations. I recently updated my article on this excellent utility: Microsoft Autoruns: Troubleshoot Windows Startup Problems
I would recommend Autoruns to anyone wanting to investigate automatic-start configurations more thoroughly.
So, How Do We Know if a PC Has Been Hacked?
Here is the most important point in this entire discussion.
None of these commands can definitively tell us whether a Windows computer has been compromised.
They can help identify suspicious activity, unexpected configurations, unfamiliar processes, and potential persistence mechanisms. But those observations must be interpreted together.
Consider two examples.
Example A: Your computer has an established TCP connection to an IP address you don’t recognize.
That could be an indication of malicious activity. Or it might be your browser communicating with a legitimate content delivery network. We need to identify the process responsible, examine the executable, and determine whether the connection is consistent with expected behavior.
Example B: You discover a newly created local administrator account that you did not authorize, and the Windows Security log shows a corresponding account-creation event at an unexpected time.
Now we have two related observations that warrant serious attention. We should investigate who or what created the account, what privileges it has, and whether any associated logon or configuration changes occurred.
That is the difference between noticing something unfamiliar and building an evidence-based security investigation.
What Should You Do If You Find Something Suspicious?
First, don’t assume that every unfamiliar process or network address represents malware. Document what you find. Record process IDs, executable paths, timestamps, remote addresses, account names, and relevant event logs. Try to establish whether the activity corresponds to legitimate installed software or a known system function. If you discover stronger evidence of compromise, such as unauthorized administrative access or confirmed malware, consider isolating the machine from the network and obtaining qualified assistance.
For a business or managed computer, follow your organization’s incident-response procedures before modifying anything. If evidence preservation matters, arbitrary cleanup actions could make the investigation more difficult.
For a personal computer, Windows Security provides additional scanning options, including Microsoft Defender Offline scanning when appropriate.
Importantly, if a device is suspected of having been compromised, avoid entering new passwords or accessing sensitive accounts on that device until its integrity has been assessed.
Final Thoughts
The original five-command social media post wasn’t completely wrong. In fact, four of the commands are still useful, and the fifth has a modern PowerShell replacement.
What bothered me was the suggestion that identifying something unfamiliar is enough to conclude that a PC has been hacked. It isn’t.
For those of us involved in networking, packet analysis, and troubleshooting, this is a familiar principle. We don’t diagnose a network problem simply because we observe an unexpected packet. We examine the protocol behavior, correlate multiple observations, and determine whether the evidence supports our hypothesis. Windows security investigations should follow the same approach.
These ten commands won’t turn someone into a digital forensics investigator, but they provide a practical introduction to examining what a Windows computer is doing, what it is configured to do, and what the operating system may have recorded about past activity. And that is considerably more useful than simply searching for unfamiliar names and assuming the worst.
Additional CellStream Resources
For more information on Windows troubleshooting and network analysis, see:
- Windows Networking Toolkit
- Windows Networking Toolkit Usage Instructions
- Microsoft Autoruns: Troubleshoot Windows Startup Problems
- PC and Network Troubleshooting: Practical Tips and Tools
- Windows Packet Monitor (Pktmon): Capture and Analyze Traffic
- Capture Network Packets in Windows with Netsh and Wireshark
Microsoft References
- Microsoft: Features Removed from Windows
- Microsoft: PowerShell Defender Module
- Microsoft: Get-NetTCPConnection
- Microsoft: Sysinternals Autoruns
Instruction. Knowledge. Skills. — CellStream, Inc.
If you would like to help support the continued development of independent networking, broadband, Wi-Fi, VoIP, and packet analysis content, please consider joining our Patreon community where you will gain access to exclusive technical resources, downloadable labs and PCAPs, bonus course content, troubleshooting guides, and additional member-only material. Comments and technical discussion are always welcomed at our Patreon community or on our Discord server. You can also support our work by simply buying us a coffee — every contribution helps us continue creating practical, real-world network science education for professionals and enthusiasts alike.