
Originally published February 7, 2011 | Updated November 6, 2026
Important Security Update: If you followed the original 2011 instructions and still have Remote Desktop Protocol (RDP) ports forwarded from your Internet router to Windows computers, review those rules. Directly exposing RDP to the public Internet creates unnecessary security risks. Remove any forwarding rules that are no longer needed, and consider replacing direct Internet access with a properly secured VPN or Remote Desktop Gateway. This updated article explains the recommended approach.
Back in February 2011, I wrote an article explaining how to access multiple Windows computers and virtual machines using Microsoft’s Remote Desktop Connection utility. At the time, the procedure involved assigning static IP addresses, changing the Remote Desktop listening port on each computer, modifying Windows Firewall rules, and configuring port forwarding on the Internet router.
It worked, and we tested it successfully. But quite a bit has changed in fifteen years, particularly when it comes to remote access security. Today, there are simpler ways to accomplish the same objective, and some of my original recommendations are no longer appropriate.
Let’s revisit Remote Desktop, explain how it works, and demonstrate how to access multiple computers or virtual machines on a local network—and how to reach them securely when you’re away.
What Is Remote Desktop?
Microsoft’s Remote Desktop Protocol (RDP) allows you to connect to another Windows computer and interact with its desktop remotely. Instead of sitting directly in front of the computer, you establish a network connection and use its graphical interface from another system.
For example, you might have three computers in your home office:
- A primary Windows 11 workstation.
- A second Windows computer used for testing.
- A virtual machine running Windows 11 for software experiments.
Rather than connecting a separate keyboard, mouse, and monitor to each system, you can use Remote Desktop to access them from your primary computer. This is especially useful in technical laboratories, training environments, and networks where computers are located in different rooms.
Remote Desktop is also useful for troubleshooting, managing applications, and accessing files on another computer.
One distinction worth mentioning is that conventional RDP is not the same as screen sharing. On ordinary Windows desktop editions, a remote interactive sign-in generally locks or replaces the local interactive session rather than allowing two people to independently control the same desktop simultaneously.
Understanding Remote Desktop Clients and Hosts
Before getting started, we need to distinguish between the computer initiating the connection and the computer accepting it.
The Remote Desktop client is the computer you’re using to connect to another system. The Remote Desktop host is the computer you’re connecting to.
This distinction matters because not every Windows edition can function as an RDP host.
| Windows Edition | RDP Client | RDP Host |
|---|---|---|
| Windows 11 Home | Yes | No |
| Windows 11 Pro | Yes | Yes |
| Windows 11 Enterprise | Yes | Yes |
| Windows 11 Education | Yes | Yes, subject to configuration and policy |
| Windows Server | Yes | Yes, subject to configuration and licensing |
A Windows 11 Home computer can initiate a Remote Desktop connection to an appropriately configured Windows 11 Pro computer. However, Windows 11 Home does not include the supported ability to accept incoming Microsoft Remote Desktop sessions. This is a common source of confusion.
Also, Windows 10 reached the end of its standard support lifecycle on October 14, 2025. If you’re still using Windows 10 systems, particularly for remote access, make sure you understand their security update status.
For the current Microsoft instructions, see How to Use Remote Desktop in Windows.
Step 1: Understand the Network
Let’s start with three Windows computers connected to the same local area network. For this example, we’ll use the following addressing plan:
| Computer | IPv4 Address | RDP Port |
|---|---|---|
| Windows PC 1 | 192.168.1.101 | TCP 3389 |
| Windows PC 2 | 192.168.1.102 | TCP 3389 |
| Windows VM 1 | 192.168.1.103 | TCP 3389 |
Notice something important? All three computers use the same TCP port.
That’s perfectly acceptable. Each computer has a different IP address, so the destination IP address and TCP port identify the appropriate RDP endpoint on the network. There is no need to reconfigure the RDP listening port on every system.
This is one of the biggest changes from my original article. The earlier port-changing procedure was intended to distinguish multiple internal computers when accessing them through a single public IPv4 address and NAT port forwarding.
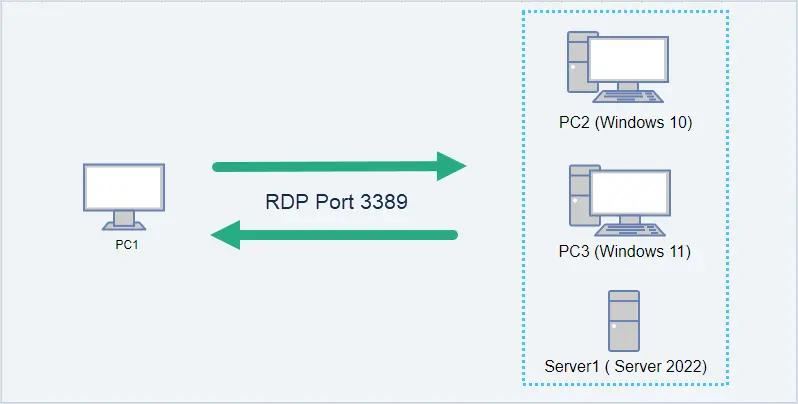
A Remote Desktop client accessing three Windows computers on the same LAN. Each destination has a unique IP address but uses the default RDP port, TCP 3389.
What About Static IP Addresses?
In the original article, I recommended manually configuring static IPv4 addresses on every computer. That approach still works, but it isn’t always necessary.
For most home and small-business networks, I now recommend using DHCP reservations on the router or DHCP server. A DHCP reservation associates a particular device’s MAC address with a designated IPv4 address. The computer continues using DHCP, but the DHCP server consistently offers it the reserved address.
This provides predictable addressing without manually configuring IP addresses, subnet masks, gateways, and DNS servers on every computer. Of course, you can also connect using a computer’s hostname if your local name-resolution mechanism is functioning correctly.
For additional information on Windows IP addressing and troubleshooting utilities, see my CellStream Windows Networking Toolkit.
Step 2: Enable Remote Desktop on Each Host
On each Windows 11 Pro, Enterprise, or other supported host computer:
- Open Settings.
- Select System.
- Select Remote Desktop.
- Turn on Remote Desktop.
- Confirm the change if prompted.
- Record the computer name displayed in the Remote Desktop settings.
Repeat this procedure on each computer that you want to access remotely.
You should also review which user accounts are permitted to connect. By default, members of the local Administrators group generally have Remote Desktop access. Additional authorized accounts can be added using the Remote Desktop users settings.
I recommend using appropriately secured individual user accounts rather than sharing administrator credentials among multiple users.
Enable Network Level Authentication
Network Level Authentication (NLA) requires authentication before a full remote desktop session is established. For ordinary modern Windows environments, keep NLA enabled.
It provides an additional security layer and reduces unnecessary exposure of the remote session functionality to unauthenticated connections. Also verify that the user accounts permitted to connect have strong passwords and are not unnecessarily privileged.
For more information, see Microsoft’s Remote Desktop Configuration Documentation.
Step 3: Verify the Windows Firewall Configuration
Enabling Remote Desktop through Windows Settings normally configures the appropriate Windows Defender Firewall rules. However, it’s worth verifying that the expected traffic is permitted.
By default, Microsoft RDP uses TCP port 3389. It can also use UDP port 3389 to improve session performance when supported and permitted.
You can inspect the firewall rules through:
Windows Security → Firewall & network protection → Advanced settings
Look for the Remote Desktop inbound rules.
On a trusted local network, access may be permitted according to the applicable Windows Firewall profile and policies. For greater security, consider restricting remote access to trusted source addresses or subnets rather than accepting connections from any reachable network.
Be careful when modifying firewall rules remotely. You don’t want to accidentally block the connection you’re using to manage the system.
Step 4: Connect to the First Windows Computer
Now let’s initiate a connection.
On your primary Windows computer, press Win + R, enter:
mstscThen press Enter.
This launches the traditional Windows Remote Desktop Connection application.
In the Computer field, enter the destination IP address or hostname. For example:
192.168.1.101Select Connect.
Windows will request the appropriate credentials for the remote computer. Once authentication succeeds, you should see the remote Windows desktop.
You are now controlling that computer through the network.
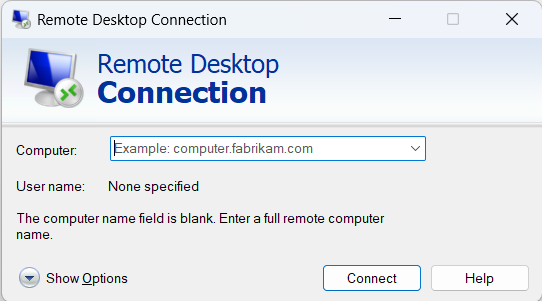
Windows Remote Desktop Connection using an IPv4 address to reach another computer on the LAN.
A Note About Microsoft’s Windows App
Microsoft has been transitioning some of its remote-access client offerings to Windows App, which supports several Microsoft cloud desktop and application services as well as remote PC connections on supported platforms.
However, the familiar mstsc.exe Remote Desktop Connection utility remains available and is still a convenient choice for connecting directly to Windows computers.
For this exercise, we’ll continue using mstsc because it is widely recognized and requires no additional installation on typical Windows systems.
Step 5: Connect to Additional Computers
Now that the first connection works, connecting to additional computers is straightforward.
Open another Remote Desktop Connection window and enter:
192.168.1.102Connect using the credentials authorized on that computer.
Then, if desired, open a third Remote Desktop Connection window and connect to:
192.168.1.103You now have access to three different Windows systems from your primary workstation. All three destinations are using TCP port 3389, and there are no conflicting port assignments because each computer has a different IP address.
You can also save connection settings as .rdp files using Show Options → General → Save As in Remote Desktop Connection.
For example, you might save:
Windows-PC1.rdpWindows-PC2.rdpWindows-Lab-VM.rdp
This makes it convenient to reconnect without repeatedly entering the computer name or IP address. Be careful with saved credentials and connection files, especially on shared computers.
Step 6: Access Windows Virtual Machines
This is another area where Remote Desktop can be especially useful.
Suppose you’re running multiple Windows virtual machines on a computer using VirtualBox, VMware, Hyper-V, or another virtualization platform. Depending on how the virtual machines are networked, you may be able to access them using RDP just like physical computers.
The important detail is the virtual network configuration.
Bridged Networking
With bridged networking, the virtual machine connects to the physical LAN through a virtualized network interface. In a typical configuration, the VM obtains its own IP address from the same network used by other computers.
For example:
- Physical host:
192.168.1.100 - Windows VM:
192.168.1.103
The virtual machine can then be reached directly from other computers on the LAN, assuming its operating system, firewall, and virtualization settings permit the connection.
This is often the simplest arrangement for a technical lab.
NAT Networking
With NAT networking, the VM is generally located behind a virtual NAT device managed by the hypervisor. The VM may have an address on a private virtual network that is not directly reachable from other LAN computers.
Outbound connectivity may work perfectly, but unsolicited inbound RDP connections may not.
Depending on the hypervisor, you may need to configure port forwarding through the virtualization software.
For example, the hypervisor could forward a selected host-side TCP port to TCP port 3389 on a particular Windows guest. This is a legitimate use of port forwarding, provided it is restricted to trusted interfaces and is not unintentionally exposed to the public Internet.
Host-Only Networking
Host-only networking generally provides connectivity between the physical host and one or more VMs on an isolated virtual network.
The physical host may be able to connect directly to a Windows VM using its host-only IP address. Other computers on the physical LAN typically cannot reach that virtual network without additional routing or connectivity arrangements.
Host-only networking is particularly useful for isolated laboratory experiments.
Regardless of the virtual network mode, remember that the Windows guest must support accepting incoming RDP connections. A Windows 11 Home virtual machine doesn’t become an RDP host simply because it is running inside a hypervisor.
Step 7: Access Your LAN from Somewhere Else
Now let’s address the part of my original 2011 article that deserves the biggest change.
Back then, I described configuring a home router to forward different external TCP ports to different Windows computers. For example, port 3390 might reach PC 1, port 3391 might reach PC 2, and so forth.
That was a common approach when a network had one public IPv4 address and several internal computers. The router would use the destination TCP port to determine which internal address should receive the incoming connection.
Technically, this is still possible.
But I no longer recommend directly exposing Remote Desktop services to the Internet through ordinary port-forwarding rules.
RDP services are attractive targets for password attacks, exploitation attempts, and unauthorized access. Changing the port number from 3389 to something else does not provide meaningful protection against determined attackers.
The Better Approach: Use a VPN
Instead, establish an authenticated and encrypted VPN connection to your home or business network.
Once connected to the VPN, your computer can reach the internal systems through the network paths permitted by the VPN configuration.
Here’s the basic sequence:
- Your remote laptop establishes a VPN connection.
- The VPN authenticates the user and establishes an encrypted tunnel.
- The VPN configuration provides permitted access to the private network.
- You launch Remote Desktop Connection.
- You connect to the appropriate internal Windows computer using its private IP address or resolvable hostname.
No individual Windows desktop needs to have its RDP port publicly forwarded through the Internet router.
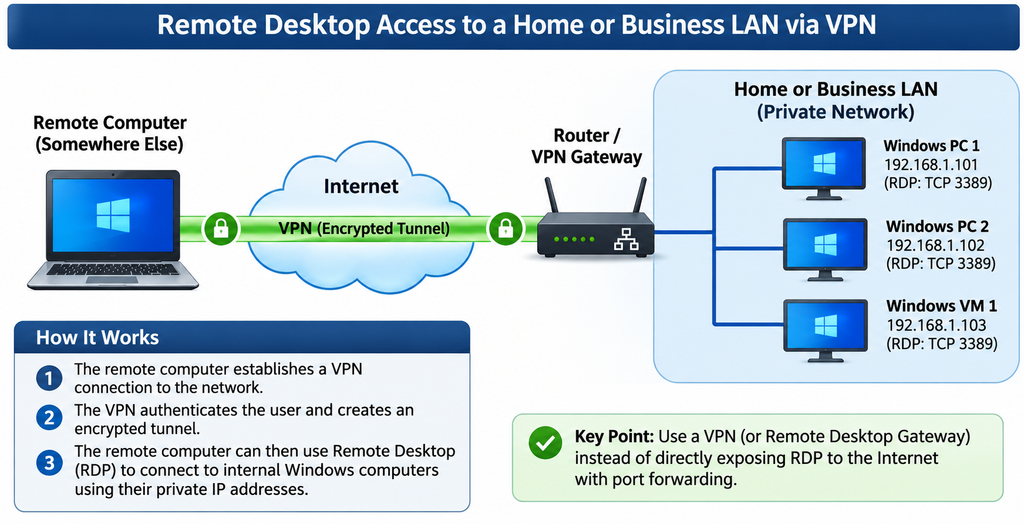
A remote laptop establishing an encrypted VPN connection before accessing multiple Windows computers on a private LAN using RDP.
VPN Alternatives
There are several ways to provide this kind of private connectivity.
A home or business router may have a built-in VPN server. Organizations may use dedicated VPN gateways or a Remote Desktop Gateway. Managed or mesh VPN solutions can also provide private connectivity between approved devices without requiring traditional inbound RDP port forwarding.
The specific configuration depends on your networking equipment, operating systems, security requirements, and administrative policies.
For enterprise environments, Remote Desktop Gateway can provide controlled access to internal Remote Desktop resources through a managed gateway service.
The key point is that RDP should be reachable only through an appropriately secured and authorized access path.
Also, a VPN does not automatically make a remote system trustworthy. User authentication, device security, access controls, software updates, and network segmentation still matter.
Step 8: Verify That Remote Desktop Is Reachable
Now we’re getting into network troubleshooting.
Suppose you’ve enabled Remote Desktop on a Windows computer, but the connection fails. Rather than repeatedly changing settings, let’s gather some information.
From the Windows client computer, open PowerShell and enter:
Test-NetConnection 192.168.1.101 -Port 3389Replace the IP address with your destination.
If the test succeeds, you should see:
TcpTestSucceeded : TrueThis indicates that the TCP connection test to port 3389 succeeded. It does not prove that RDP authentication or session establishment will succeed.
If the result is False, possible causes include:
- The destination computer is powered off or unreachable.
- Remote Desktop is disabled.
- Windows Firewall or another network firewall is blocking the traffic.
- The VM networking configuration prevents the connection.
- A VPN route or access-control rule is missing.
- The computer’s address or listening port is different from what you expected.
You can also examine the IP configuration using:
ipconfig /allAnd test basic IP reachability using:
ping 192.168.1.101Remember, however, that an unsuccessful ping does not necessarily mean a computer is unreachable. ICMP Echo Requests may be blocked even when TCP connections are permitted.
For routing information, use:
route printOr PowerShell:
Get-NetRouteThese commands help determine whether the client has an appropriate route toward the destination.
For more Windows networking utilities, see my free CellStream Windows Networking Toolkit. I also explain the individual commands and their uses in my Windows Networking Toolkit Instructions.
Step 9: Common Remote Desktop Problems
A few problems occur frequently enough that they’re worth addressing directly.
The Computer Cannot Be Found
If you’re connecting by hostname, try using its IPv4 address instead. This helps distinguish a name-resolution problem from a basic connectivity problem.
If the IP connection works but the hostname does not, investigate DNS or the local name-resolution mechanism.
Remote Desktop Is Unavailable
Verify that the remote system is running an edition of Windows that supports RDP hosting. Also confirm that Remote Desktop is enabled and the appropriate firewall rules are active.
The Virtual Machine Is Unreachable
Examine the VM’s network adapter mode. A bridged interface, NAT interface, and host-only interface provide different connectivity characteristics.
Don’t assume that a VM with working Internet access can automatically accept incoming connections from other LAN computers.
Authentication Fails
Verify the account being used, its password, and its permission to access the remote computer. Local and domain accounts may require different username formats.
Avoid disabling Network Level Authentication simply to work around an authentication problem.
The Computer Is Asleep
Remote Desktop cannot normally establish a session with a computer that is powered off or sleeping. Consider the remote computer’s power management configuration if it must remain available for remote access.
Some Final Security Recommendations
When enabling Remote Desktop, I suggest following a few basic practices.
Use supported and properly updated operating systems. Allow RDP access only to accounts that genuinely need it, use strong authentication, and keep Network Level Authentication enabled.
Restrict network access to trusted subnets, VPN users, or authorized administrative devices. Avoid exposing Windows RDP listener ports directly to the Internet.
Also consider whether the remote session should be permitted to redirect local drives, printers, or clipboard information. These features can be useful, but they also create paths through which data can move between local and remote systems.
On customer, laboratory, and business systems, that may be an important security consideration.
Final Thoughts
When I wrote the original version of this article in 2011, accessing multiple computers behind a single Internet connection often meant spending time configuring IP addresses, RDP listening ports, Windows Firewall rules, and router port forwarding.
Today, accessing several computers on the same LAN is much simpler than that original procedure suggested. Each Windows computer can have its own IP address while using the same default RDP port.
Modern virtualization platforms also make it relatively straightforward to provide Remote Desktop access to Windows virtual machines, provided their network configurations are understood. And when remote access is required from outside the LAN, a properly secured VPN or remote-access gateway is a much better choice than directly exposing RDP services to the Internet.
The technology continues to be useful, but our approach to deploying it needs to reflect current security practices.
For anyone working with multiple Windows computers, virtual machines, or technical lab environments, Remote Desktop remains an excellent tool to understand.
Just remember that getting connected is only part of the job. Understanding how the connection works—and how to protect it—is equally important.
References and Additional Resources
Microsoft resources
- How to Use Remote Desktop in Windows
- Enable Remote Desktop
- Remote Desktop Connection FAQ
- Microsoft Windows App Overview
Related CellStream articles
- CellStream Windows Networking Toolkit
- Windows Networking Toolkit Instructions
- Using Traceroute to Determine Paths Through the Internet
- Shutting Down an Unresponsive Windows Computer
- Windows 11 Keyboard Shortcuts
If you would like to help support the continued development of independent networking, broadband, Wi-Fi, VoIP, and packet analysis content, please consider joining our Patreon community where you will gain access to exclusive technical resources, downloadable labs and PCAPs, bonus course content, troubleshooting guides, and additional member-only material. Comments and technical discussion are always welcomed at our Patreon community or on our Discord server. You can also support our work by simply buying us a coffee — every contribution helps us continue creating practical, real-world network science education for professionals and enthusiasts alike.