

Check out these great references as well: |
|---|
| Our Wireless custom profile for Wireshark |
| Our Udemy course on Wireless Packet capture |
| Our other Wi-Fi related articles |
If you are like me, you count on the Internet to help with how to’s especially when using Linux. That said, sometimes the information can be contradicting or confusing. This article shows that there are three ways to put your Wi-Fi adapter into monitor mode in Linux! Three! So let’s jump in.
Windows users – look here.
In this article I am using Kali Linux (which is Debian based). I will also mention that I am logged in as root in the example screenshots. This is not recommended by some for security reasons. As root, I do not really even need to use the ‘sudo’ command as shown. Furthermore, not all commands require sudo privilege escalation. In a sense, I am trying to cover all bases to get these commands to work for you.
Lastly, before we gat started, if you are using Linux as a VM, I suggest you also read: https://www.cellstream.com/reference-reading/tipsandtricks/409-getting-a-virtual-machine-to-access-wi-fi-monitor-mode
If you cannot get the interface into Monitor Mode, then that means the interface probably does not support monitor mode. So let’s digress a little for those folks. This means that you need to get an external Wi-Fi interface that does. Trust me – way too many DO NOT support monitor mode.
The following chipsets are known to support monitor mode and packet injection, but there may be more:
- Atheros AR9271: The Alfa AWUS036NHA is a great long-range network adapter. There’s also the TP-Link TL-WN722N but only v1 will work with Kali Linux since v2 uses a different chipset.
- Ralink RT3070: This chipset is used by a number of popular wireless network adapters. Of those, the Alfa AWUS036NH is a b/g/n adapter with great range. For a more discreet wireless adapter that can be plugged in via USB, the Alfa AWUS036NEH is a powerful b/g/n adapter that’s slim and doesn’t require a USB cable to use. If you need a stealthier option, you might consider the g/n Panda PAU05.
- Ralink RT3572: While the previous adapters have been 2.4 GHz only, the Alfa AWUS051NH v2 is a dual-band adapter that is also compatible with 5 GHz networks.
- Realtek 8187L (Wireless G adapters): The Alfa AWUS036H USB 2.4 GHz adapters use this older chipset that is less useful and will not pick up as many networks.
- Realtek RTL8812AU: Supported in 2017, the Alfa AWUS036ACH is a beast, with dual antennas and 802.11ac and a, b, g, n compatibility with 300 Mbps at 2.4 GHz and 867 Mbps at 5 GHz. It’s one of the newest offerings that are compatible with Kali. To use it, you may need to first run “apt update” followed by “apt install realtek-rtl88xxau-dkms” which will install the needed drivers to enable packet injection.
Aircrack-ng also lists a few cards as best in class on its site, so if you’re interested in more suggestions, check it out (some of the ones listed above are also on its list).
That all said, let’s get started:
1. Using iw
Start by making sure the system recognizes the Wi-Fi interface:
sudo iw dev
You should get something like this:
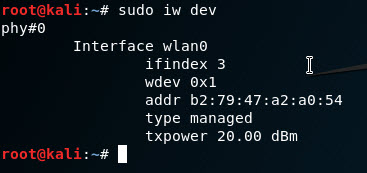
The output tells us that the Wi-Fi interface is called “wlan0” and in my case the MAC address is “b2:79:47:a2:a0:54”. We also see that the interface is in “managed” mode, meaning it is operating as a station (the other options here would be monitor or ad-hoc or master).
A note here: some systems will use a different name for the WLAN/Wi-Fi interface like “wlp5s0” instead on “wlan0”. That is fine, just replace any command below that has wlan0 with whatever you system calls the WLAN/Wi-Fi interface.
Another note: If you do not see the wlan0 interface, then you have a problem. From the comments and questions at the end of the article, I have noticed a common thread. This is usually related to whether you are using a virtual machine and/or whether you have a dedicated wireless interface for the machine. If you are using a VM – please be sure to read this article as well: https://www.cellstream.com/reference-reading/tipsandtricks/409-getting-a-virtual-machine-to-access-wi-fi-monitor-mode
There are three commands to put the interface into monitor mode that turn off the interface so we can change its settings, set it into monitor mode, then tuen the interface back up:
sudo ip link set wlan0 down
sudo iw wlan0 set monitor none
sudo ip link set wlan0 up

You can now verify the type has been changed with that same ‘sudo iw dev’ command:
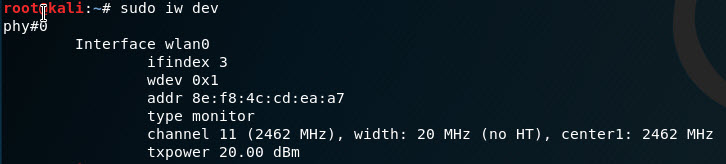
We can see the type is now monitor, and we can also see what channel we are on.
You could now start up a tool like Wireshark and capture on the interface. Wireshark will also allow you (using the Wireless tool bar that is turned on from the View menu) to change channels.
Once done sniffing the Wi-Fi you turn off monitor mode with these three commands:
sudo ip link set wlan0 down
sudo iw wlan0 set type managed
sudo ip link set wlan0 up
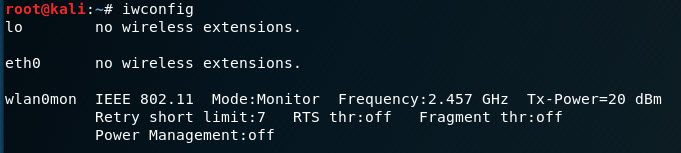
2. Using iwconfig
The second way to do this is with iwconfig. Let’s start by checking for the interface name:
sudo iwconfig
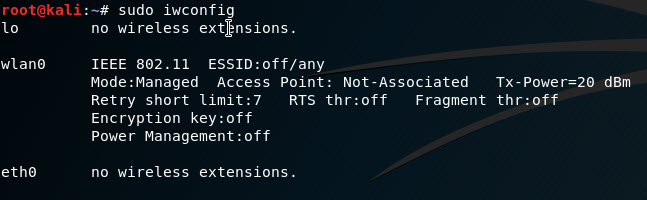
We see the name of the interface “wlan0” and that it is in “Mode: Managed”. Note that the MAc address is not provided with this command. If you want that you need to input the “ifconfig” command:

To enable monitor mode you once again have to turn the interface off, change its mode, then bring it back up again:
sudo ifconfig wlan0 down
sudo iwconfig wlan0 mode monitor
sudo ifconfig wlan0 up
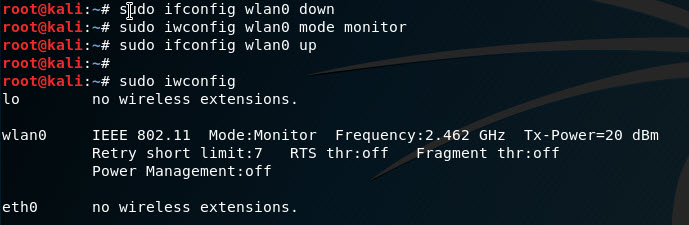
We can see that after looking at the “iwconfig” that the mode is changed to Monitor.
As stated previously, you can now use a tool to look at the Wi-Fi packets.
To return the interface to normal managed mode:
sudo ifconfig wlan0 down
sudo iwconfig wlan0 mode managed
sudo ifconfig wlan0 up
3. Using airmon-ng
This method presumes you have the tool installed. To test this, use the following command:
sudo airmon-ng

We see the “wlan0” interface.
If you are running Kali Linux, then the tool should be installed.
If this command does not work, Linux will suggest you install the aircrack-ng tool with the following command:
sudo apt-get install aircrack-ng
which we suggest you do!
The next thing we can do is use airmon-ng to check for interfering processes. This is done with the following command:
sudo airmon-ng check
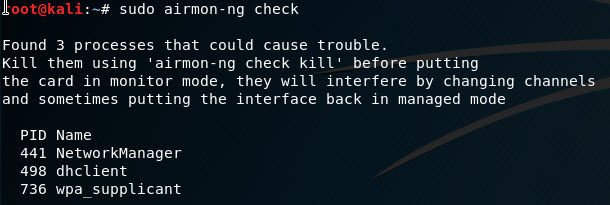
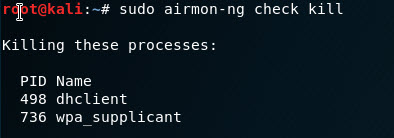
To disable these processes use the following command:
sudo airmon-ng check kill
Ok – now let’s put the interface into monitor mode:
sudo airmon-ng start wlan0
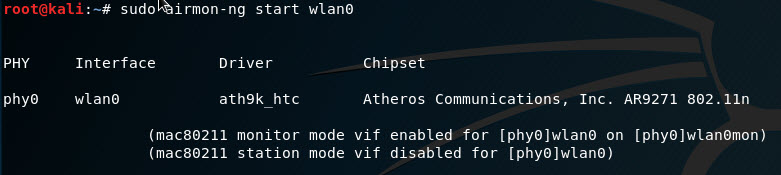
What has happened is a little different than our prior two methods. The tool has created a new interface called “wlan0mon”.
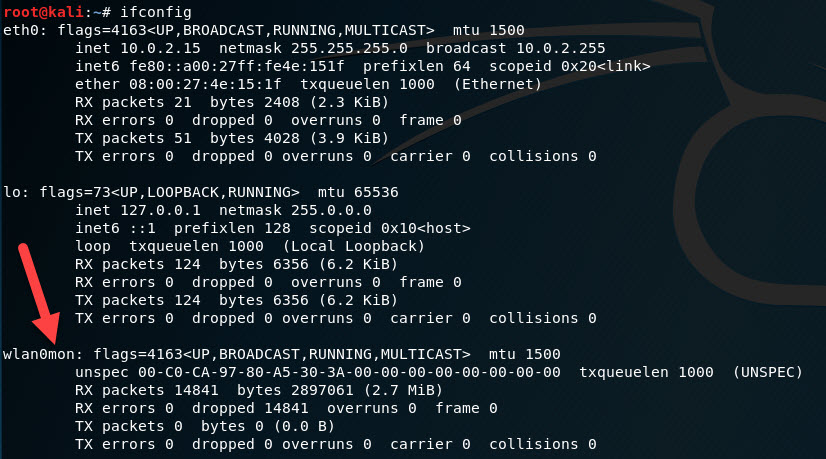
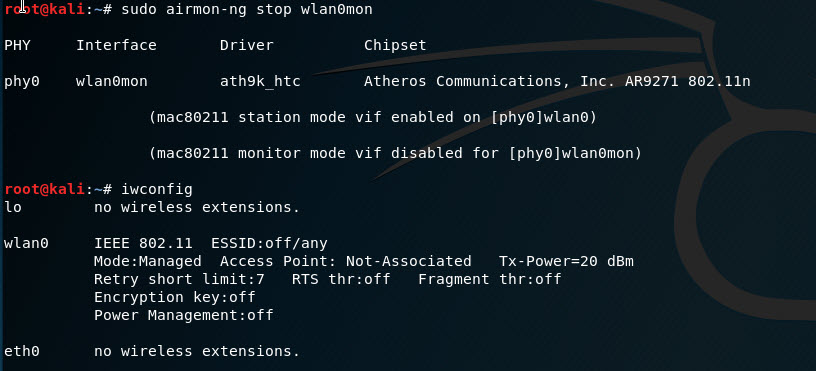
So if we look at our interfaces using the “ifconfig” or “iwconfig” commands, we see the “wlan0mon” interface:
Now when you start your packet capture tool like Wireshark, you will select that interface to capture packets on.
To return the interface to normal, we need to disable monitor mode as follows:
sudo airmon-ng stop wlan0mon
A note here – if you need to restart the network manager use “sudo systemctl start NetworkManager”.
We hope that was fun and informative.
If you would like to help support the continued development of independent networking, broadband, Wi-Fi, VoIP, and packet analysis content, please consider joining our Patreon community where you will gain access to exclusive technical resources, downloadable labs and PCAPs, bonus course content, troubleshooting guides, and additional member-only material. Comments and technical discussion are always welcomed at our Patreon community or on our Discord server. You can also support our work by simply buying us a coffee — every contribution helps us continue creating practical, real-world network science education for professionals and enthusiasts alike.