
Here is our second attempt at answering the question – we will call it Option 2. You can find the first article here.
This question comes up all the time, and the answers can be quite varied. Seems simple enough at first glance, right? But the problem is that things are not simple, especially in today’s networking.
Here are some issues:
- My Printer is not working.
- My Network is slow (are there too many devices) (are there too many high bandwidth devices)
- My TV is pixelating
- We are constantly getting buffering.
Now there are a myriad of reasons any of these issues could exist. This article is not about the entire troubleshooting process, but rather one checklist part, which is to have a good grasp as to what is on the network. To read more on troubleshooting, see my blog post here.
Here is an example of what I mean: one answer I often hear is “Anything working on the network has to get a DHCP address, so therefore looking at the DHCP table in the router or server will show you what is connected.” In a strictly IPv4 environment, I would probably have to agree, but we know the network today is a dual stack environment, and that narrow answer does not take into account IPv6. Further, what about static addressed systems? I could go on. The point here is that we probably need to stay at Layer 2 – the MAC layer, and get a list of devices connected to a given LAN, WLAN or VLAN.
With that said, then, let’s talk about options. I will focus on Windows, but end up bringing in Linux as well. As I have said before, Linux is the best environment for any network troubleshooting.
Using Ping Scan
A PING scan is a network scanning technique used to determine which hosts on a network are online or reachable. It operates by sending Internet Control Message Protocol (ICMP) echo request packets to multiple hosts within a network or IP range and listening for ICMP echo reply packets in response. Each ICMP echo request packet, often referred to as a “ping,” asks the target device to reply if it is online. If the scanning tool receives an echo reply (PING reply) from a host, it means that the host is online and responsive.
You may not be aware of my Windows Networking Toolkit, but this will make what we are about to discuss really easy:

From the main screen, we will run p) on a /24 subnet (the snippet below is truncated):
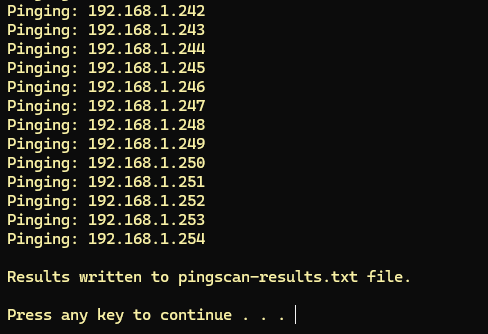
The results are placed into a .txt file:
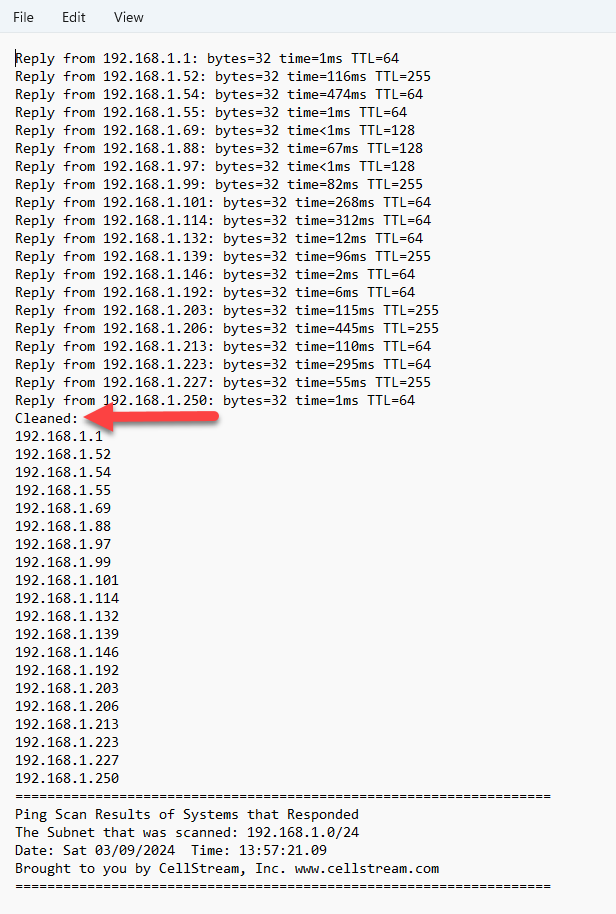
We now see that there are a total of 20 devices including the default gateway on this network. Is this perfect? No. Some devices may be asleep, and they did not respond. So sometimes you have to run this a couple of times.
Now, if you want the L2 MAC addresses, immediately run item 25, to display the arp cache:
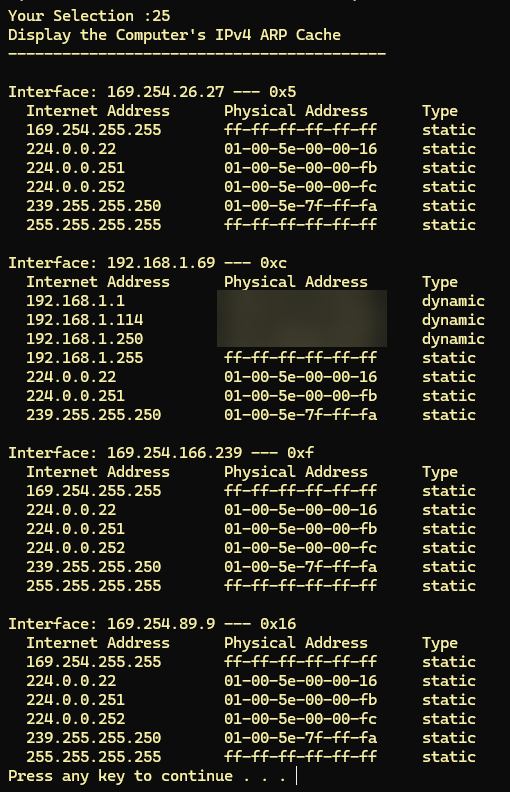
The dynamic items are those that exist, and you can align IP addresses to MAC addresses.
For IPv6 use the menu item 26 – these will include dual stack and IPv6 only devices.
Using MAC Scan – is it really a MAC scanner?
A MAC scan is a process used to discover the Media Access Control (MAC) addresses of devices on a local network. The MAC address is a unique identifier assigned to network interfaces for communications at the physical layer of a network. MAC scans can be particularly useful for various network management, security, and troubleshooting tasks. Unlike IP addresses, which can change depending on the network configuration, MAC addresses are usually fixed and uniquely identify a device on a network, making them valuable for tracking and identifying devices.
Unfortunately there is no specific tool in Windows to do this. So if you are a Windows user, skip this part and look at ARP scanning below.
Most MAC scanning is done as actually ARP scans, or PING scans.
Using ARP Scan – IPv4 only
ARP (Address Resolution Protocol) scans are used in network environments to map IP addresses to the corresponding MAC (Media Access Control) addresses of devices connected to a local network segment. Since ARP is a fundamental protocol used for network communication in IPv4 networks, an ARP scan can help network administrators and cybersecurity professionals discover and map devices within a local area network (LAN).
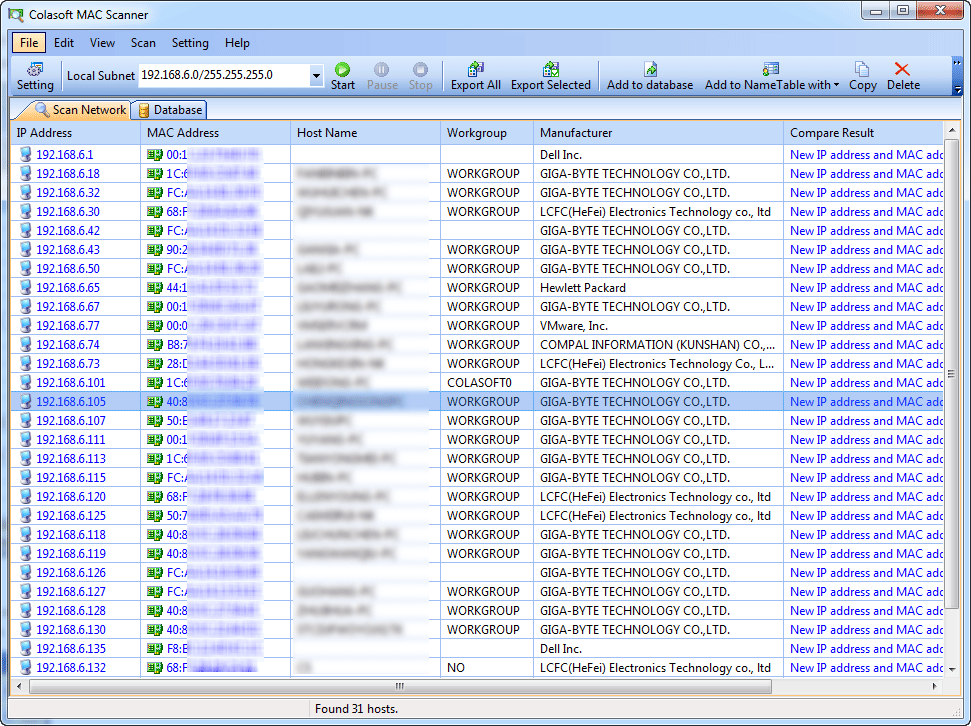
The best tool that does this for free in Windows in Colasoft’s MAC Scanner. You can download it here: https://www.colasoft.com/mac_scanner/
Now it really is not a MAC scanner, per se. It is an ARP scanner – it works through the IP addresses and sends an ARP to each one, one at a time. Here is an example of it’s output:
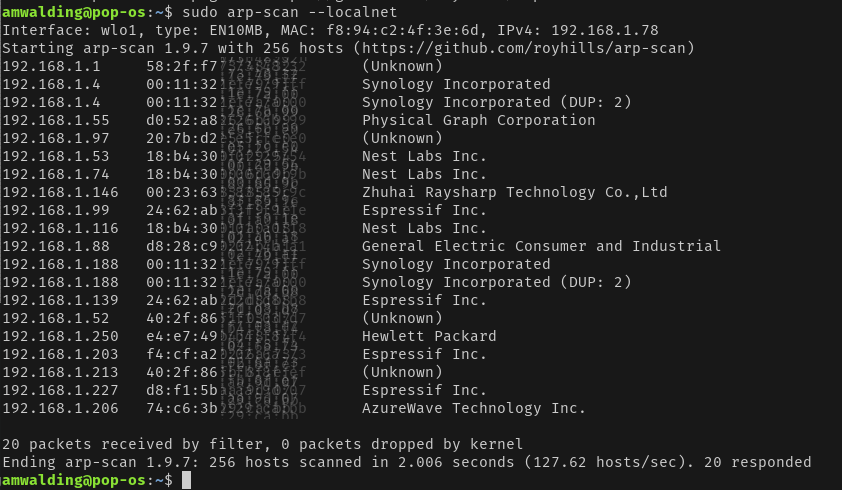
In Linux, there is a free tool available called ‘arp-scan’. It is to the point and perfect in that it displays IP, MAC and Manufacturer (parts of the MAC address are obfuscated for security):
Using nmap
Nmap (Network Mapper) is an open-source tool for network exploration and security auditing. It was designed to rapidly scan large networks, although it works fine against single hosts. Nmap uses raw IP packets in novel ways to determine what hosts are available on the network, what services (application name and version) those hosts are offering, what operating systems (and OS versions) they are running, what type of packet filters/firewalls are in use, and numerous other characteristics.
Nmap is cross platform, but requires elevated privileges to run.
Nmap can be used to perform ARP discovery on a local network to identify active devices and their IP and MAC addresses. This process is often faster and more reliable for local subnet scanning than scanning based on higher-level protocols.
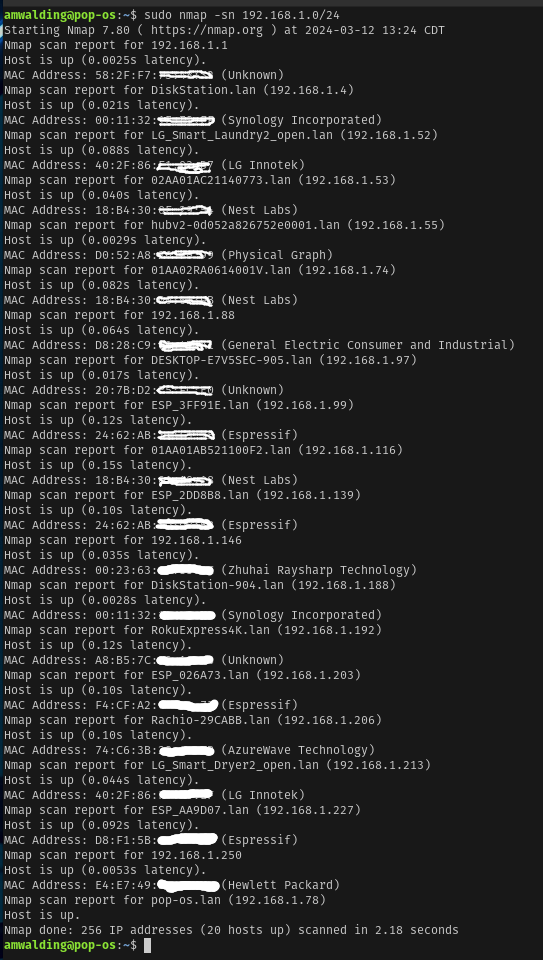
To use Nmap for this purpose, you would typically use the -sn flag (Ping Scan) and specify the target network range. The Ping Scan tells Nmap to skip the default behavior of performing a port scan after host discovery, essentially limiting the scan to host discovery only. When executed on a local network, Nmap automatically uses ARP requests for IP address scanning, which allows it to also capture the MAC addresses of live hosts.
Here’s how to use Nmap for an ARP scan to discover IP and MAC addresses on a local network:
- Open your terminal or command prompt.
- Run Nmap with the
-snflag followed by your target network range. For example, if your local network uses the192.168.1.0/24subnet, you would use:Copy codenmap -sn 192.168.1.0/24This command scans all IP addresses in the range192.168.1.1to192.168.1.254, looking for active devices. - Review the scan results. Nmap will output the list of discovered hosts, including their IP addresses. If run with sufficient privileges (typically root/administrator privileges), it will also display the MAC address and the vendor of the network interface for each detected host.
Here is an example output:
It’s important to note a few things when using Nmap:
- Permissions: Running Nmap to scan networks, especially those not owned or managed by you, should be done with caution and permission. Unauthorized scanning can be considered illegal or intrusive.
- Running as Administrator/Root: To capture MAC addresses and certain other operations, Nmap needs to be run with root (on Linux/macOS) or administrator (on Windows) privileges.
- Network Policies: Be aware of your network’s policies regarding scanning. Some networks may have protective measures that could respond to scanning attempts.
Nmap is a powerful tool with a wide range of options and capabilities beyond simple ARP scanning, including port scanning, version detection, and scriptable interactions with the target network. It’s highly recommended to review the Nmap documentation and use it responsibly. To read more on using nmap – look here first, then here, then here.
What About IPv6?
The equivalent of an ARP scan in IPv4 is performed using the Neighbor Discovery Protocol (NDP). While ARP is used for mapping IP addresses to MAC addresses in IPv4, NDP serves a similar purpose in IPv6 environments but comes with additional functionalities.
NDP operates using several ICMPv6 message types to manage communication between IPv6 neighbors. One of the key components of NDP is the Neighbor Solicitation message, which is similar to an ARP request in IPv4. It asks “Who has IPv6 address X?”, and the device with that IPv6 address replies with a Neighbor Advertisement message, which is akin to an ARP reply, providing its MAC (link-layer) address.
To perform a neighbor discovery in IPv6, you can use tools that support ICMPv6 Neighbor Discovery messages. At the time of this writing, there is nothing specific for Windows other that what we mentioned above. That said, here are a couple of methods:
- Using Ping on a Local Network: You can use the ping command to an IPv6 address on your local network. This can prompt the operating system to perform Neighbor Discovery to find the MAC address associated with that IPv6 address. This method is somewhat indirect and relies on observing the network traffic with a packet sniffer like Wireshark to see the Neighbor Solicitation and Advertisement messages.
- Using Nmap for IPv6 Neighbor Discovery: Nmap has support for IPv6 and can be used to scan devices on a local network using IPv6 addresses. You would use the
-6option to specify IPv6 scanning and can use the-snoption to perform a ping scan without port scanning, similar to its usage in IPv4 networks.Example command:arduinoCopy codenmap -6 -sn ipv6-subnet::/64Replaceipv6-subnet::/64with the actual IPv6 subnet you wish to scan. This will list devices that are up, but due to the nature of IPv6 and privacy considerations, getting MAC addresses directly from such a scan is not as straightforward as with IPv4 ARP scanning. For MAC addresses, monitoring the network traffic during the scan with a tool like Wireshark may be necessary. - Wireshark or Similar Network Analysis Tools: Running a packet capture while initiating communication with IPv6 hosts can help you observe Neighbor Solicitation and Advertisement messages, from which you can extract MAC addresses.
In Summary
I have tried to provide you with some tools and methods for determining what exactly is on the network, what are their IP’s, what are their MAC addresses, and who is the manufacturer. All this is part of gathering evidence as to what is going on, why something is not reachable, or why the network is slow.
If you would like to help support the continued development of independent networking, broadband, Wi-Fi, VoIP, and packet analysis content, please consider joining our Patreon community where you will gain access to exclusive technical resources, downloadable labs and PCAPs, bonus course content, troubleshooting guides, and additional member-only material. Comments and technical discussion are always welcomed at our Patreon community or on our Discord server. You can also support our work by simply buying us a coffee — every contribution helps us continue creating practical, real-world network science education for professionals and enthusiasts alike.