

| Check out these great references: |
|---|
| Our custom profiles repository for Wireshark |
| Our Udemy course on Wireshark |
| Our Udemy course on Wireless Packet capture |
Wireshark’s Ring Buffer feature is a capture mechanism feature that automatically rotates packet capture files based on size or time limits, overwriting the oldest files when a defined limit is reached. It is designed for continuous, unattended, or long-duration packet captures where you may be waiting for a random, intermittent, unpredictable event, or storage control and evidentiary preservation are required.
The feature is really easy to find, but not intuitive at first to use. In this article I will show you how it’s found and configured, and even better how I find it easiest to use.
You will find the feature from the Wireshark “home” screen under Capture> Options: then select the Output tab as shown:
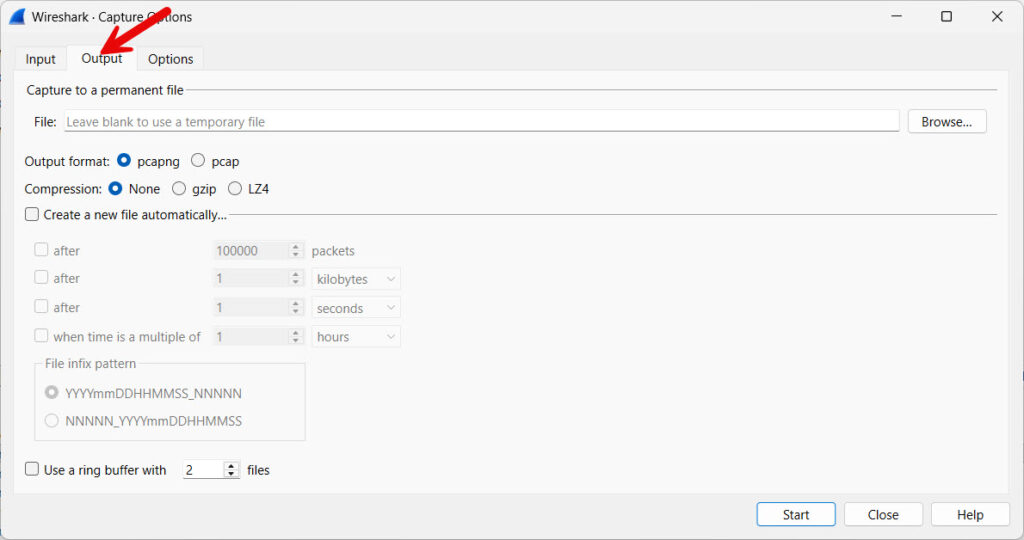
This screen contains everything we need to configure Wireshark’s Ring Buffer feature, but before we go any further, and to make your life traight forward as you learn this, create a folder on your desktop called something like Ring Buffer:
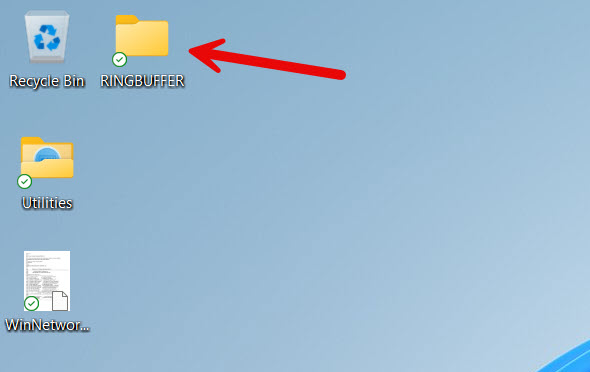
Note that I have moved it right up next to my trash/recycle bin to remind me its there and to use it each time. Later, of course, you may choose to move the captures elsewhere but it serves as a great quick and easy location to view the ring buffer feature at work each and every time you use it.
1. A Quick and Dirty Example to Try
OK, now that we are kind of set up, let me cover a few things first. Let’s do a quick and dirty example of this feature to help understand exactly what it is and how it works, and then we will dive deeper.
Step 1:
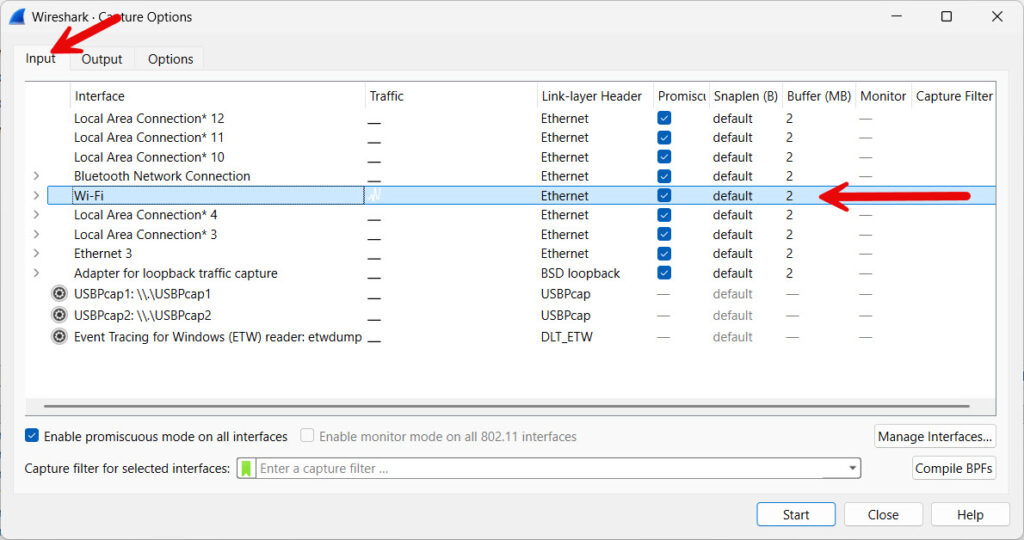
In the Capture> Options> Input, select the interface you want to capture on:
Step 2:
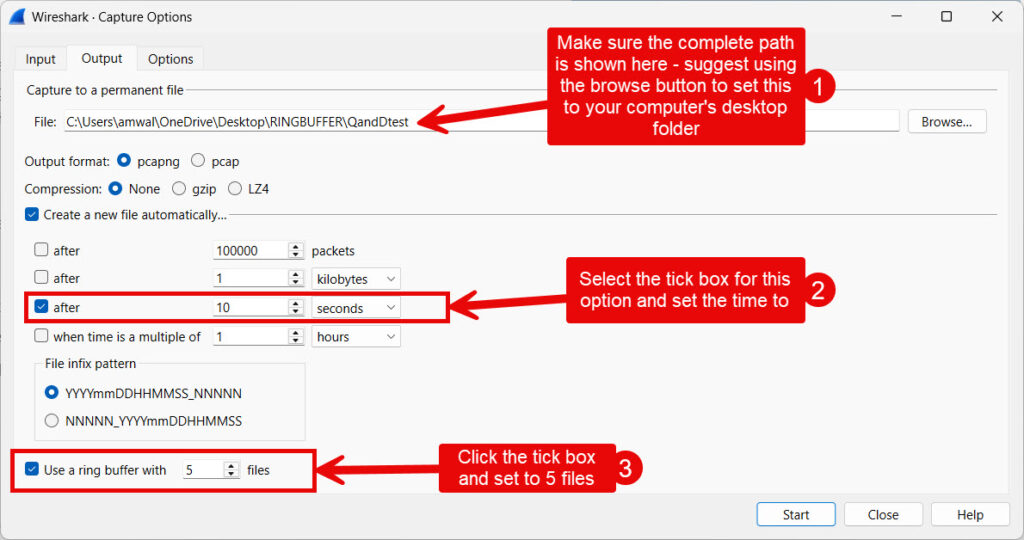
Now, on that Capture> Options> Output screen copy your settings as shown (again, I assume you have created that desktop folder – you will need to change the path to use your username on your machine – I suggest using the browse button to get that proper path).
Step 3:
Click the start button, Wireshark will start capturing.
Navigate to that folder on your desktop using the File Explorer, and you will see something like the following:

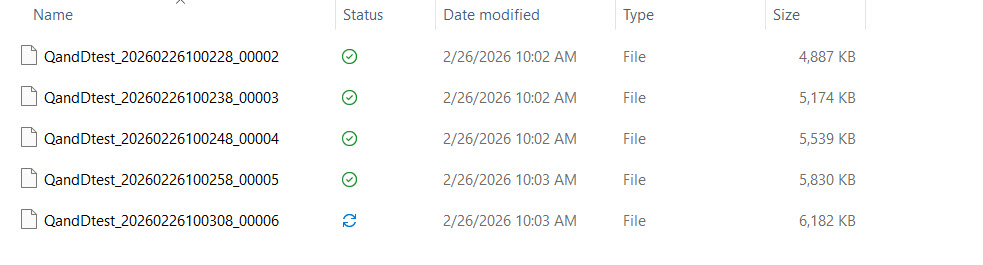
You can see that Wireshark is saving files (every 10 seconds) using the seed name we provided “QandDtest” and then adding date and time and a file number.
As this progresses, 5 files will be created based on our configuration. But then magic happens! After file 5, file 6 overwrites file 1:
And this looping will continue until you stop the Ring Buffer!! I stopped mine quick and dirty example at 11 files:
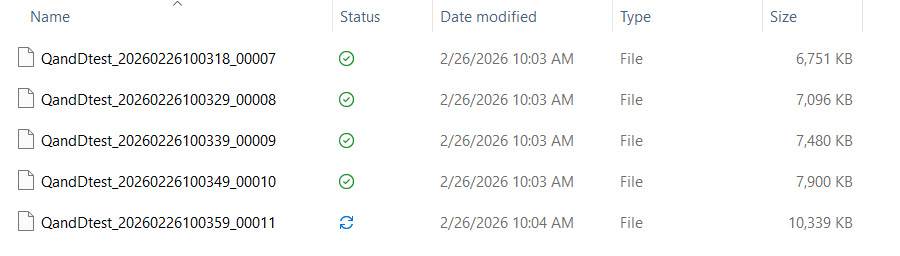
The last file will be the one that is open in your main Wireshark screen. From this point you can save that, or you can save it then merge prior files, or just open the prior files. Depends of where you wish to look. In this quick and dirty example we have 5 files, each containing 10 seconds of traffic, and if we merged them all we would have approximately 50 seconds of recorded traffic.
But I hope you see the beauty of this feature. We could have essentially left this to run overnight or for weeks. We would never run out of disk space with the feature configured as we did. But, we would only have 50 seconds of capture. So perhaps we did not choose the real world settings, but you hopefully get the idea. Let’s now dig deeper.
In real-world troubleshooting—especially in broadband, VoIP, or Wi-Fi environments—you often need:
- Continuous background capture
- Capture of intermittent or hard-to-reproduce faults
- Storage control to prevent disk exhaustion
- Automatic file segmentation for post-analysis
Without a ring buffer:
- A single capture file grows indefinitely which can be a real problem if you have limited disk or memory
- Therefore there is a risk of a disk full condition
- I also think it is harder to isolate events by timeframe, and having a ring buffer running removes some of that time pressure when configured correctly
With a ring buffer:
- Files rotate predictably.
- Oldest captures are overwritten once the buffer limit is reached.
- Storage usage remains bounded.
2. Review of how the Ring Buffer feature works
You define:
- File size limit (e.g., 100 MB per file)
OR
Time limit (e.g., new file every 300 seconds) – we chose this one in the quick and dirty example - Number of files in rotation (e.g., 10 files)
Wireshark then creates sequential capture files:
capture_00001.pcapng
capture_00002.pcapng
capture_00003.pcapng
...
capture_00010.pcapng
Once the maximum number is reached:
- The oldest file is deleted.
- A new file is created in its place.
- Rotation continues.
This forms a logical circular buffer on disk.
Now you can use the command line instead of the GUI. This is further explained in this post. For now we will stick to the Wireshark GUI.
3. Details on the GUI Configuration in Wireshark
- Go to Capture → Options
- Select your interface on the Input Tab
- Enable the following in the Output tab:
- “Use multiple files”
- “Next file every ___ MB” or “Next file every ___ seconds”
- “Ring buffer with ___ files”
4. Some Real-World Engineering Use Cases
Broadband Intermittent Outage Investigation
Run a 48-hour capture with:
- 50 MB files
- 100 files
- Rolling overwrite
When customer reports outage:
- Stop capture
- Examine last few files
VoIP RTP Quality Monitoring
Segment by 10-minute duration files:
- Allows MOS trend review
- Correlates to call events
Wi-Fi Roaming Failures
Continuous capture near AP controller:
- Rotate every 200 MB
- Keep last 30 files
- Review recent authentication or deauth events
5. Operational Considerations
You have to do a little thinking, and a little math when configuring the Ring Buffer.
Storage Math
Example:
- 100 MB per file
- 20 files
- Total disk usage = 2 GB fixed
Performance
- Ring buffers reduce memory pressure
- Using the command line like tshark or dumpcap may isolate capture from GUI crashes – just a thought
- Recommended for production monitoring
Legal / Forensics
Ring buffers may overwrite evidence if not configured properly, and you can’t go back and fix things if the event does not repeat. For evidentiary capture:
- Disable overwrite
- Archive immediately
6. Technical Internals
- All Wireshark capturing is managed by
dumpcapin the background (if you did not already know this - Uses
pcapngby default - Supports:
filesizedurationfiles(count)
- Works with capture filters (BPF). See more on example capture filters here and some great Ring Buffer examples when combining capture filters here.
- Does not impact display filtering
7. When NOT to Use Wireshark Ring Buffers
- Short lab captures
- When you must preserve entire capture history
- When disk space is not constrained and full retention is required
I hope you find using Wireshark Ring Buffers feature to be especially helpful. I use them all the time. Happy Packet Capturing!
If you would like to help support the continued development of independent networking, broadband, Wi-Fi, VoIP, and packet analysis content, please consider joining our Patreon community where you will gain access to exclusive technical resources, downloadable labs and PCAPs, bonus course content, troubleshooting guides, and additional member-only material. Comments and technical discussion are always welcomed at our Patreon community or on our Discord server. You can also support our work by simply buying us a coffee — every contribution helps us continue creating practical, real-world network science education for professionals and enthusiasts alike.